Set your grading scale and category weights
MarkTrack turns the scores a teacher enters into a single final grade for each student. Two settings control how that math works: your grading scale (the letter grades and the percentages behind them, like A = 90–100) and your grade weights (how much each kind of work — assignments, quizzes, tests, the final exam — counts toward the grade). This guide shows you where to find both, how to change them, and what each change does to the grades families see.
Both settings live in one place: the Grade Formula window inside any class's gradebook. The grading scale is set once per school and applies to every class in that school. The weights are set per class, so a Quran class can weight things differently from a math class. There is also an optional third tab, Term Weights, for schools that split the year into graded semesters.
This guide is about the settings, not the math
For the full walkthrough of exactly how scores, weights, and terms combine into a report-card grade, see How grades and report cards are calculated. Here we focus on the two screens where you change the rules.
Step 1 — Open the Grade Formula window
Every class has its own gradebook, and the grade settings open from there.
- From the school menu, open Gradebooks to see the list of class gradebooks.
- Click the class you want to work on. This opens its gradebook.
- In the top-right action bar, click Grade Formula.
A window opens with up to three tabs across the top: Weights, Grading Scale, and (if your year uses graded semesters) Term Weights.
Don't see the Grade Formula button?
If grading for the class's term is locked, the Grade Formula and Add Grade buttons are hidden so the formula can't change after grades are finalized. Unlock the term (or pick a class in an open term) to edit the formula.
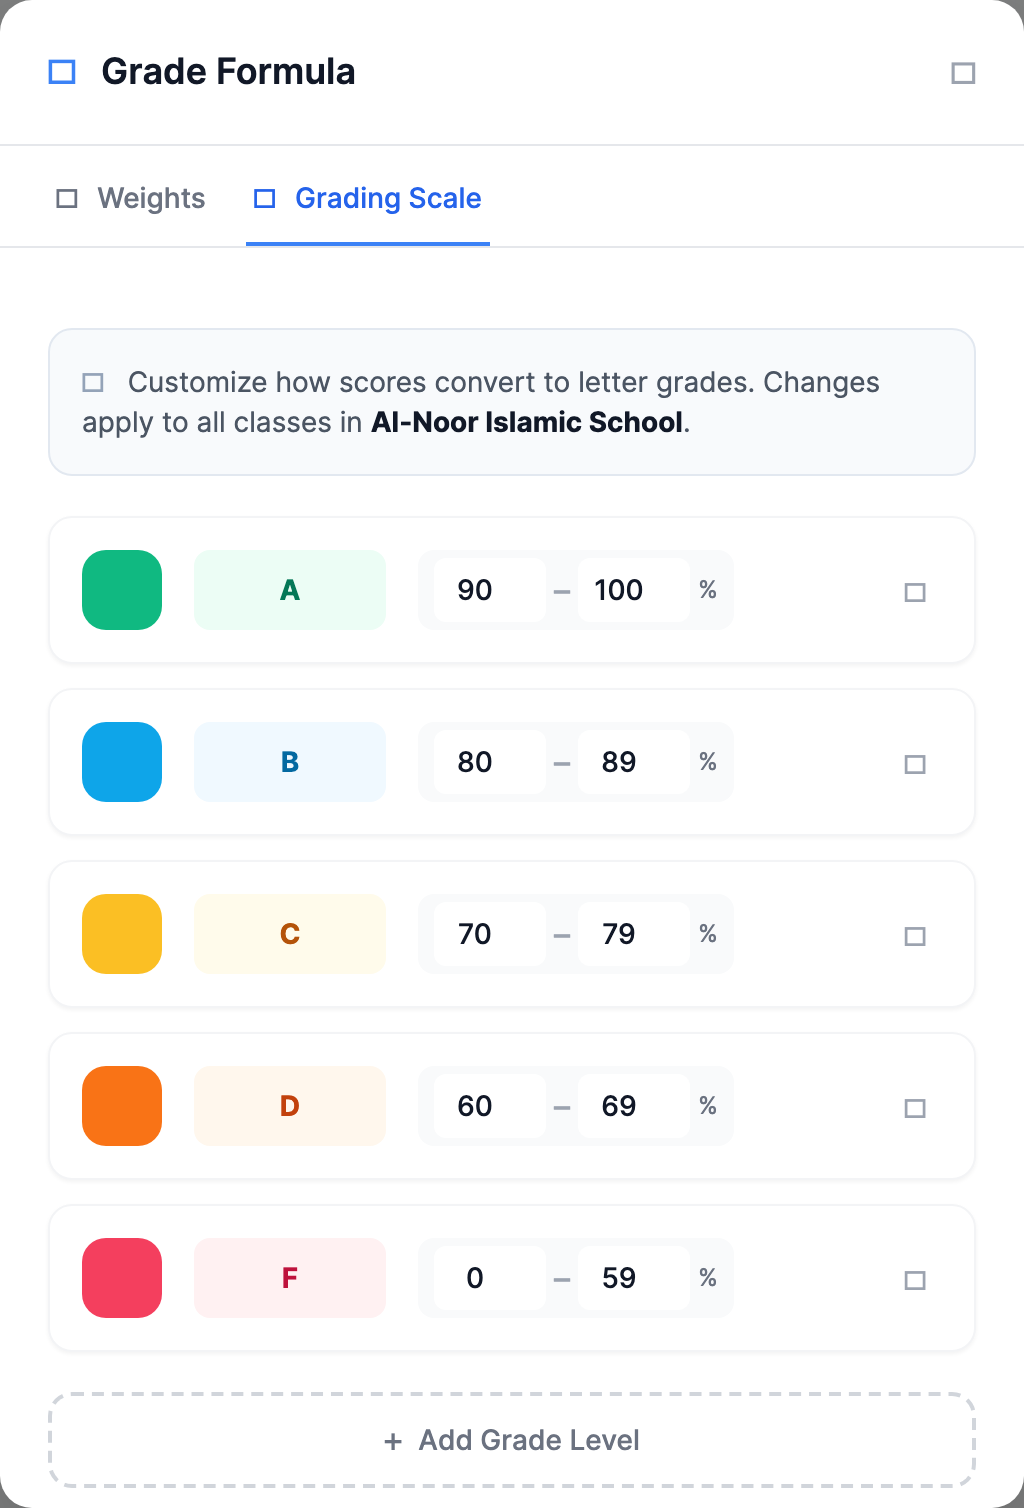
Step 2 — Set your letter-grade scale
Click the Grading Scale tab. Each row is one letter grade with a percentage range and a color. MarkTrack starts every school with the standard US scale:
- A — 90 to 100 (green)
- B — 80 to 89 (blue)
- C — 70 to 79 (yellow)
- D — 60 to 69 (orange)
- F — 0 to 59 (red)
To customize the scale:
- Change the label in the left box of any row (for example A+ or a pass/fail label).
- Set the percentage range using the min and max boxes (the two numbers separated by a dash).
- Click the colored square on the left to pick a color from the palette. The color is what shows next to the grade across the app.
- Click Add Grade Level to add another band, or the trash icon to remove one.
- Click Update Scale to save.
The scale must cover 0 to 100 with no gaps
As you type, MarkTrack checks that every percentage from 0 to 100 falls into exactly one band. If there's a gap (say nothing covers 59–60), the status turns red and the Update Scale button is disabled until you fix it. Make each band's min one above the previous band's max.
The scale is school-wide, not per class
Even though you open it from one class's gradebook, saving the scale changes it for every class in that school — the window says so right above the rows. Each school in your organization keeps its own separate scale, so your Sunday School and your full-time program can grade differently.
Reset the scale to the default A–F
At the bottom of the Grading Scale tab, click Reset to Defaults and confirm. This wipes any custom scale and puts the standard A–F scale back for the whole school.
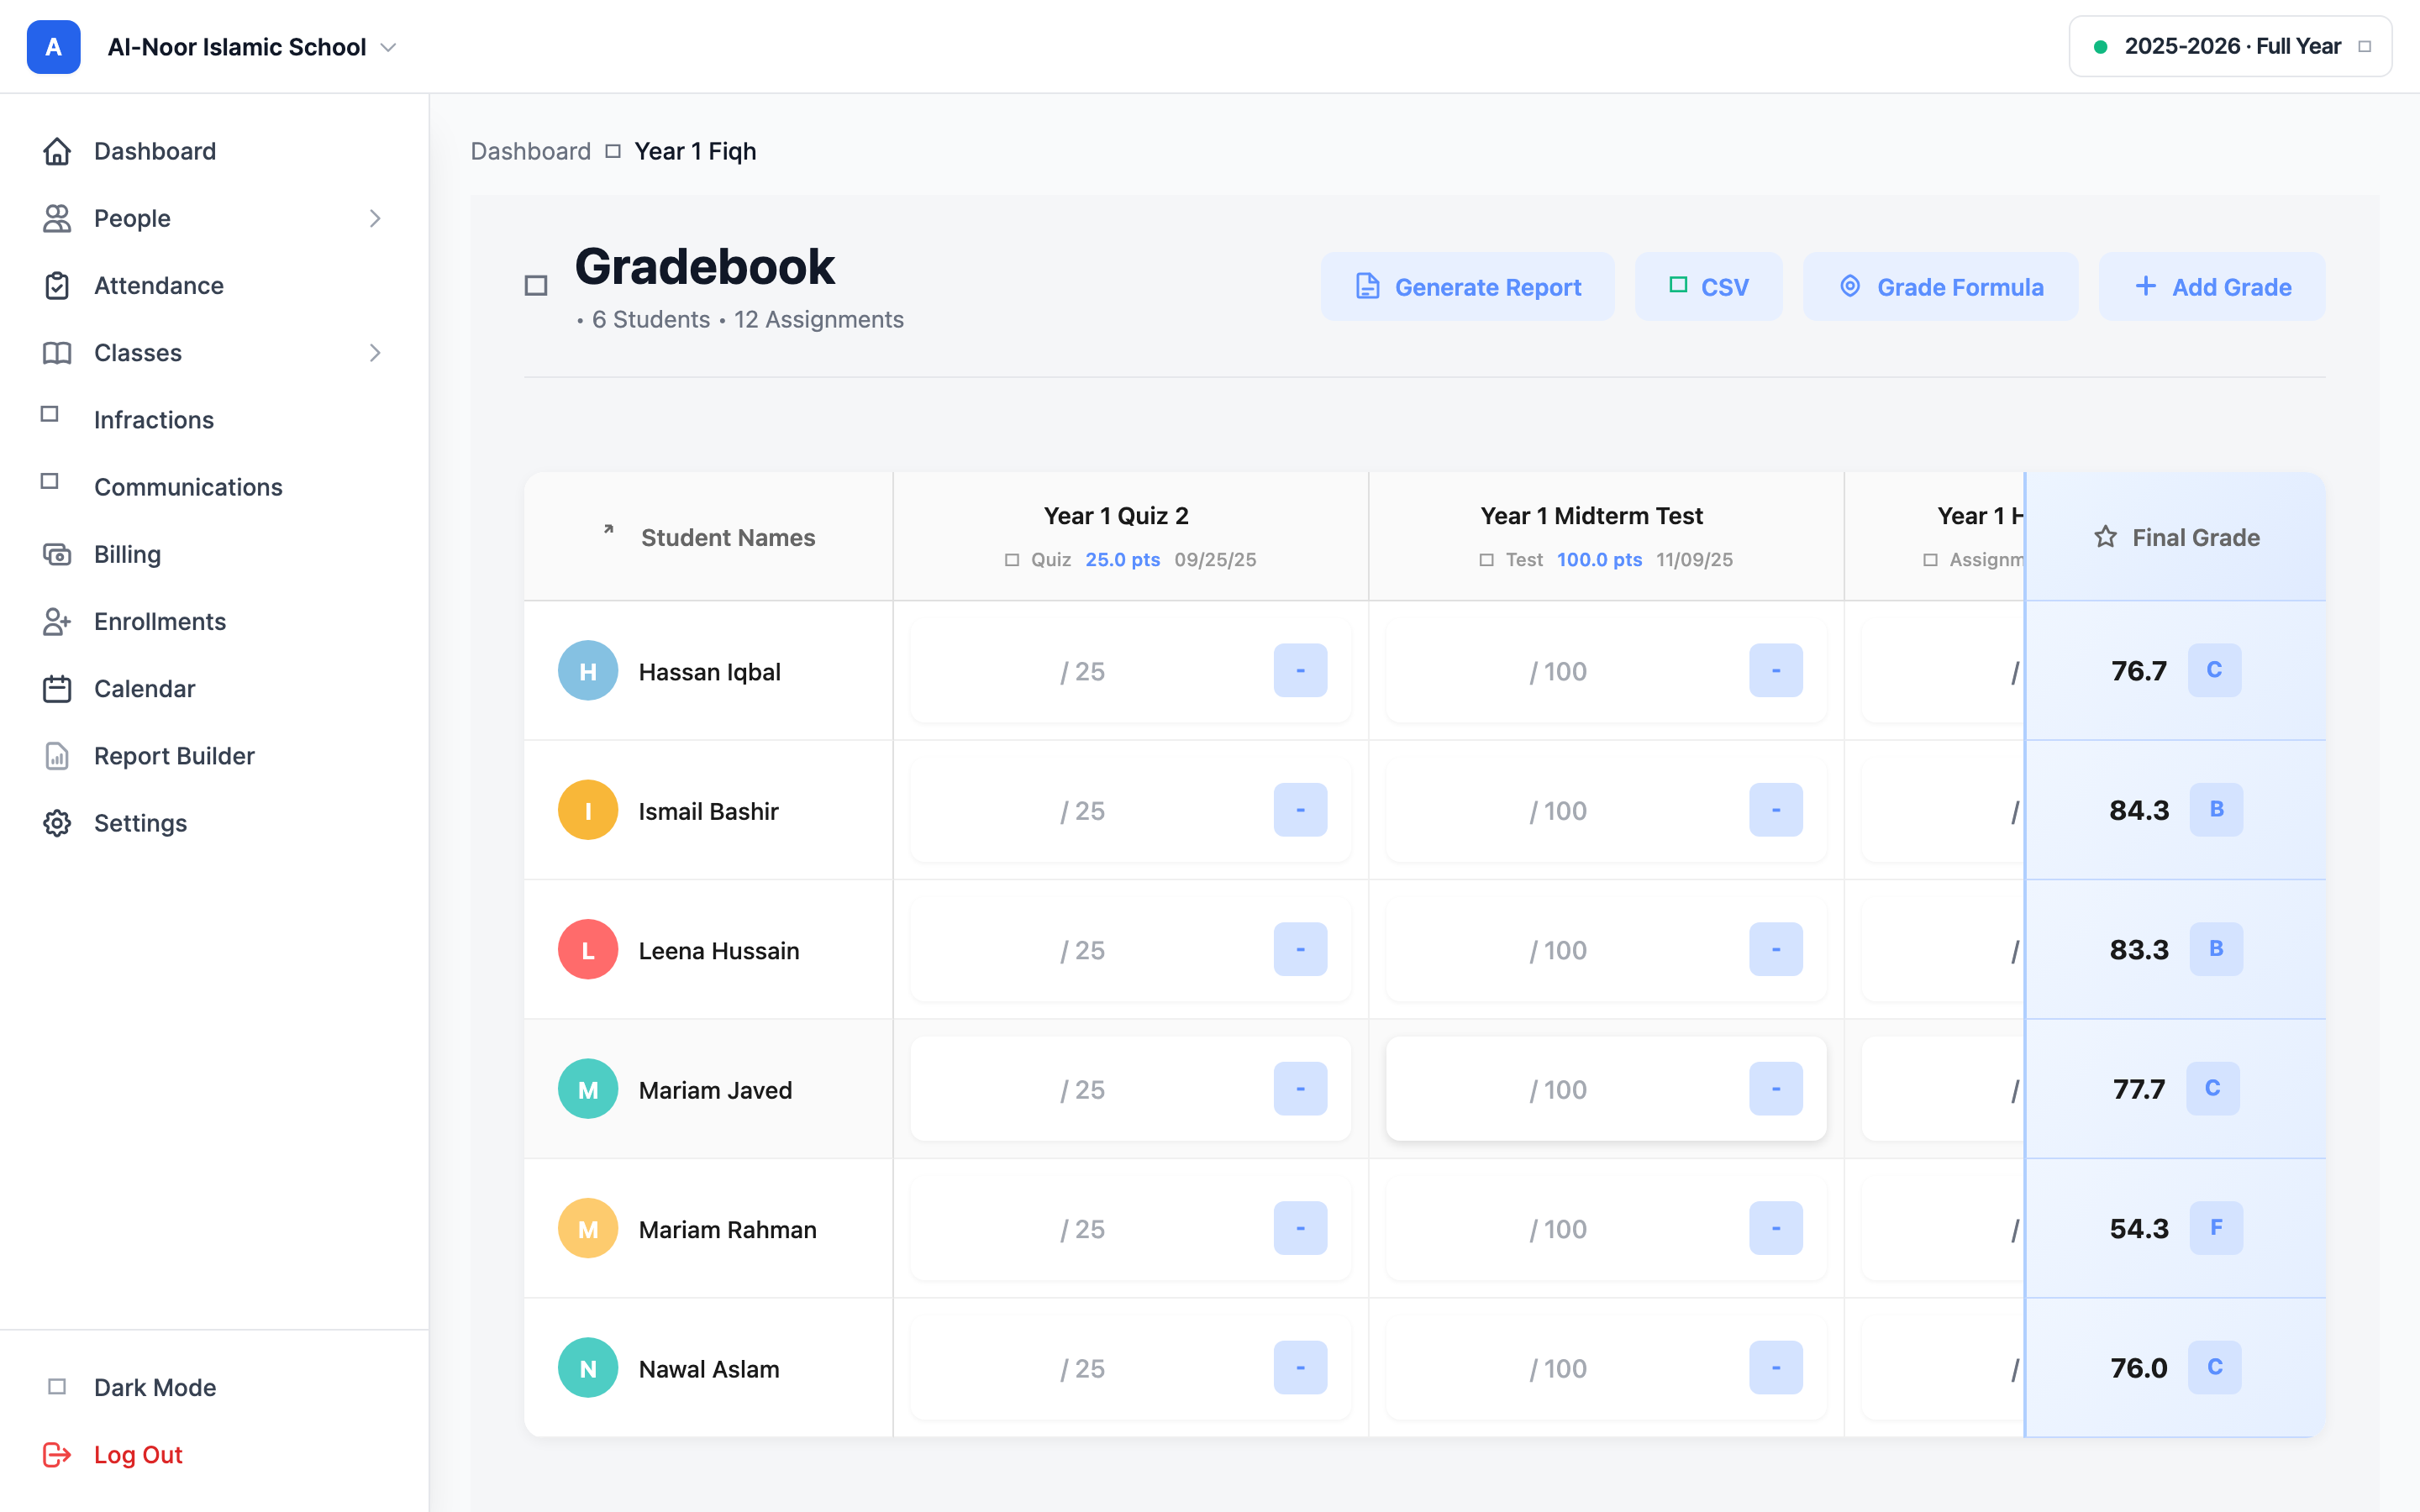
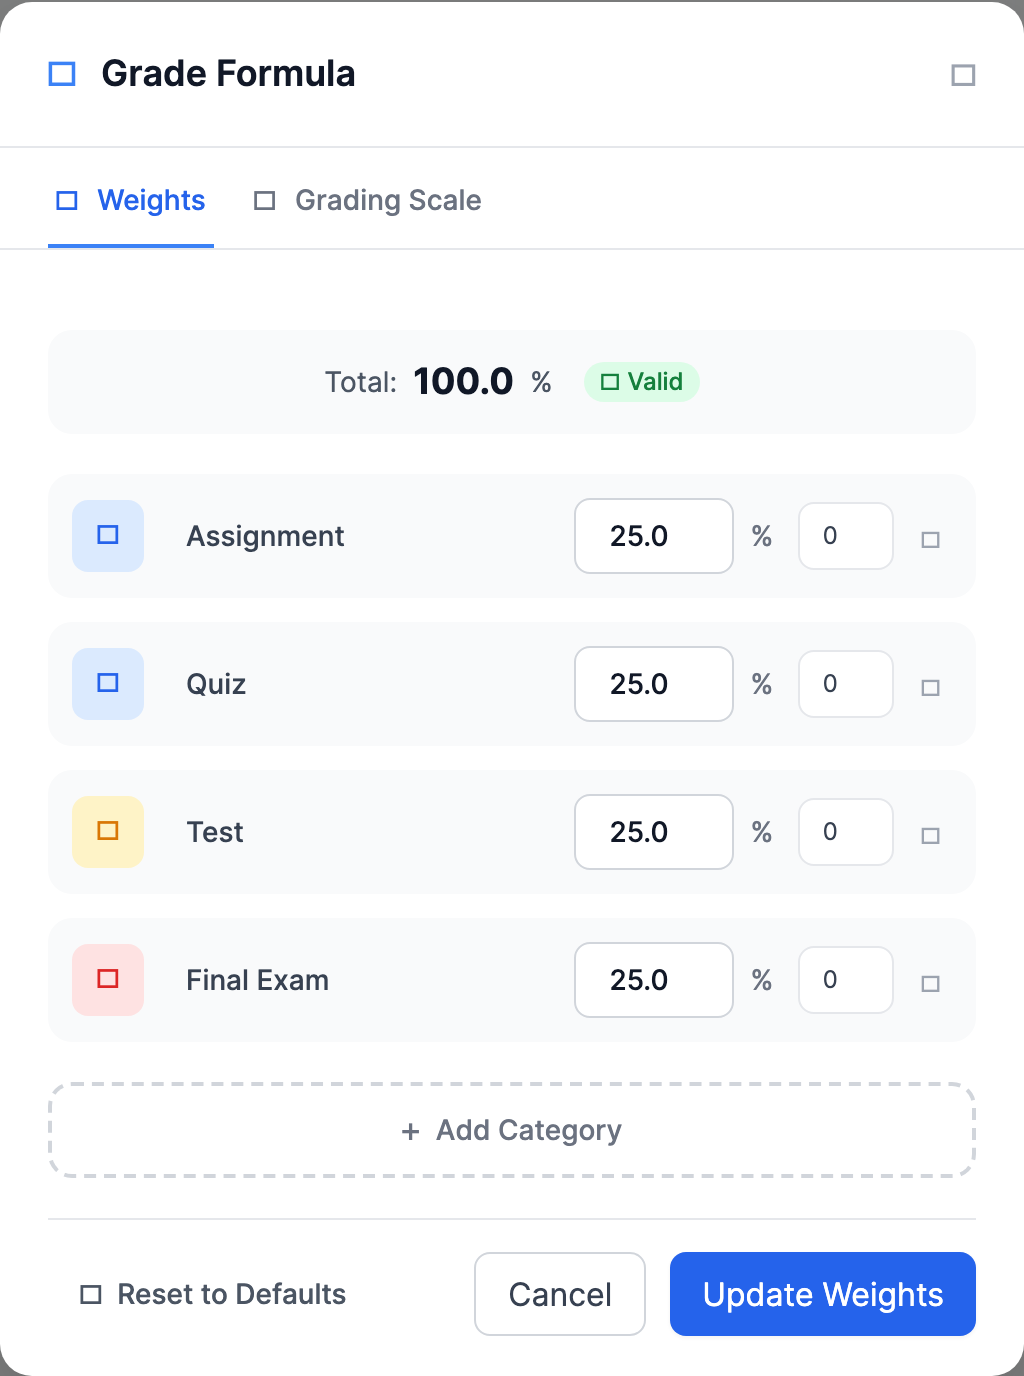
Step 3 — Set your category weights
Click the Weights tab. This is where you decide how much each kind of work counts. Every new class starts with four equal categories:
- Assignment — 25%
- Quiz — 25%
- Test — 25%
- Final Exam — 25%
To change the split:
- Type a new percentage in the number box for each category. The big Total at the top updates live.
- Watch the status pill: it reads Valid (green) only when the categories add up to exactly 100%. The Update Weights button stays disabled until they do.
- Click Update Weights to save.

Weights must total exactly 100%
MarkTrack will not save weights that don't add up to 100. If you only want two categories to count, set the others to 0 and the remaining two to add up to 100 — a category set to 0% is simply ignored in the grade.
Rename a category, change its icon, or add your own
The four built-in categories are just starting points. You can reshape them:
- Rename — click the category name and type a new one (for example rename "Test" to "Exam" or "Tajweed").
- Change the icon — click the colored icon on the left of the row and pick a new one from the icon grid.
- Add a custom category — click Add Category, give it a name, an icon, and a weight. Use this for things like Participation, Memorization, or Behavior.
- Remove a category — click the trash icon on its row. Remember to re-balance the remaining weights back to 100%.
Categories connect to your assignments
When a teacher adds an assignment, they pick which category it belongs to. That's how a quiz score lands in the "Quiz" bucket and counts at the quiz weight. If a category has no assignments yet, it simply doesn't affect the grade until one is added. See Create quizzes and file assignments for how teachers tag each one.
Drop the lowest scores in a category
Each weight row has a small extra box for drop lowest. Set it to a number to automatically ignore that many of a student's worst scores in that category when figuring the grade. For example, set the Quiz row's drop-lowest box to 1 and each student's single lowest quiz is thrown out before the quiz average is calculated.
It never drops everything
If a student has fewer scores than the drop number, MarkTrack keeps their single highest score so the category still counts. Leave the box at 0 to drop nothing.
Reset weights to the default 25/25/25/25
Click Reset to Defaults at the bottom-left of the Weights tab and confirm. This clears any custom categories, names, icons, and drop-lowest settings for this class only and restores the four equal 25% categories. It does not touch any other class.
Step 4 — (Optional) Weight each term differently
If your school year is split into graded semesters, a third tab appears: Term Weights. By default every graded term counts equally toward the final year grade. This tab lets you change that split for this class — for example, make the second semester worth more than the first, or carve out a slice for a midterm.
- Open the Term Weights tab. Each graded term in the year is listed with its date range.
- Type a percentage next to each term. A common split might be Semester 1 = 35%, Midterm = 10%, Semester 2 = 35%, Final Exam = 20%.
- The Total must reach exactly 100% before you can save.
- Click Update Term Weights.
- To go back to equal terms, click Clear Weights and save — the year grade then treats every term the same.
Two different "weights," two different jobs
Category weights (Step 3) decide how a student's grade is built inside one term — assignments vs. quizzes vs. tests. Term weights decide how those per-term grades roll up into the full-year grade. You set them on separate tabs and they don't overlap. If your year has no graded semesters, you won't see the Term Weights tab at all, and only the category weights matter.
How it all feeds the final grade
Putting it together: a teacher enters scores, MarkTrack groups them by category, applies your category weights (dropping the lowest scores where you set that), and produces a percentage. That percentage is matched against your grading scale to show a letter grade and color. If you use term weights, each term's grade is then combined into the year grade by those percentages. Set up your academic years and terms first so the term tab and report cards have something to work with.
For the exact formula — how missing work, excused grades, and rounding are handled — read How grades and report cards are calculated. If your numbers ever look off, it's almost always one of three things: weights that don't total 100, a category with no assignments, or a grading scale with a gap. If you're still stuck, reach out via our contact page.
More in Classes & Grades
Still stuck?
Our team is happy to walk you through it.