Build course modules for a class
A module is a unit, chapter, or week of a class — a labeled box that holds a tidy, ordered list of everything a student needs for that section: readings, files, assignments, web links, and short text pages. MarkTrack's module system works like the one in Canvas: you build the outline, drop content into each module, then publish a module to make it visible to students. This guide covers building modules, filling them with items, ordering everything, publishing, and tracking who has finished what.
The big idea: a module is a container, not a copy. When you put a resource or an assignment into a module, you are pointing at something that already lives in the class — you are not duplicating it. That is why removing an item from a module never deletes the underlying file or assignment. Modules are organized per class, so each class has its own set.
Modules live inside a class
Only an admin or a teacher assigned to the class can build or edit modules. Students and parents can only see modules that are published. Before you start, make sure the class already has some content to organize — see Share resources and files with a class and Create quizzes and file assignments.
Step 1 — Open the Modules page for a class
- In the left sidebar, open Classes and click into the class you want to organize.
- On the class page, click the Modules button. (The number on the button is how many modules the class already has.)
- You land on the Modules page for that class. If there are no modules yet, you'll see a "No modules yet" empty card with an Add Module button in the top-right.

Step 2 — Create a module
- Click Add Module. The New Module window opens.
- Type a Module name — this is the section heading students see, so make it descriptive (for example, "Week 1: Orientation" or "Unit 3: Salah").
- Decide whether to tick Publish now (visible to students). Leave it unchecked to keep the module a private draft while you build it; you can publish later. (See Step 6 for what publishing does.)
- Optionally pick a Prerequisite module. If you set one, students must finish that earlier module before this one unlocks for them. Leave it on No prerequisite for a normal, always-open module.
- Optionally set Available from and Available until dates. These control the window during which a published module is visible to students.
- Click Save. The new module appears at the bottom of the list, collapsed and ready for content.
Schedule a module to publish itself
If you leave a module as a draft but set Available from to a future date and time, MarkTrack will automatically publish it for you when that time arrives — and notify students just as a manual publish does. The module card shows a blue "Publishes [date]" badge until then. This is a handy way to drip-release weekly content.
Step 3 — Add items to a module
Each module holds a list of items. There are five kinds, and each behaves a little differently:
- Resource — points at a file or resource already in the class (a PDF, a video link, a document). Only resources not already placed in a module are offered, so you can't accidentally list the same file twice.
- Assignment — points at an existing assignment or quiz in the class. The item row shows the due date and points automatically.
- Link — any web address (for example a YouTube video or an outside article). You give it a Title and a URL; it opens in a new tab.
- Page (text) — an inline page you write right here with a rich-text editor. Good for instructions, a "to-do this week" list, or a short lesson. You can drop links to the class's own resources, assignments, and other pages straight into the text.
- Text header — not real content; a bold divider line that visually groups the items beneath it inside one module. Headers never count toward student progress.
- On the module's header bar, click Add item. A small menu drops down listing Resource, Assignment, Link, Page (text), and Text header.
- Pick the kind you want. A window opens with just the fields that kind needs.
- Fill it in:
- For Resource or Assignment, choose the record from the dropdown.
- For Link, enter the title and the URL.
- For Page (text), give it a title and write the content. Use the Insert a link to class content chips below the editor to add a link to a resource, assignment, or another page at your cursor.
- For Text header, type the header text.
- Optionally tick Indent (sub-item) to nest the item one level under the one above it, for a cleaner outline.
- Click Add to module. The item appears at the bottom of that module instantly.
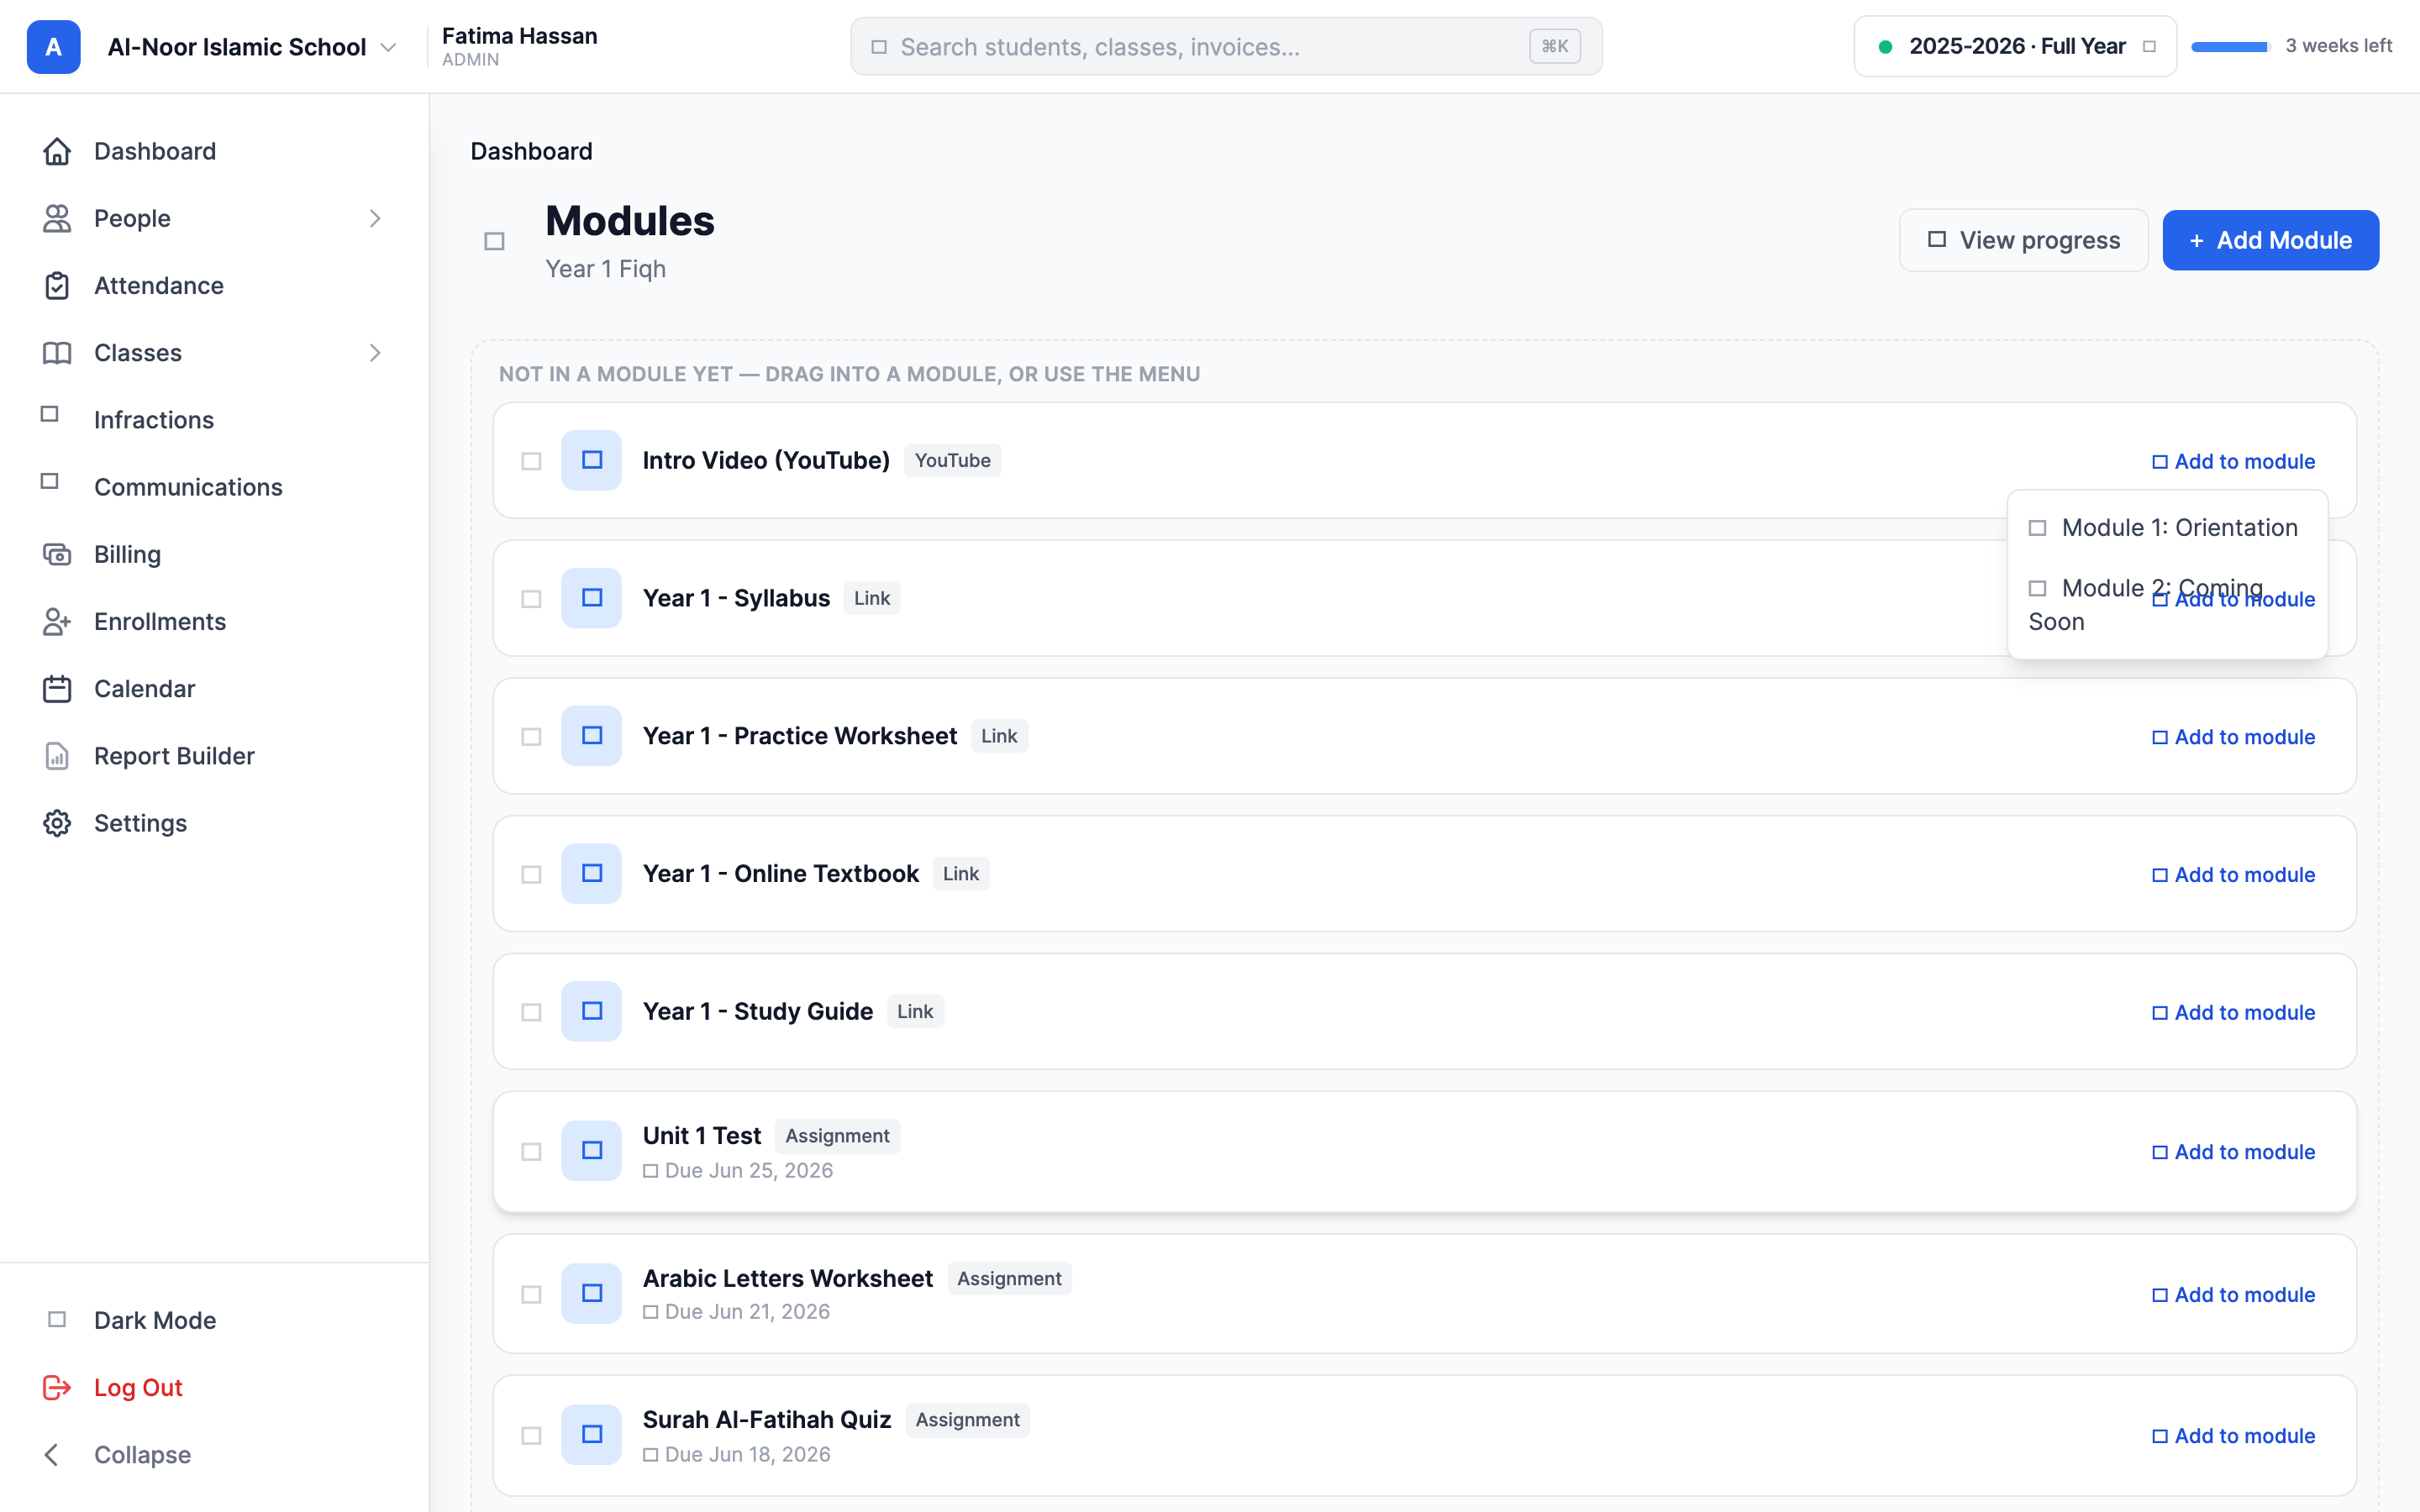
"Not in a module yet" content
Any resource or assignment in the class that hasn't been placed in a module yet shows up in a dashed box at the top of the Modules page labeled "Not in a module yet." You can drag those cards straight into a module, or use their menu to file them — a quick way to organize content you already created.
Step 4 — Reorder modules and items by dragging
Order matters — it's the path you want students to follow. You can rearrange both the modules themselves and the items inside them.
- To reorder modules, grab the grip handle (the dotted icon) on the left of a module's header and drag it up or down. The new order saves on its own.
- To reorder items within a module, grab the grip handle on the left of an item row and drag it to its new spot.
- The grip handles also work with the keyboard: focus one and use the up and down arrow keys to move that module or item.
Step 5 — Move, copy, duplicate, and delete
Beyond simple reordering, each item and each module has a few management actions.
Move or copy an item to another module
- Hover an item and click its move/copy icon (the four-arrows icon). A menu opens with two sections.
- Under Move to, click a module to relocate the item there — it leaves the current module.
- Under Copy to, click a module to drop a copy there while keeping the original in place. (For a page, the copy keeps the same text; for a resource or assignment, both items just point at the same underlying record.)
Duplicate a whole module
- On a module's header, click the Duplicate module icon (the clone icon).
- MarkTrack creates a copy named "[Module name] (Copy)" at the bottom of the list. The copy is always an unpublished draft, so students don't see it until you're ready. Page content is copied; resource and assignment items in the copy point at the same records as the original.
Delete items and modules
- To remove an item, click its trash icon and confirm.
- To delete a whole module, click the module's trash icon and confirm.
Deleting never destroys your content
Removing an item from a module only removes the listing. The actual resource or assignment stays right where it lives in the class, untouched — that's why the delete prompt for a whole module says "Its resources and assignments stay in the class." You can safely reorganize without fear of losing files or grading work.
A page's text is the exception
An inline Page (text) item only exists inside its module — its text isn't stored anywhere else in the class. So deleting a page item does delete the page's content for good. Resource, assignment, link, and header items are safe to delete; pages, copy elsewhere first if you want to keep them.
Step 6 — Publish a module so students can see it
A new module is a draft by default. Draft modules show a yellow "Draft" badge and are invisible to students and parents — only you and other staff on the class can see them. Publishing is the switch that turns a module on for the whole class.
- On the module's header, click the Publish button (the open-circle icon). The module is now live; the button changes to a green Published label.
- To hide it again, click Published to unpublish. The module reverts to a draft and disappears from the student view.
Publishing notifies the class
The first time a module is published — whether you click Publish yourself or it auto-publishes on its scheduled date — MarkTrack sends a push notification to students in the class so they know new content is available. Unpublishing and re-publishing the same module does not send the notification again.
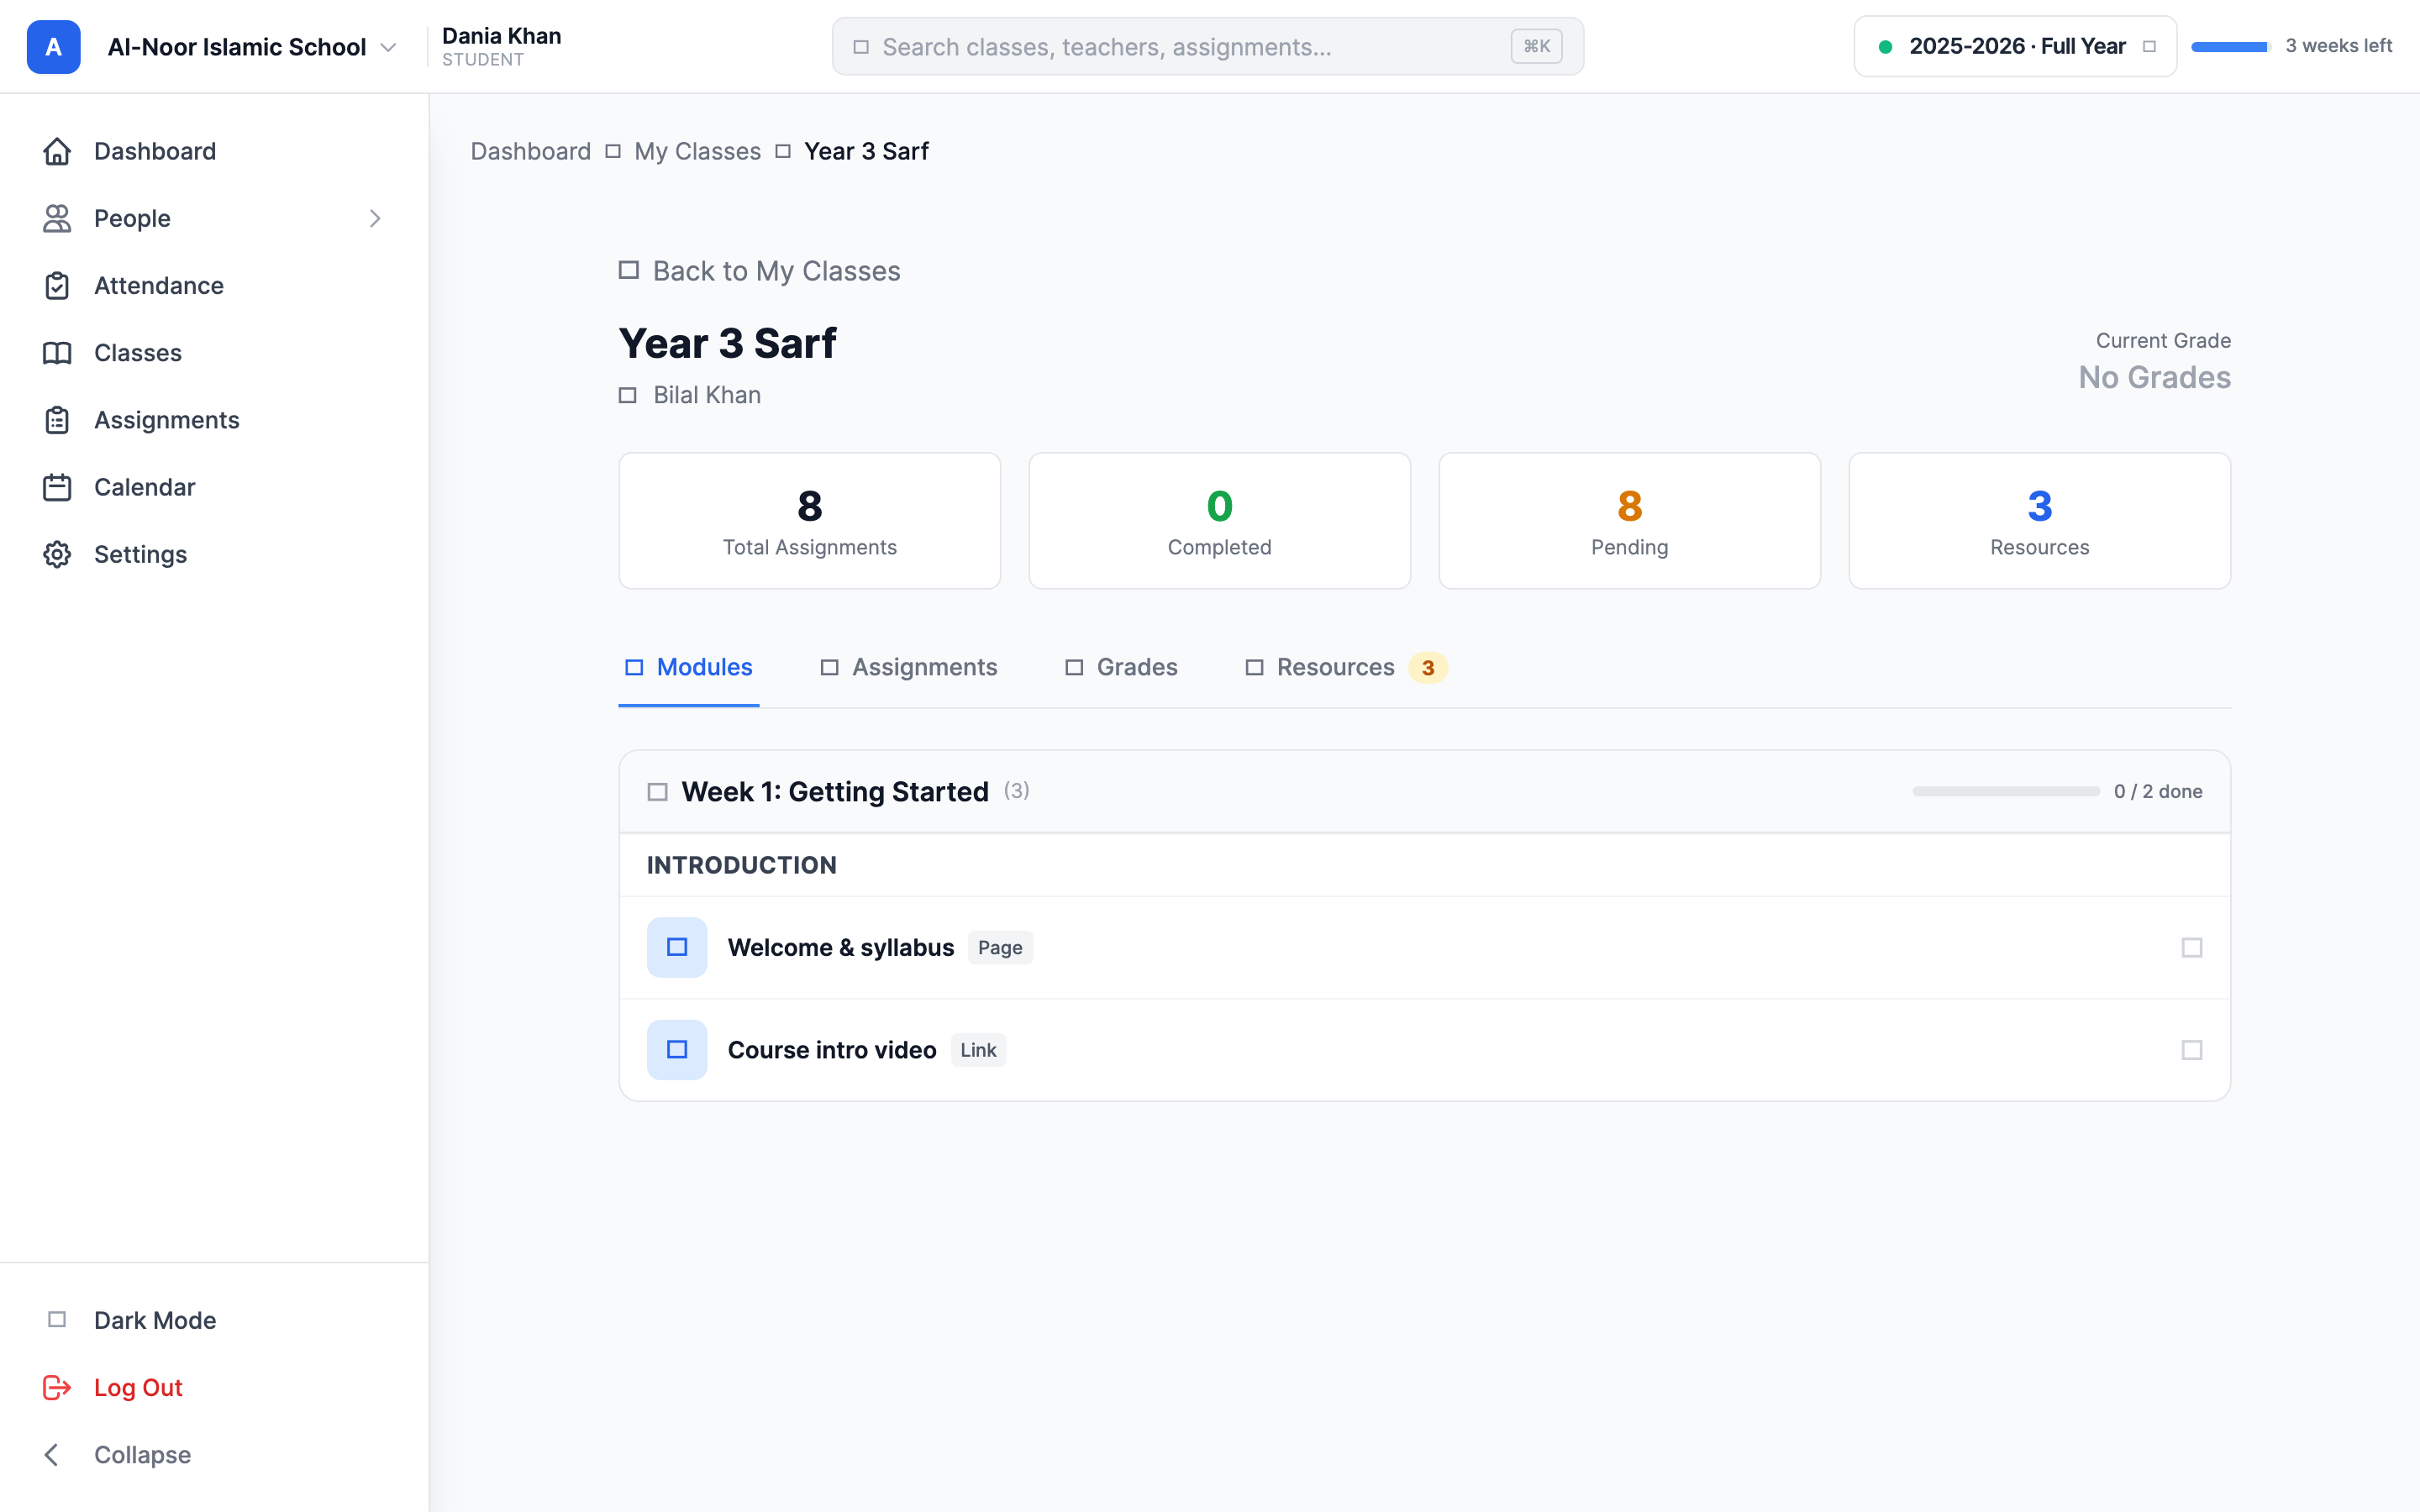
What students actually see
Students open the class, click the Modules tab, and see only the modules that are published and currently inside their availability window. For each module they get a thin progress bar and an "X / Y done" count. A few rules shape their view:
- Draft modules are hidden entirely.
- A published module whose Available from date is in the future, or whose Available until date has passed, is also hidden until/while it's in range.
- A gated module (one with a prerequisite) still appears but is shown locked, with a note telling the student which module to finish first. It unlocks automatically once they complete the prerequisite.
Step 7 — Track completion and progress
Every item except a header counts as one step toward finishing a module. Students complete items in two ways:
- Automatically — opening a page item, or viewing a resource or assignment, marks it done.
- Manually — each item row has a round mark-as-done toggle the student can click. Clicking it again undoes a manual completion. The module's progress bar updates instantly.
To see where the whole class stands:
- On the Modules page, click View progress in the top-right.
- You get a grid: one row per enrolled student, one column per module, and each cell shows that student's completion (a bar plus "done / total"). A cell turns green at 100%, and a dash (—) means the module has no completable items yet.
- Draft modules are still included here (marked "Draft") so you can see progress on content you're piloting before it goes live.
Only students earn completions
Completion tracking is for enrolled students. When you preview a module as staff, nothing is recorded against you, and parents viewing their child's class don't accrue completions either. Headers are dividers, so they're never part of the count.
That's the whole loop: build modules, fill them with resources, assignments, links, pages, and headers, order everything, then publish to release it and watch the progress grid fill in. If a module or item isn't behaving the way you expect, contact our team and we'll help you sort it out.
More in Classes & Grades
Still stuck?
Our team is happy to walk you through it.