Take daily attendance
In MarkTrack, attendance is taken per class, per day. Every student gets one mark for each class they are enrolled in: Present, Absent, Tardy, or Excused. This guide shows you where to take attendance, how clicking a cell works, how to mark a whole class at once, which days a class meets, the three rules that lock attendance, and how to run reports.
Before you start: set your timezone
Your organization's timezone decides what counts as "today" for attendance. If it's wrong, evening attendance can be rejected as a future date. Set it first — see Set your timezone (and why it controls attendance).
Step 1 — Open the Attendance page and pick a class
- From the dashboard, go to Attendance.
- Use the class picker at the top. It works in two steps: pick the subject first, then the class.
- MarkTrack remembers your choice. The same class loads the next time you open the page.
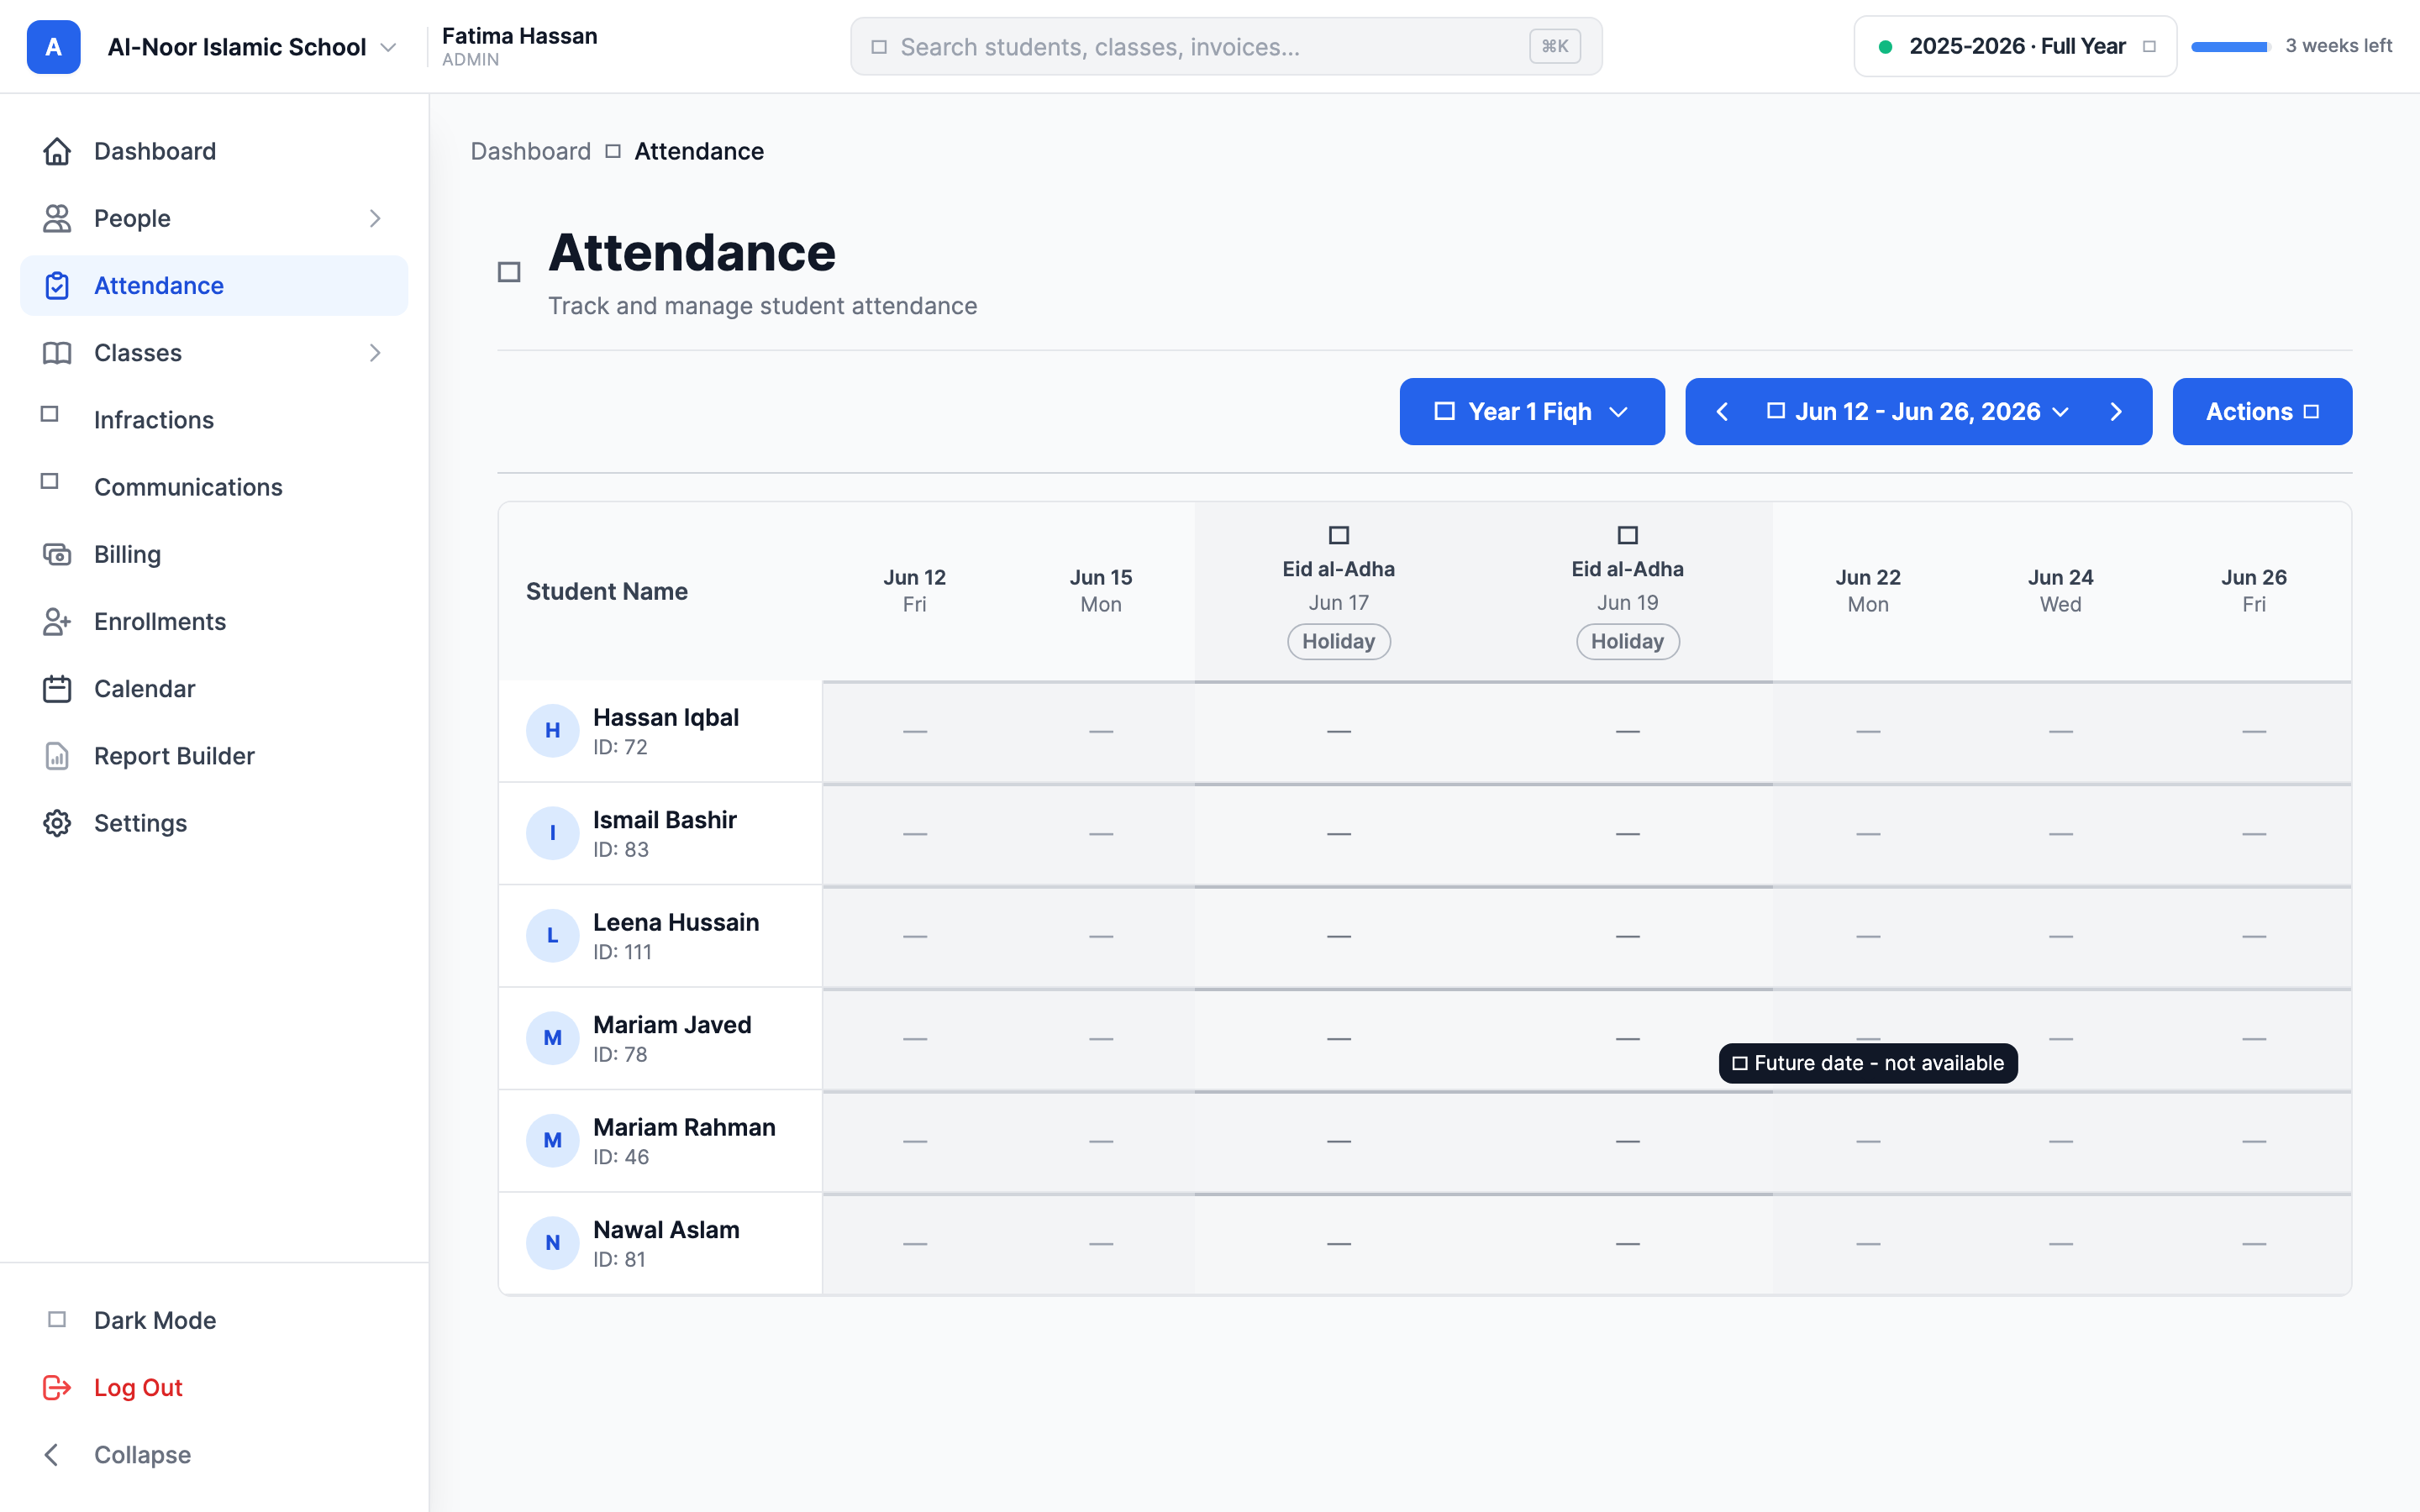
Step 2 — Read the grid
The page shows a grid: one row per student, one column per date.
- Green means Present, red means Absent, yellow means Tardy, orange means Excused. A gray — means the day hasn't been marked yet.
- Holidays show as disabled — cells. You can't mark attendance on a holiday. Holidays can apply to the whole organization or to one school.
- Days from before the class existed are not shown.
- The grid can show a standard week (Monday to Sunday) or weekend-focused views. Sunday schools get the Friday/Saturday/Sunday weekend view automatically. Your view choice is remembered.
Step 3 — Mark students by clicking
Click a student's cell to mark them. Clicks cycle through the statuses:
- The first click on an unmarked cell sets Present — not Absent.
- After that, every click moves to the next status in this order: Absent → Present → Tardy → Excused → Absent. So from Present, one more click gives you Tardy, the next gives Excused, the next gives Absent.
There is no "unmark"
Once a cell has a status, you can only cycle it to a different status — you can't clear it back to the gray dash. If you mis-click, keep clicking until the right status comes back around. Every mark records who made it.
Attendance is per class
A student who is out for the whole day must be marked absent in each of their classes separately. The one exception: an approved absence request marks Excused in every class at once.
Step 4 — Mark everyone present at once
- Click Actions in the top-right of the Attendance page.
- Choose Mark All Present.
Every student in the selected class is marked Present for today only. It doesn't touch other days or other classes. If any student had a pending absence text queued (see Absence alerts), flipping them to Present cancels that text.
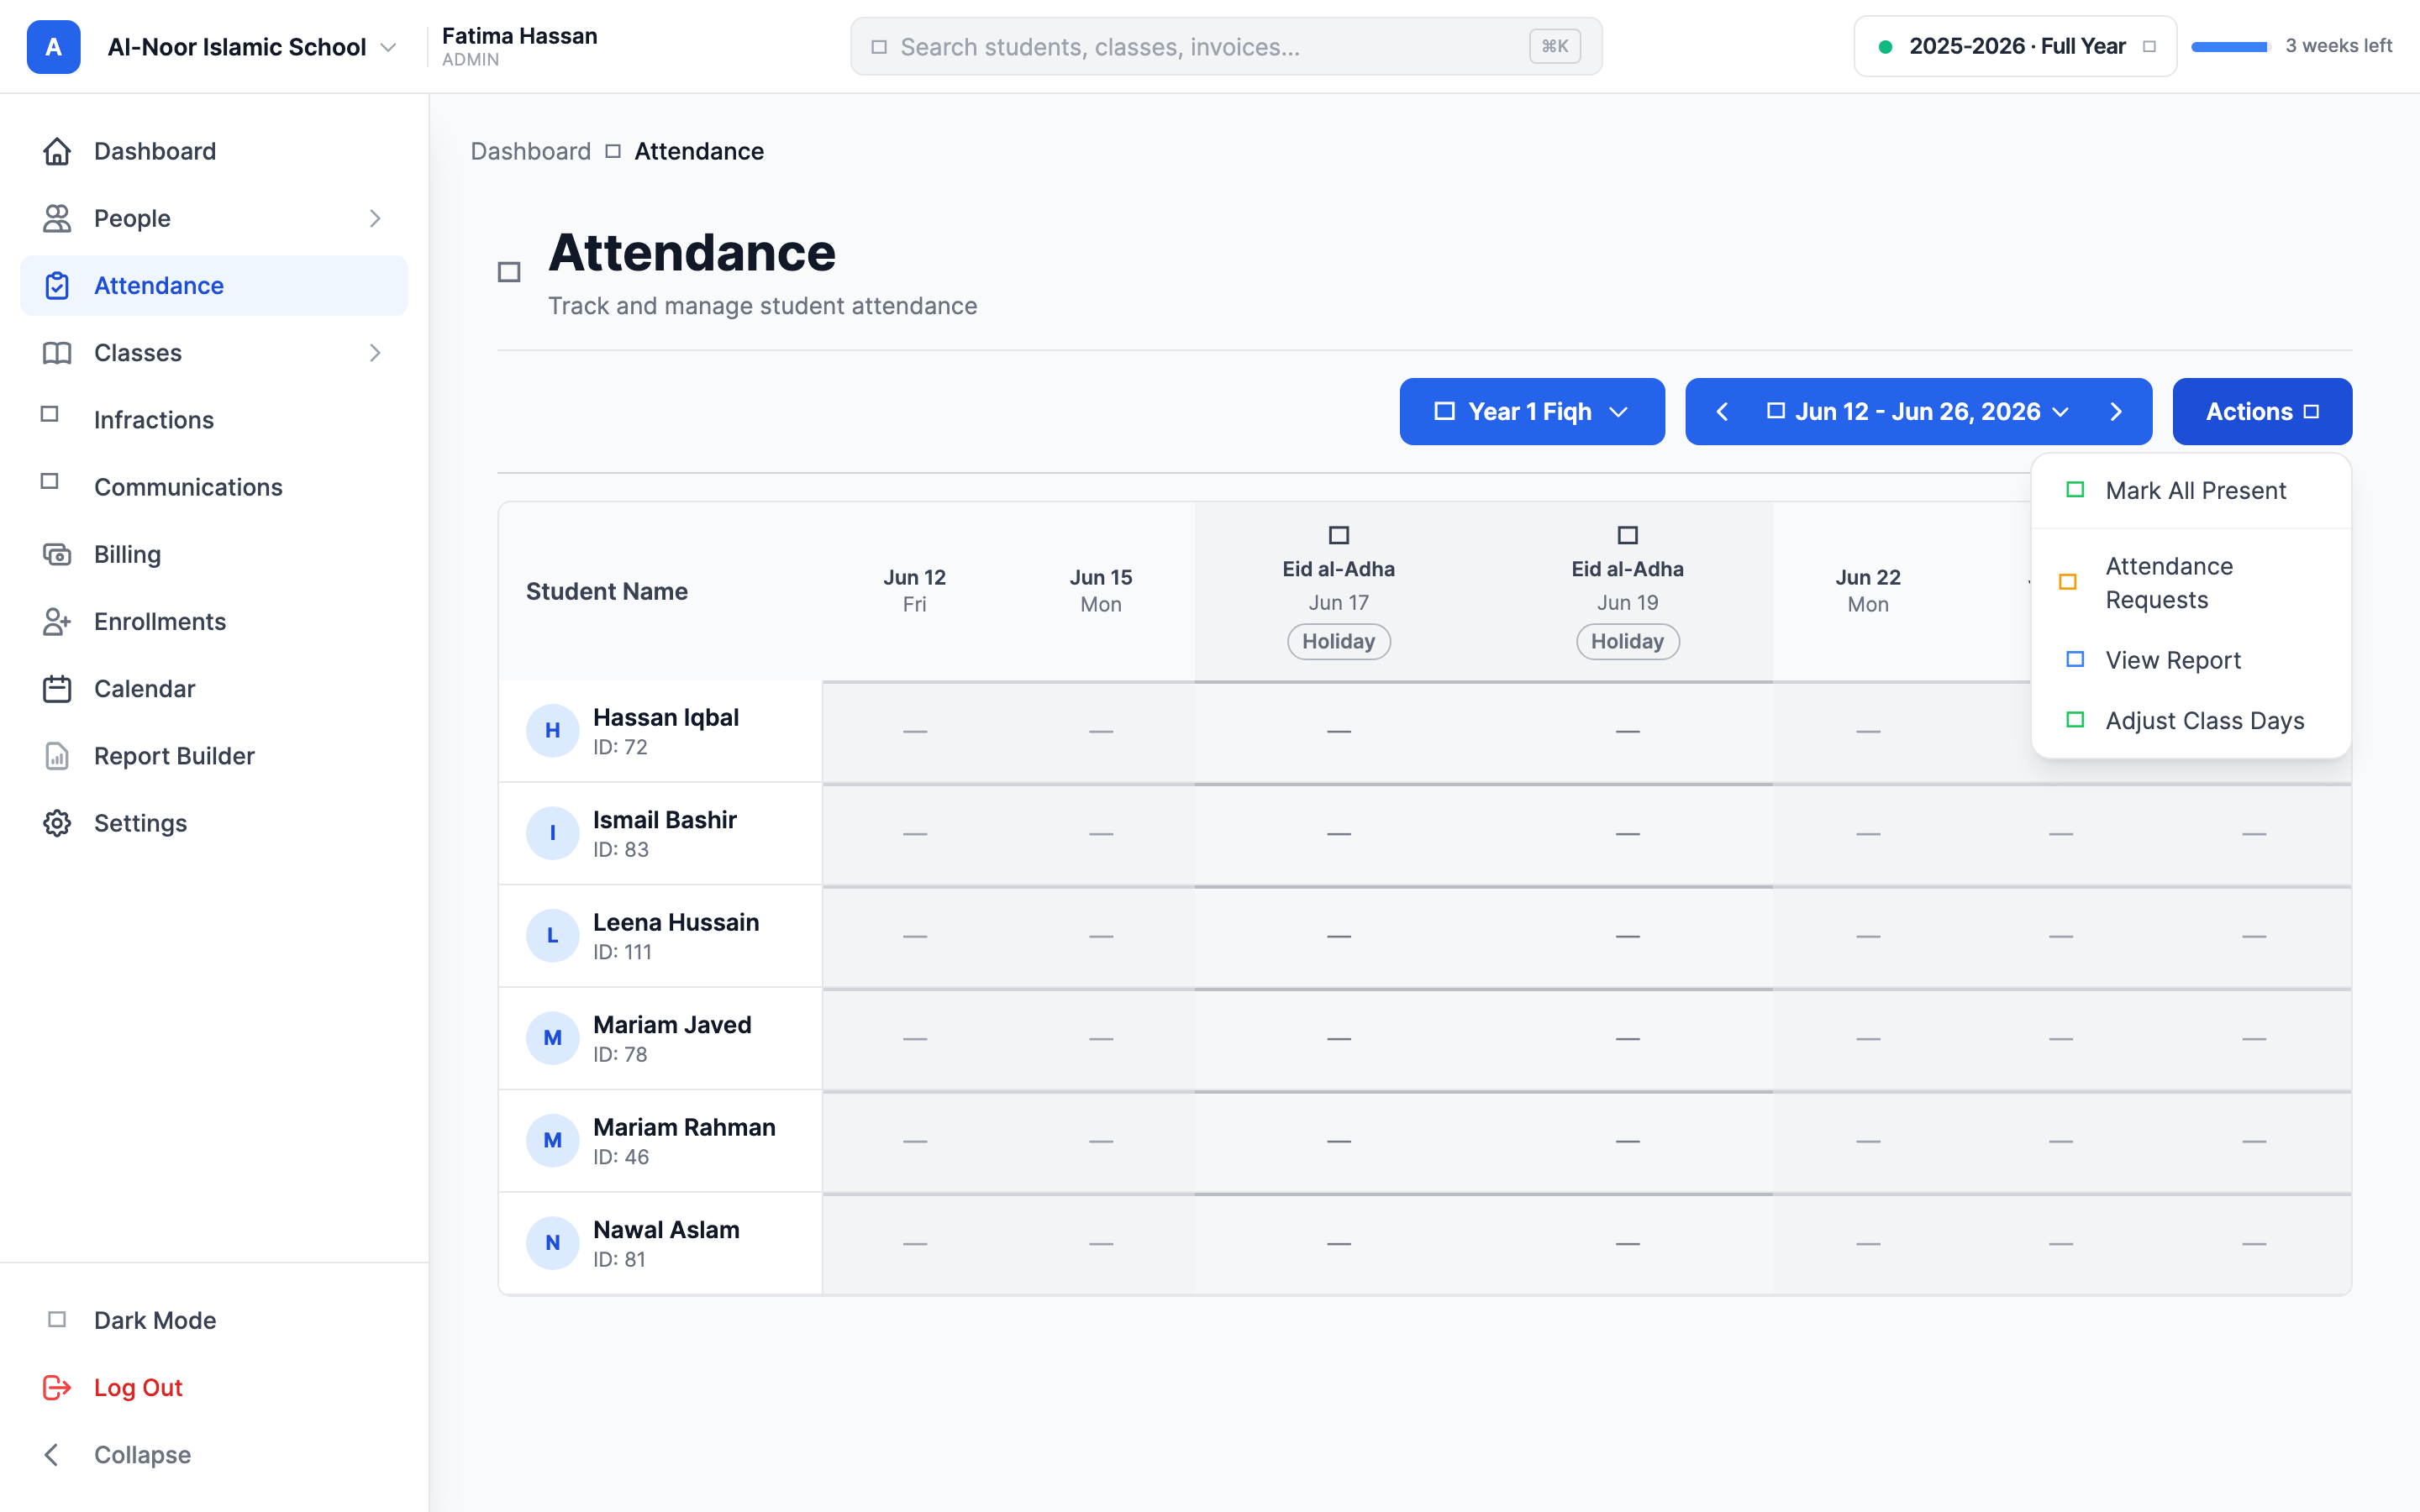
Set which days the class meets
- Click Actions → Adjust Class Days ("Select which days this class meets").
- Tick the weekdays the class actually meets and save. You'll see "Class days updated successfully."
The grid then shows columns only for those weekdays. Only an admin or the class's assigned teacher can change this.
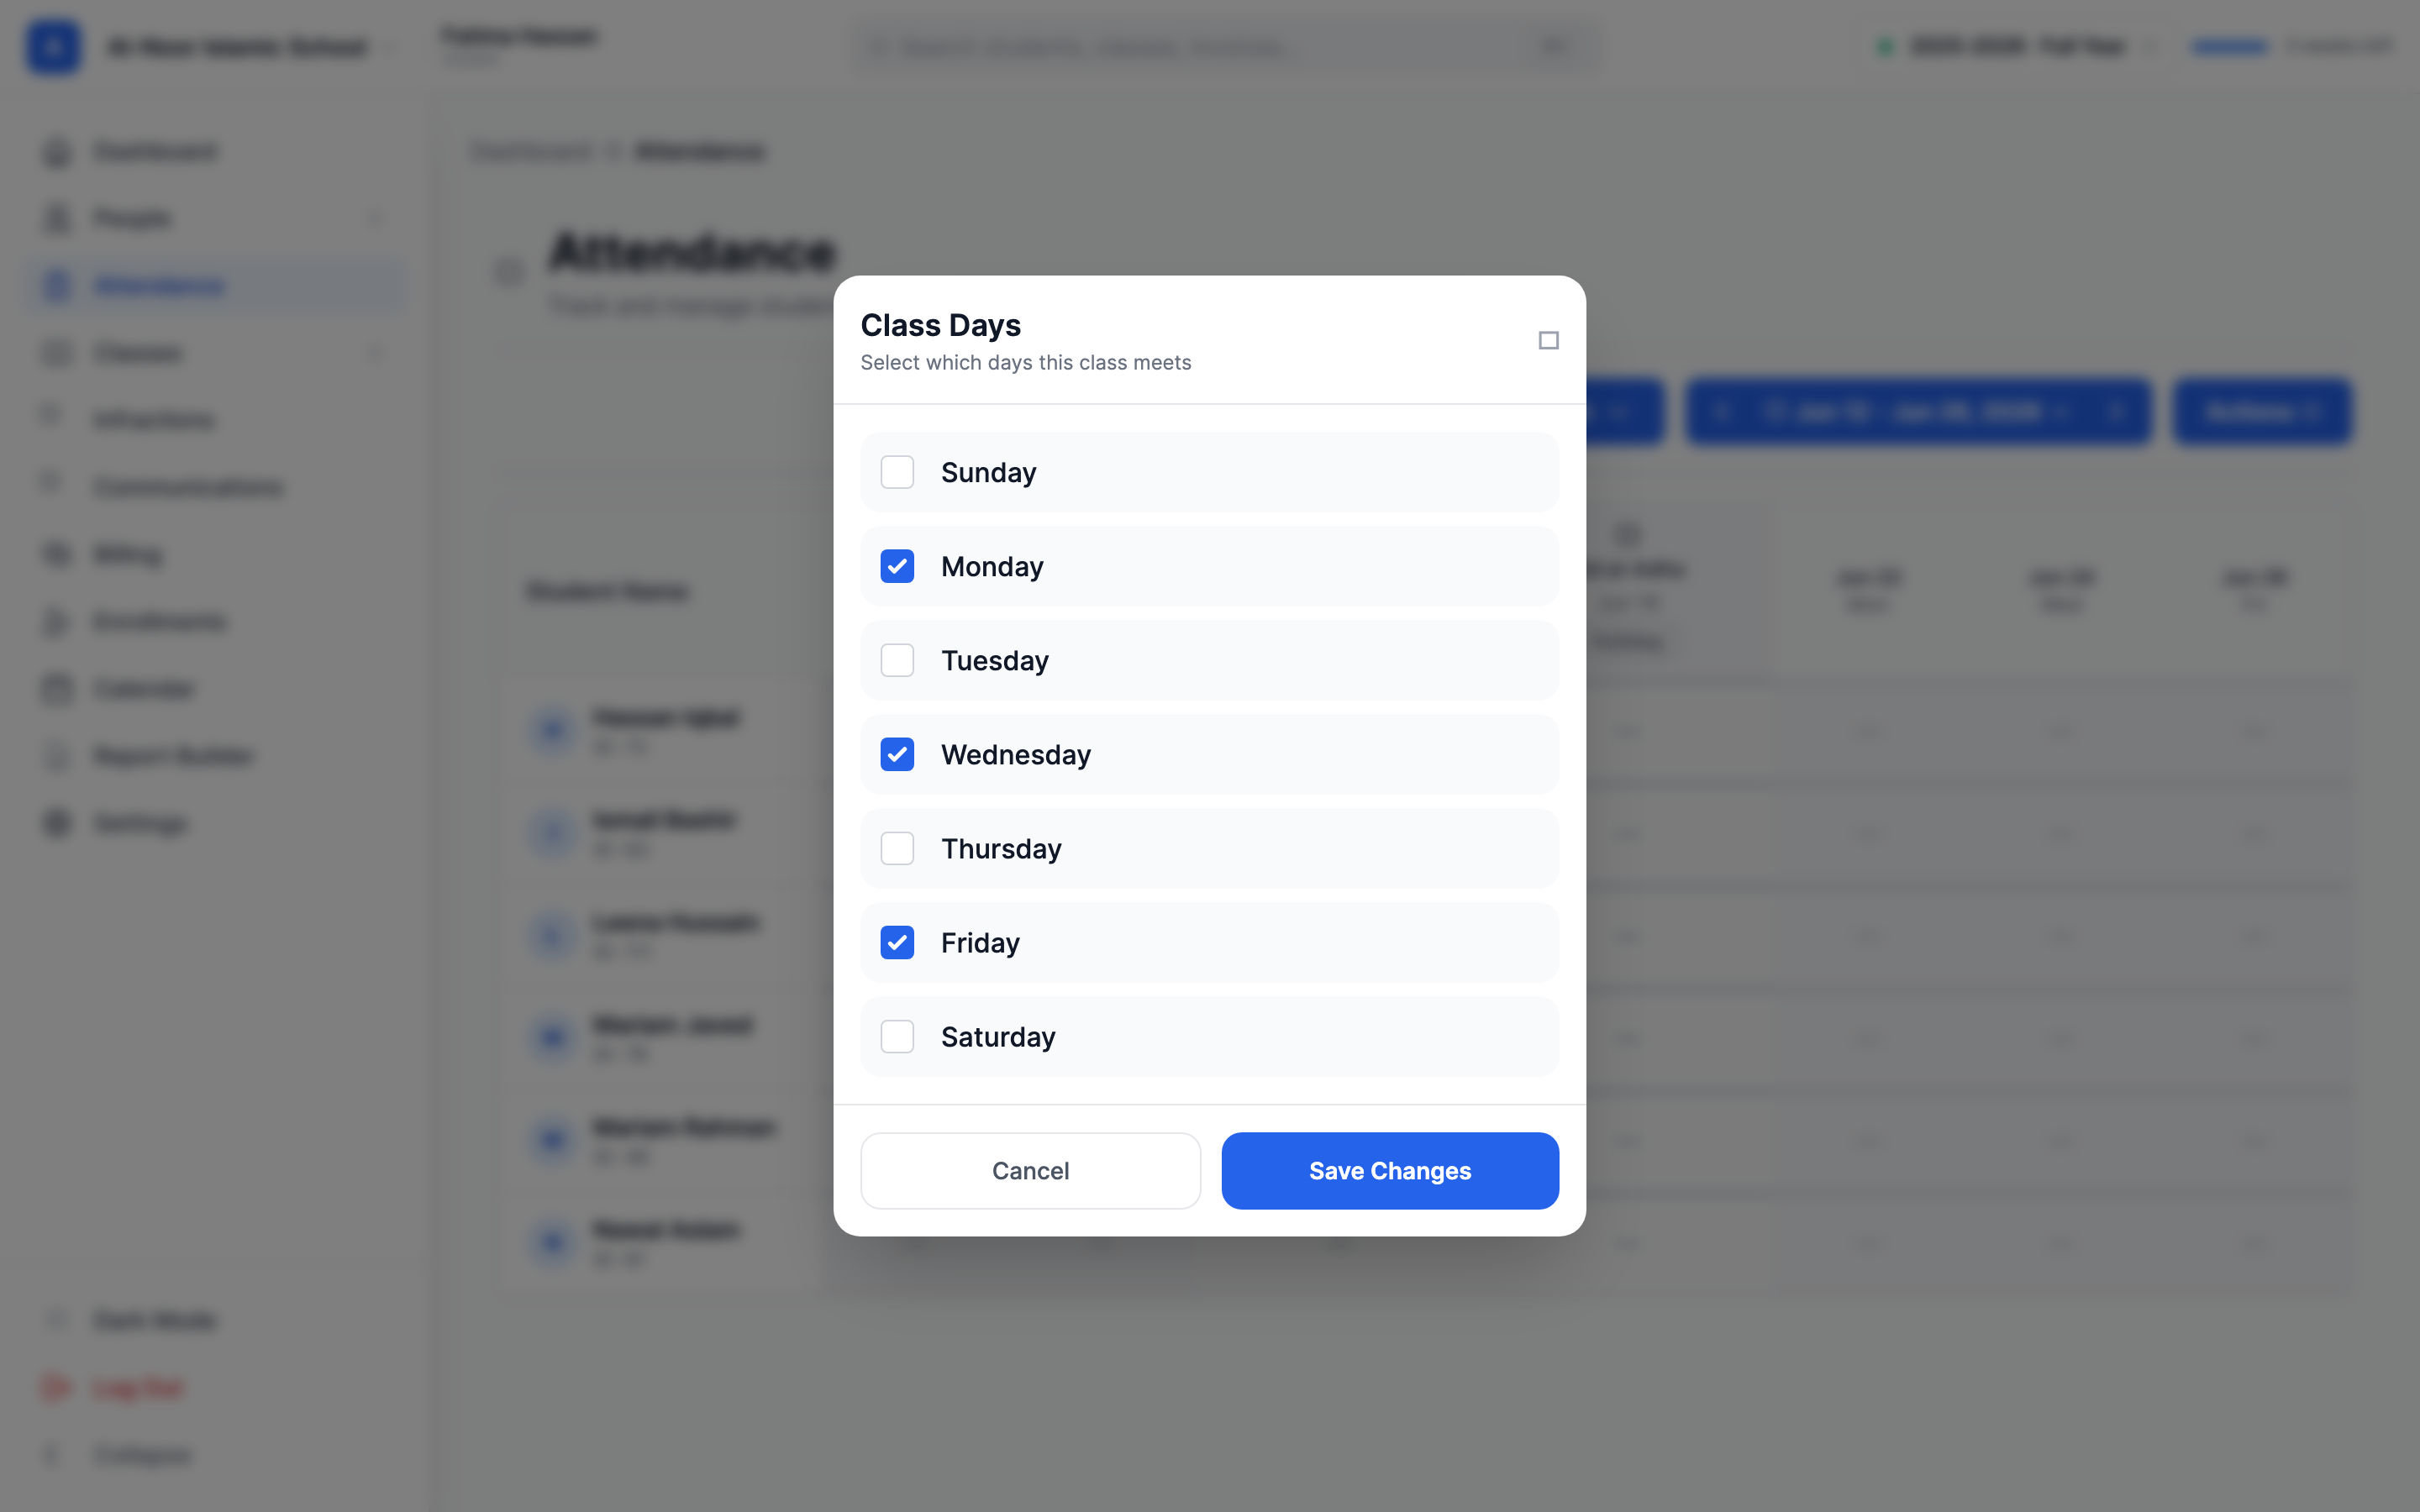
Don't leave all seven days ticked
If class days are left at the default (all 7 days), reports treat the class as unconfigured and fall back to a generic schedule based on your school type. Set the real meeting days so the "School Days" count in reports is accurate.
Who can do what
- Admins can mark attendance for any class in the school.
- Teachers can only mark classes they are assigned to. Trying another class shows "Not authorized to manage attendance for this class".
- Parents and students can view attendance but never change it. Parents see the tooltip "View only - parents cannot modify attendance".
- If a teacher sees "You don't have permission to access this resource", an admin needs to grant them attendance permissions. Teachers have attendance view and edit access by default.
The three locks
Three separate rules can stop a cell from being changed:
- Future dates are always locked. No one — not even an admin — can mark a day that hasn't happened yet. There is no setting to override this. The error reads "Cannot update attendance for future dates", and the cell tooltip says "Future date - not available".
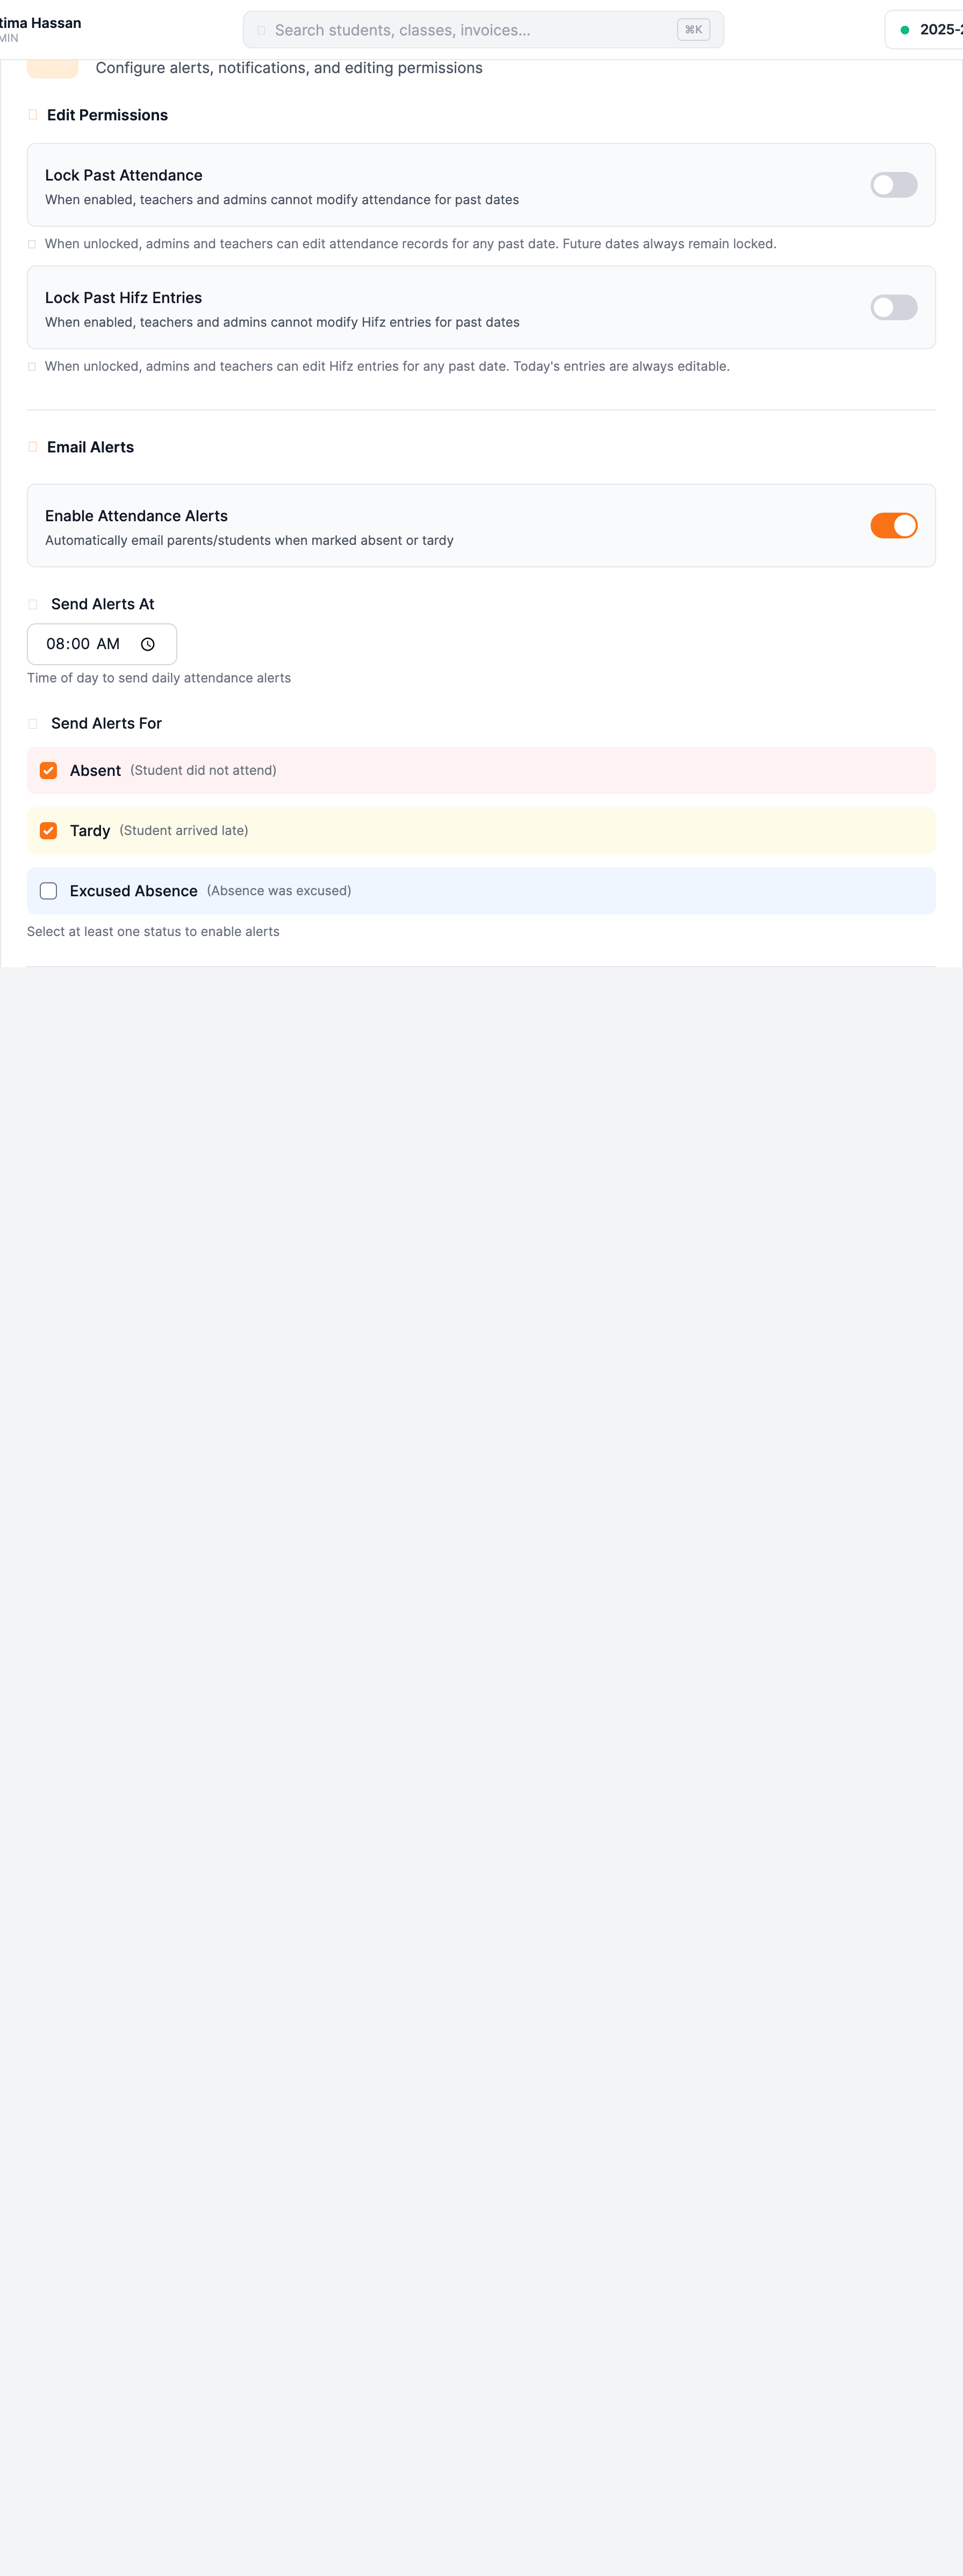
- Lock Past Attendance (optional). Go to Settings, open the Attendance tab, and find the Edit Permissions section. When Lock Past Attendance is on, teachers and admins can't change attendance for past dates: locked cells show a small lock icon with the tooltip "Date passed - locked", and edits are refused with "Attendance for past dates is locked. Contact your administrator to unlock." The toggle saves itself the moment you flip it. A matching Lock Past Hifz Entries toggle sits right below it — that one is a separate setting and only affects Hifz entries.
- Concluded years and locked terms. Once an academic year is concluded, everything in it is read-only ("[Year name] has been concluded. All data is read-only."). And if a date falls inside a term that has been locked, edits are refused with "This term is locked. Grades and attendance from this period are read-only."
"Past" and "future" follow your timezone
Both locks measure days against your organization's timezone. If marks are being rejected at odd hours, check your timezone setting before anything else.
Reports and exports
- Click Actions → View Report ("Attendance statistics & export").
- Pick a Date Range. The report opens on the current month.
The report shows summary cards — School Days, Attendance Rate, Total Present, Total Absent, Tardy, Excused — and a per-student table with each student's counts and rate. Use the PDF, XLS, or CSV buttons next to Export: to download it. A per-student version of the same report is also available from the student's profile page.
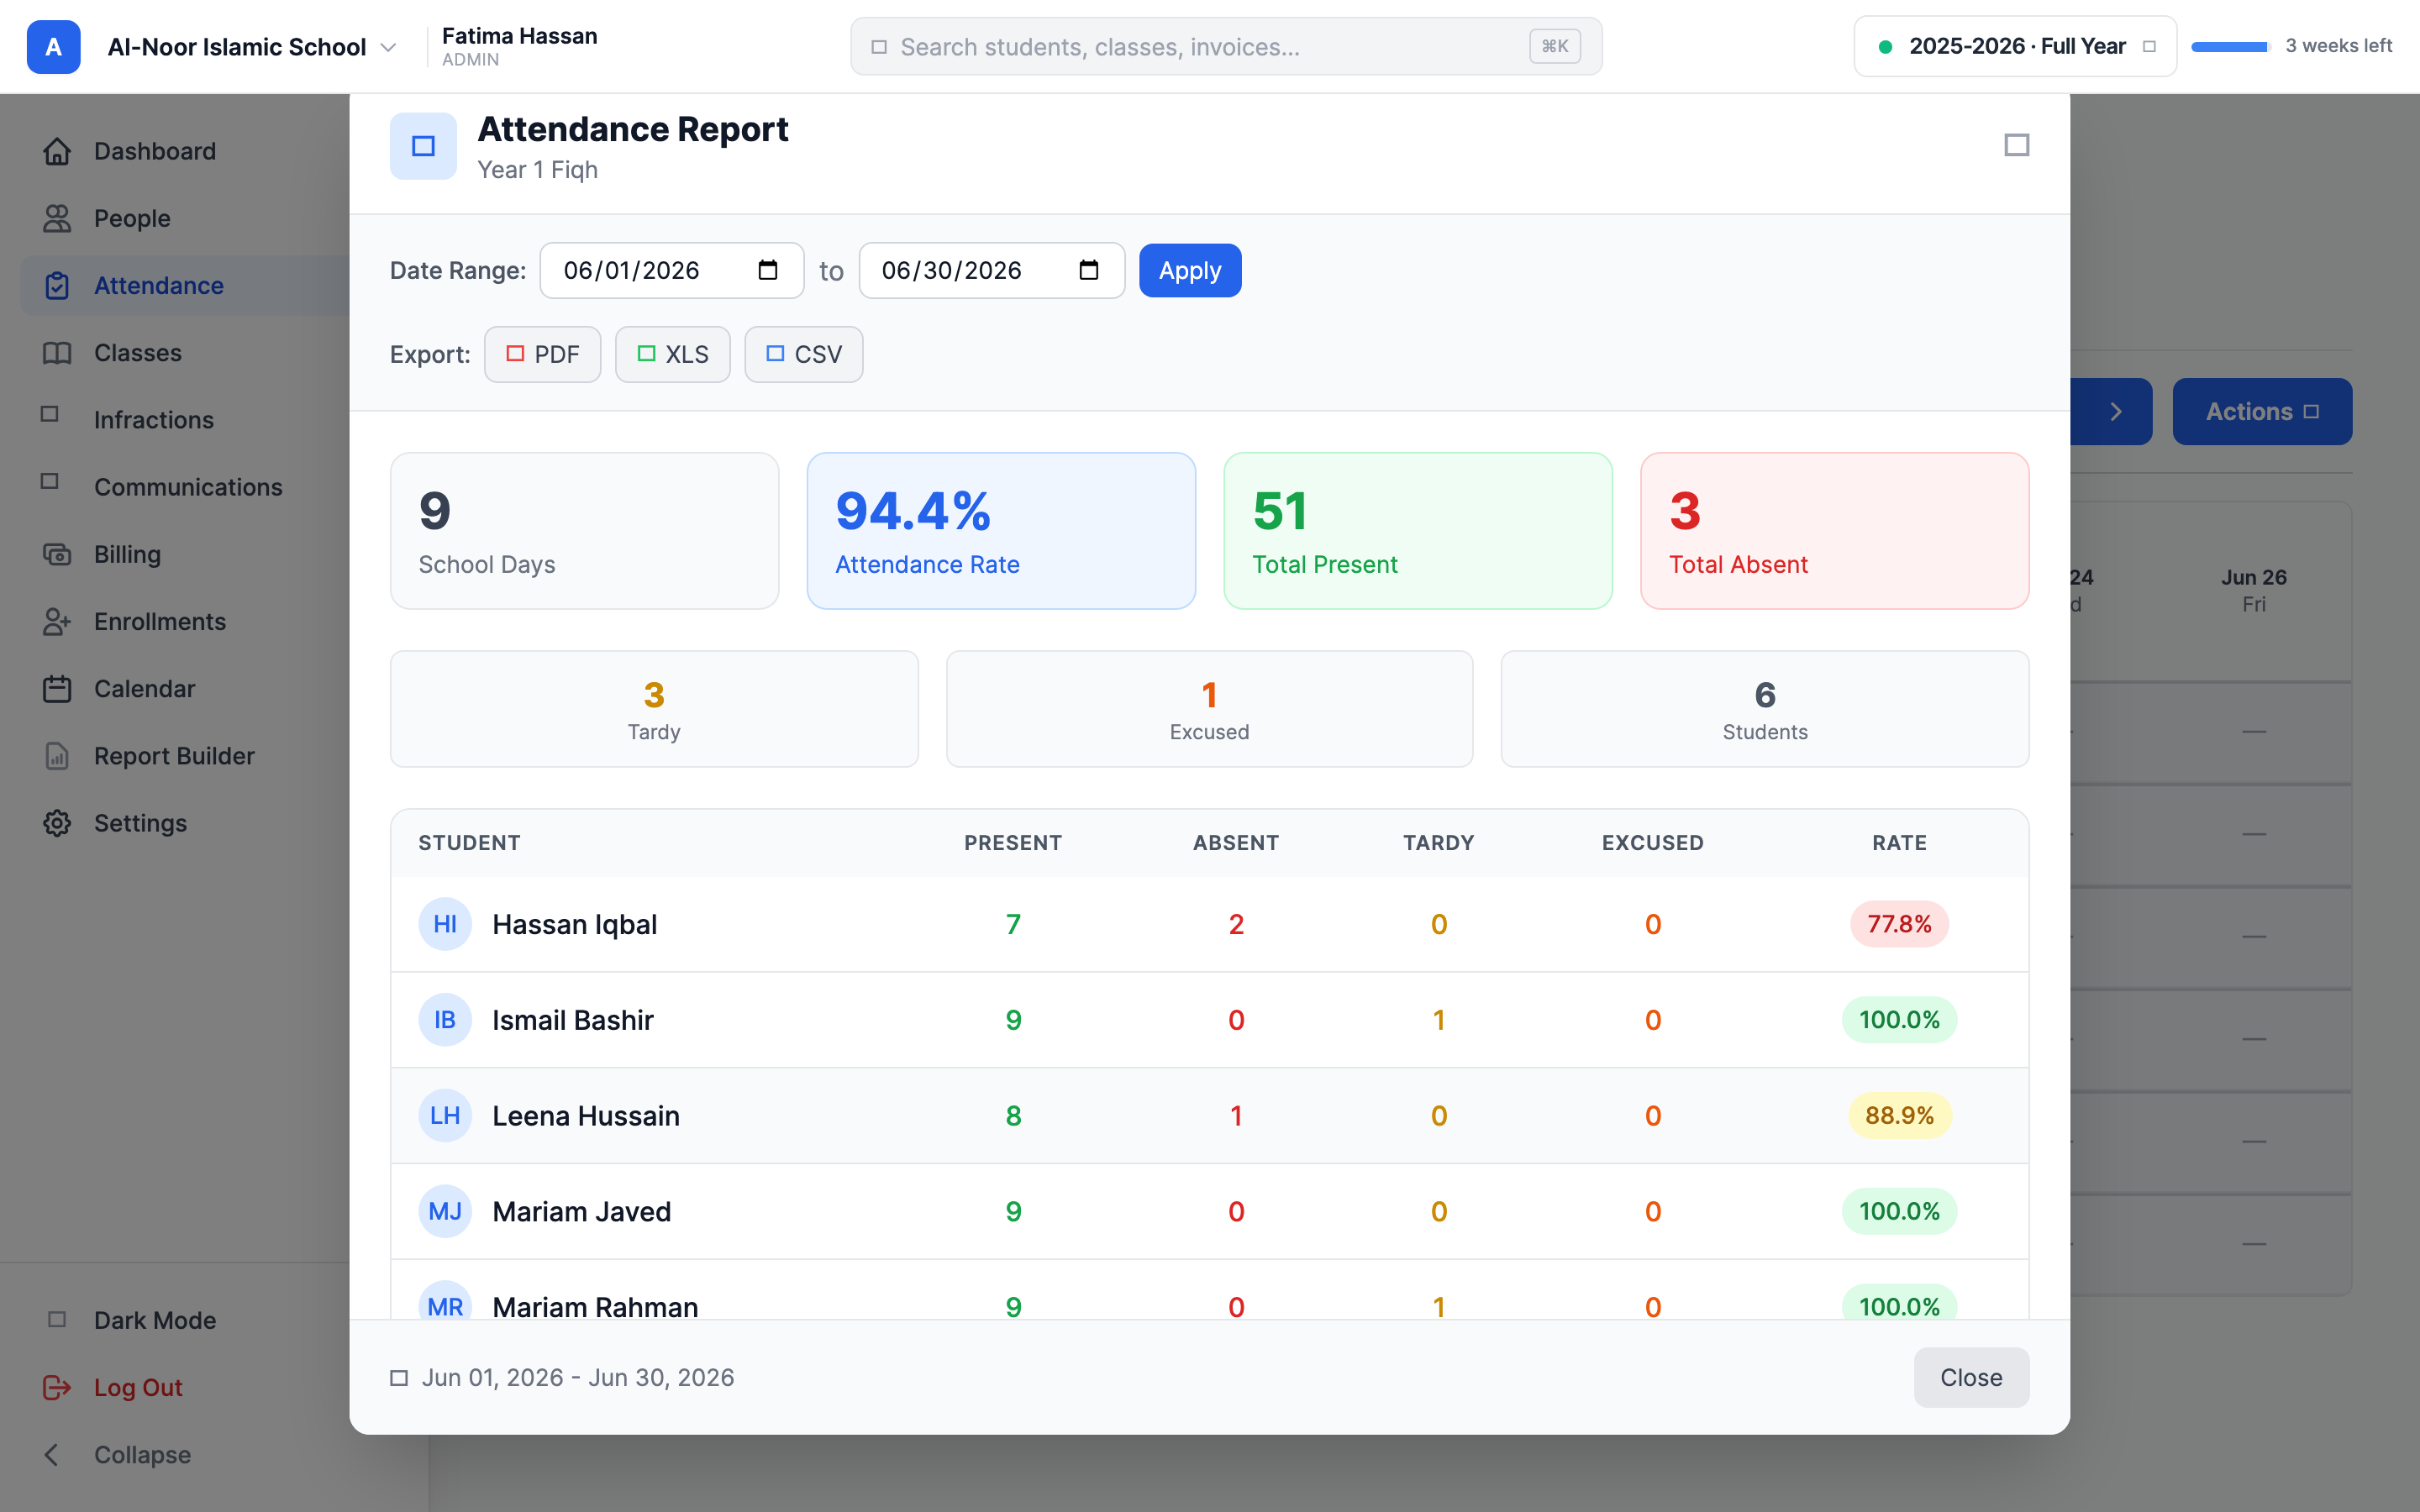
How the attendance rate is calculated, in plain terms:
- A student with no mark on a class day counts as present. Unmarked days never hurt the rate.
- Tardy and Excused also count as present for the rate. Only Absent lowers it.
- Holidays are skipped completely — they don't count for or against anyone.
- Only days between the class's start and today are counted. If the range has no class days at all, the rate shows "—" instead of a misleading 100%.
The raw data export is CSV only
The separate Export Attendance Data option (with Start Date, End Date, File Format, status filter, and File Title fields) always downloads a CSV file — the PDF choice and the File Title are currently ignored. If you need a PDF, use View Report and its PDF button instead.
Students see a slightly different rate
Students have their own attendance calendar in their account. The rate shown there counts only Present days as attended, so it can read lower than the class report's rate. That's expected — the formulas differ.
Next up: handle parent requests with the absence requests guide, or browse the other guides in Attendance.
More in Attendance
Still stuck?
Our team is happy to walk you through it.