
Run attendance from the Command Center
The Attendance Command Center is the admin home for attendance. Instead of opening one class grid at a time, it puts the whole school on one page: headline numbers, the absence request queue, a searchable record of every mark ever taken, a per-student profile, and a per-teacher "did they take attendance?" report. This guide walks each of its six tabs, what the numbers mean, and where the exports live.
Admins only, and one school at a time
The Command Center is an admin surface — teachers don't see it. Everything on it is scoped to the school in the URL. To look at another school, switch schools in the top bar; there is no school picker on the page itself.
Step 1 — Open the Command Center
- Go to Attendance.
- Click the Command Center button at the top of the page. The amber badge on it is the number of absence requests waiting for review at this school.
It also opens from Actions → Attendance Requests (which lands you straight on the Requests tab), and from the Review button in the absence-request email admins receive — that link opens the page with the right request's drawer already showing.
Step 2 — Read the shell: filters, KPIs, tabs
Use the Year and Term filters and the tab bar to choose the view. Summary cards depend on the tab: Today has no KPI strip, Records summarizes its own filtered results, and Overview shows the six attendance KPIs (Today · Overview · Requests · Records · Students · Teachers).
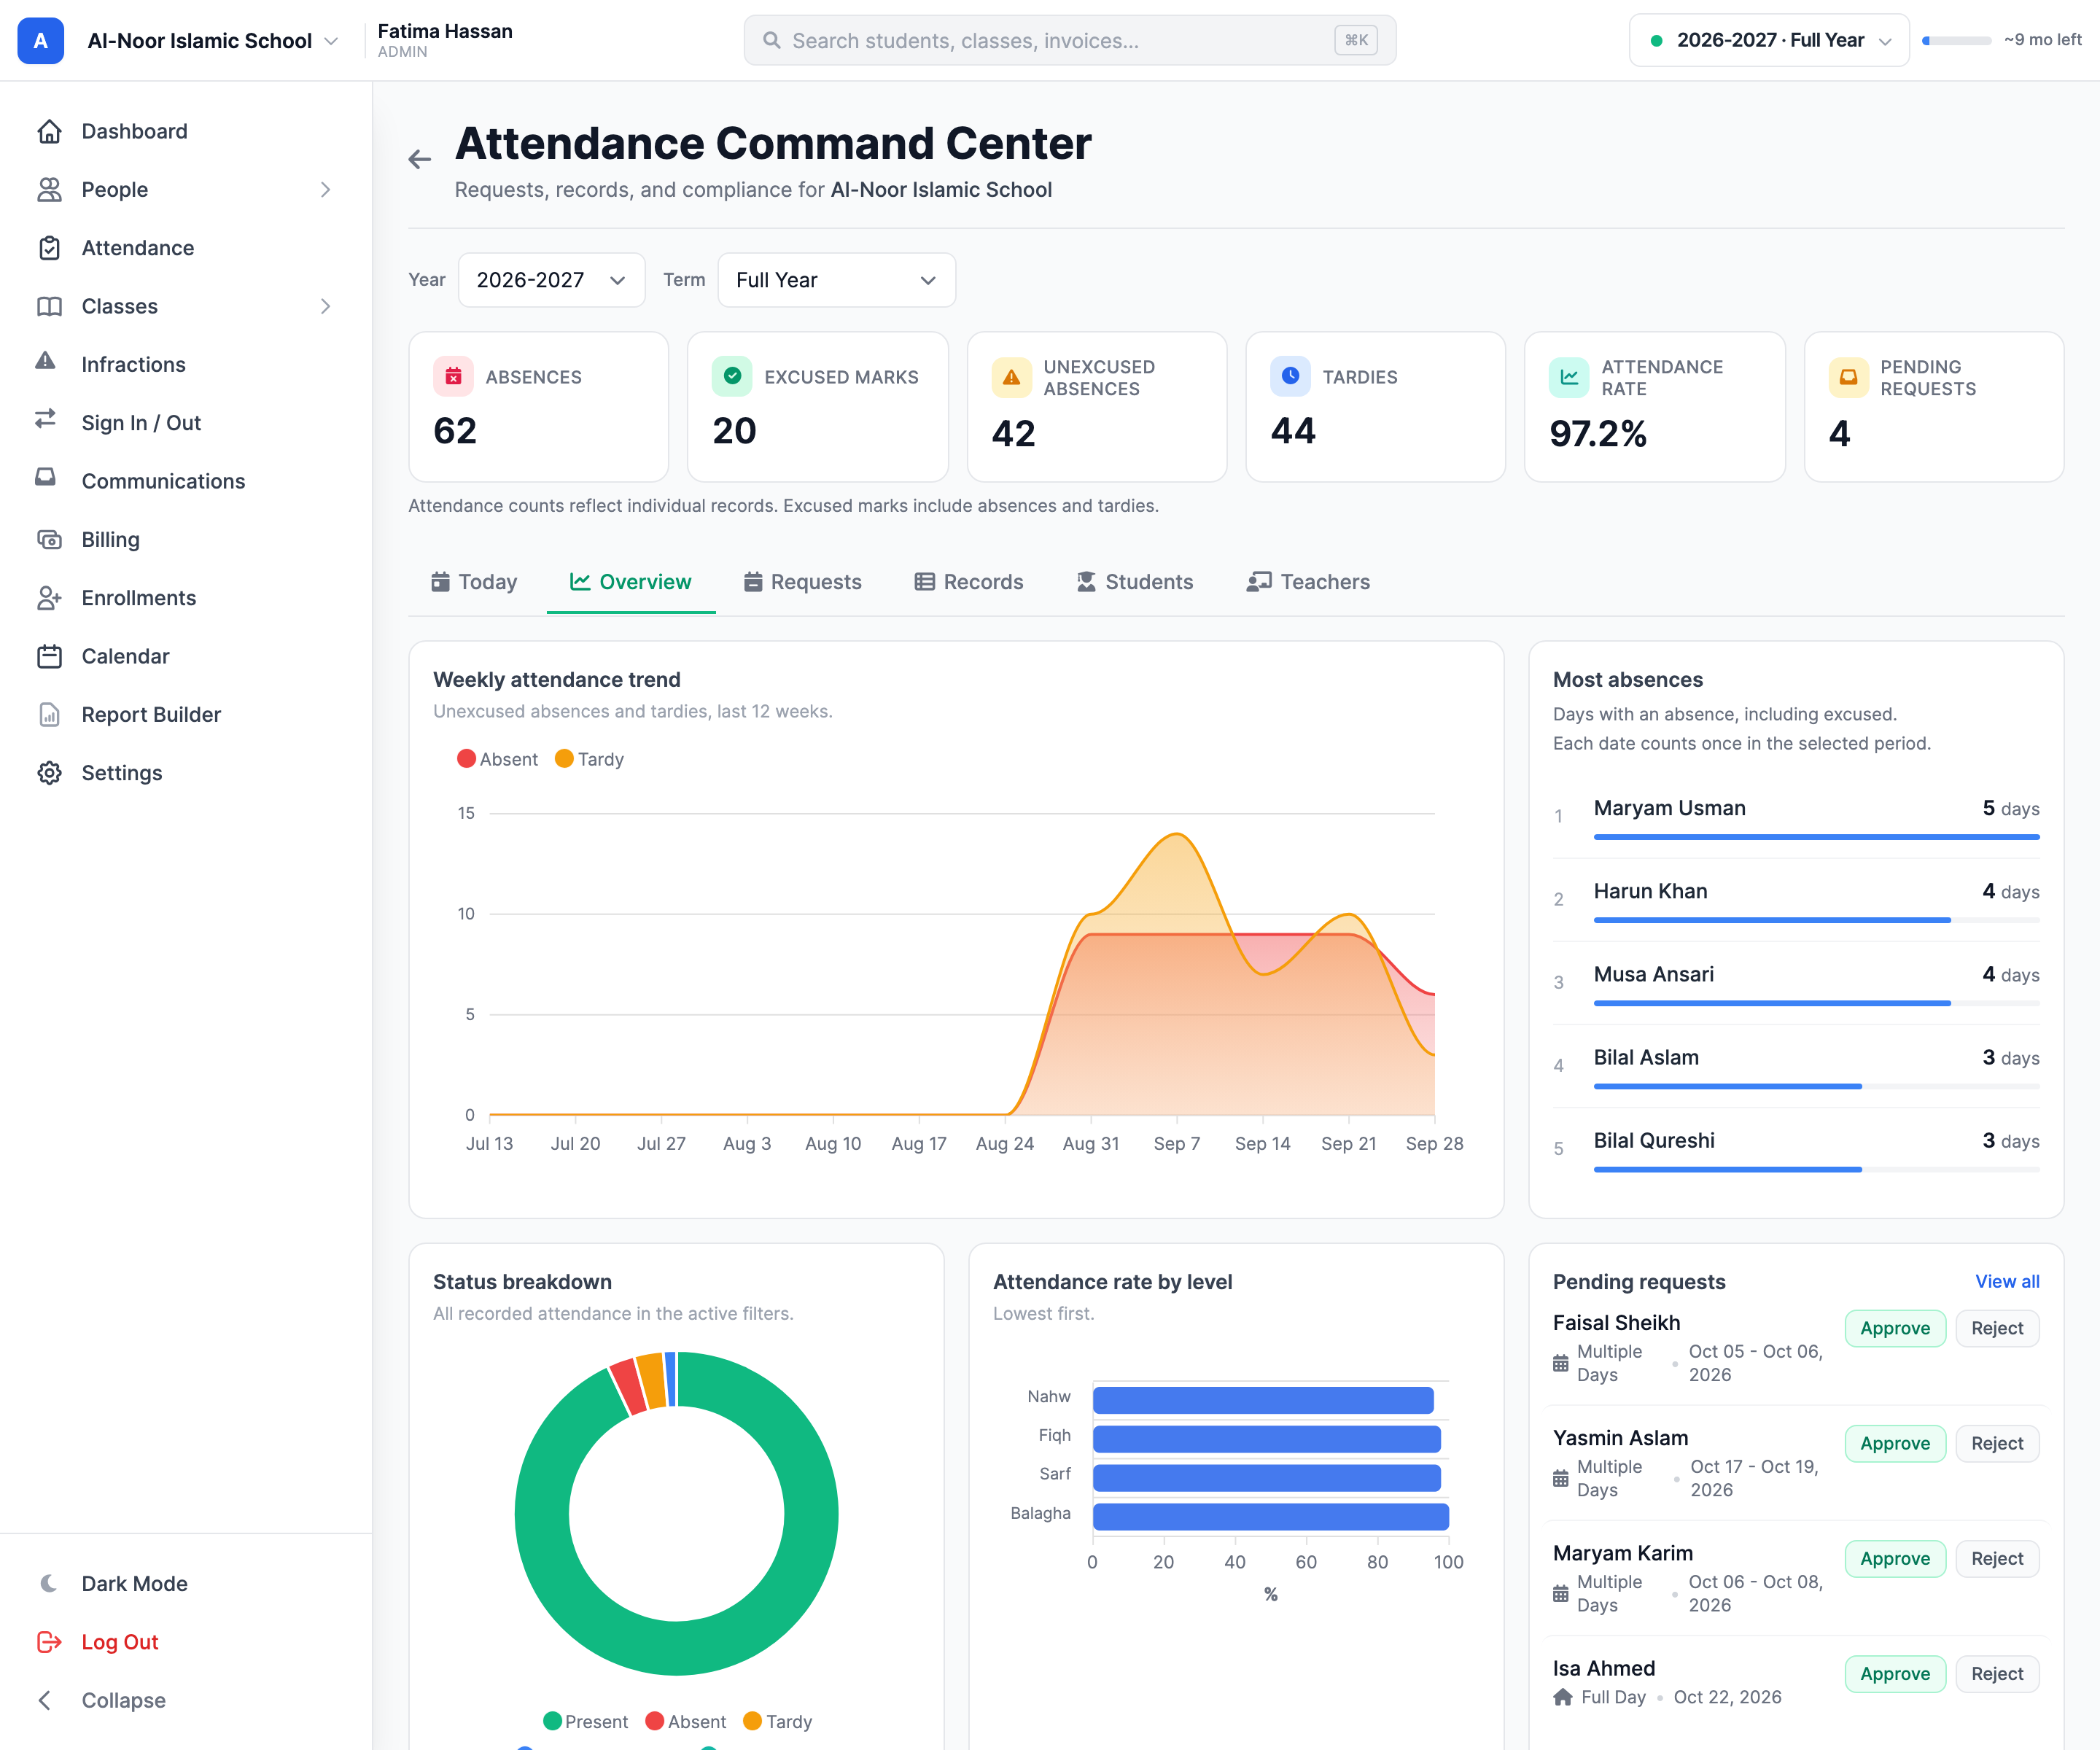
What the six KPI tiles count, exactly:
- Absences — every absence, excused or not.
- Excused — excused absences plus excused tardies.
- Unexcused — plain absences only.
- Tardies — tardies plus excused tardies.
- Attendance rate — the share of recorded marks that aren't a plain absence. Tardy and excused marks count as attended.
- Pending requests — absence requests waiting on a decision at this school. It turns amber when there's anything to do.
An excused tardy is counted twice, on purpose
It is a tardy and it is excused, so it lands in both the Excused and the Tardies tile. Don't add the tiles up expecting them to equal the total — they overlap by design.
The Year and Term pickers at the top set the window the KPI strip, the Overview charts, the Records table, and a student's profile are measured over; Full Year is the default term choice. Changing them updates the current tab while preserving its own filters. Every filter lives in the address bar, so a filtered view is a link you can bookmark or paste to a colleague.
Use each tab's date controls
Today uses its selected day. The Requests tab lists every absence request for the school regardless of academic year — filter it by its own From/To dates instead. The Teachers tab is likewise driven by its own date or date range, not by the year picker.
The Today tab
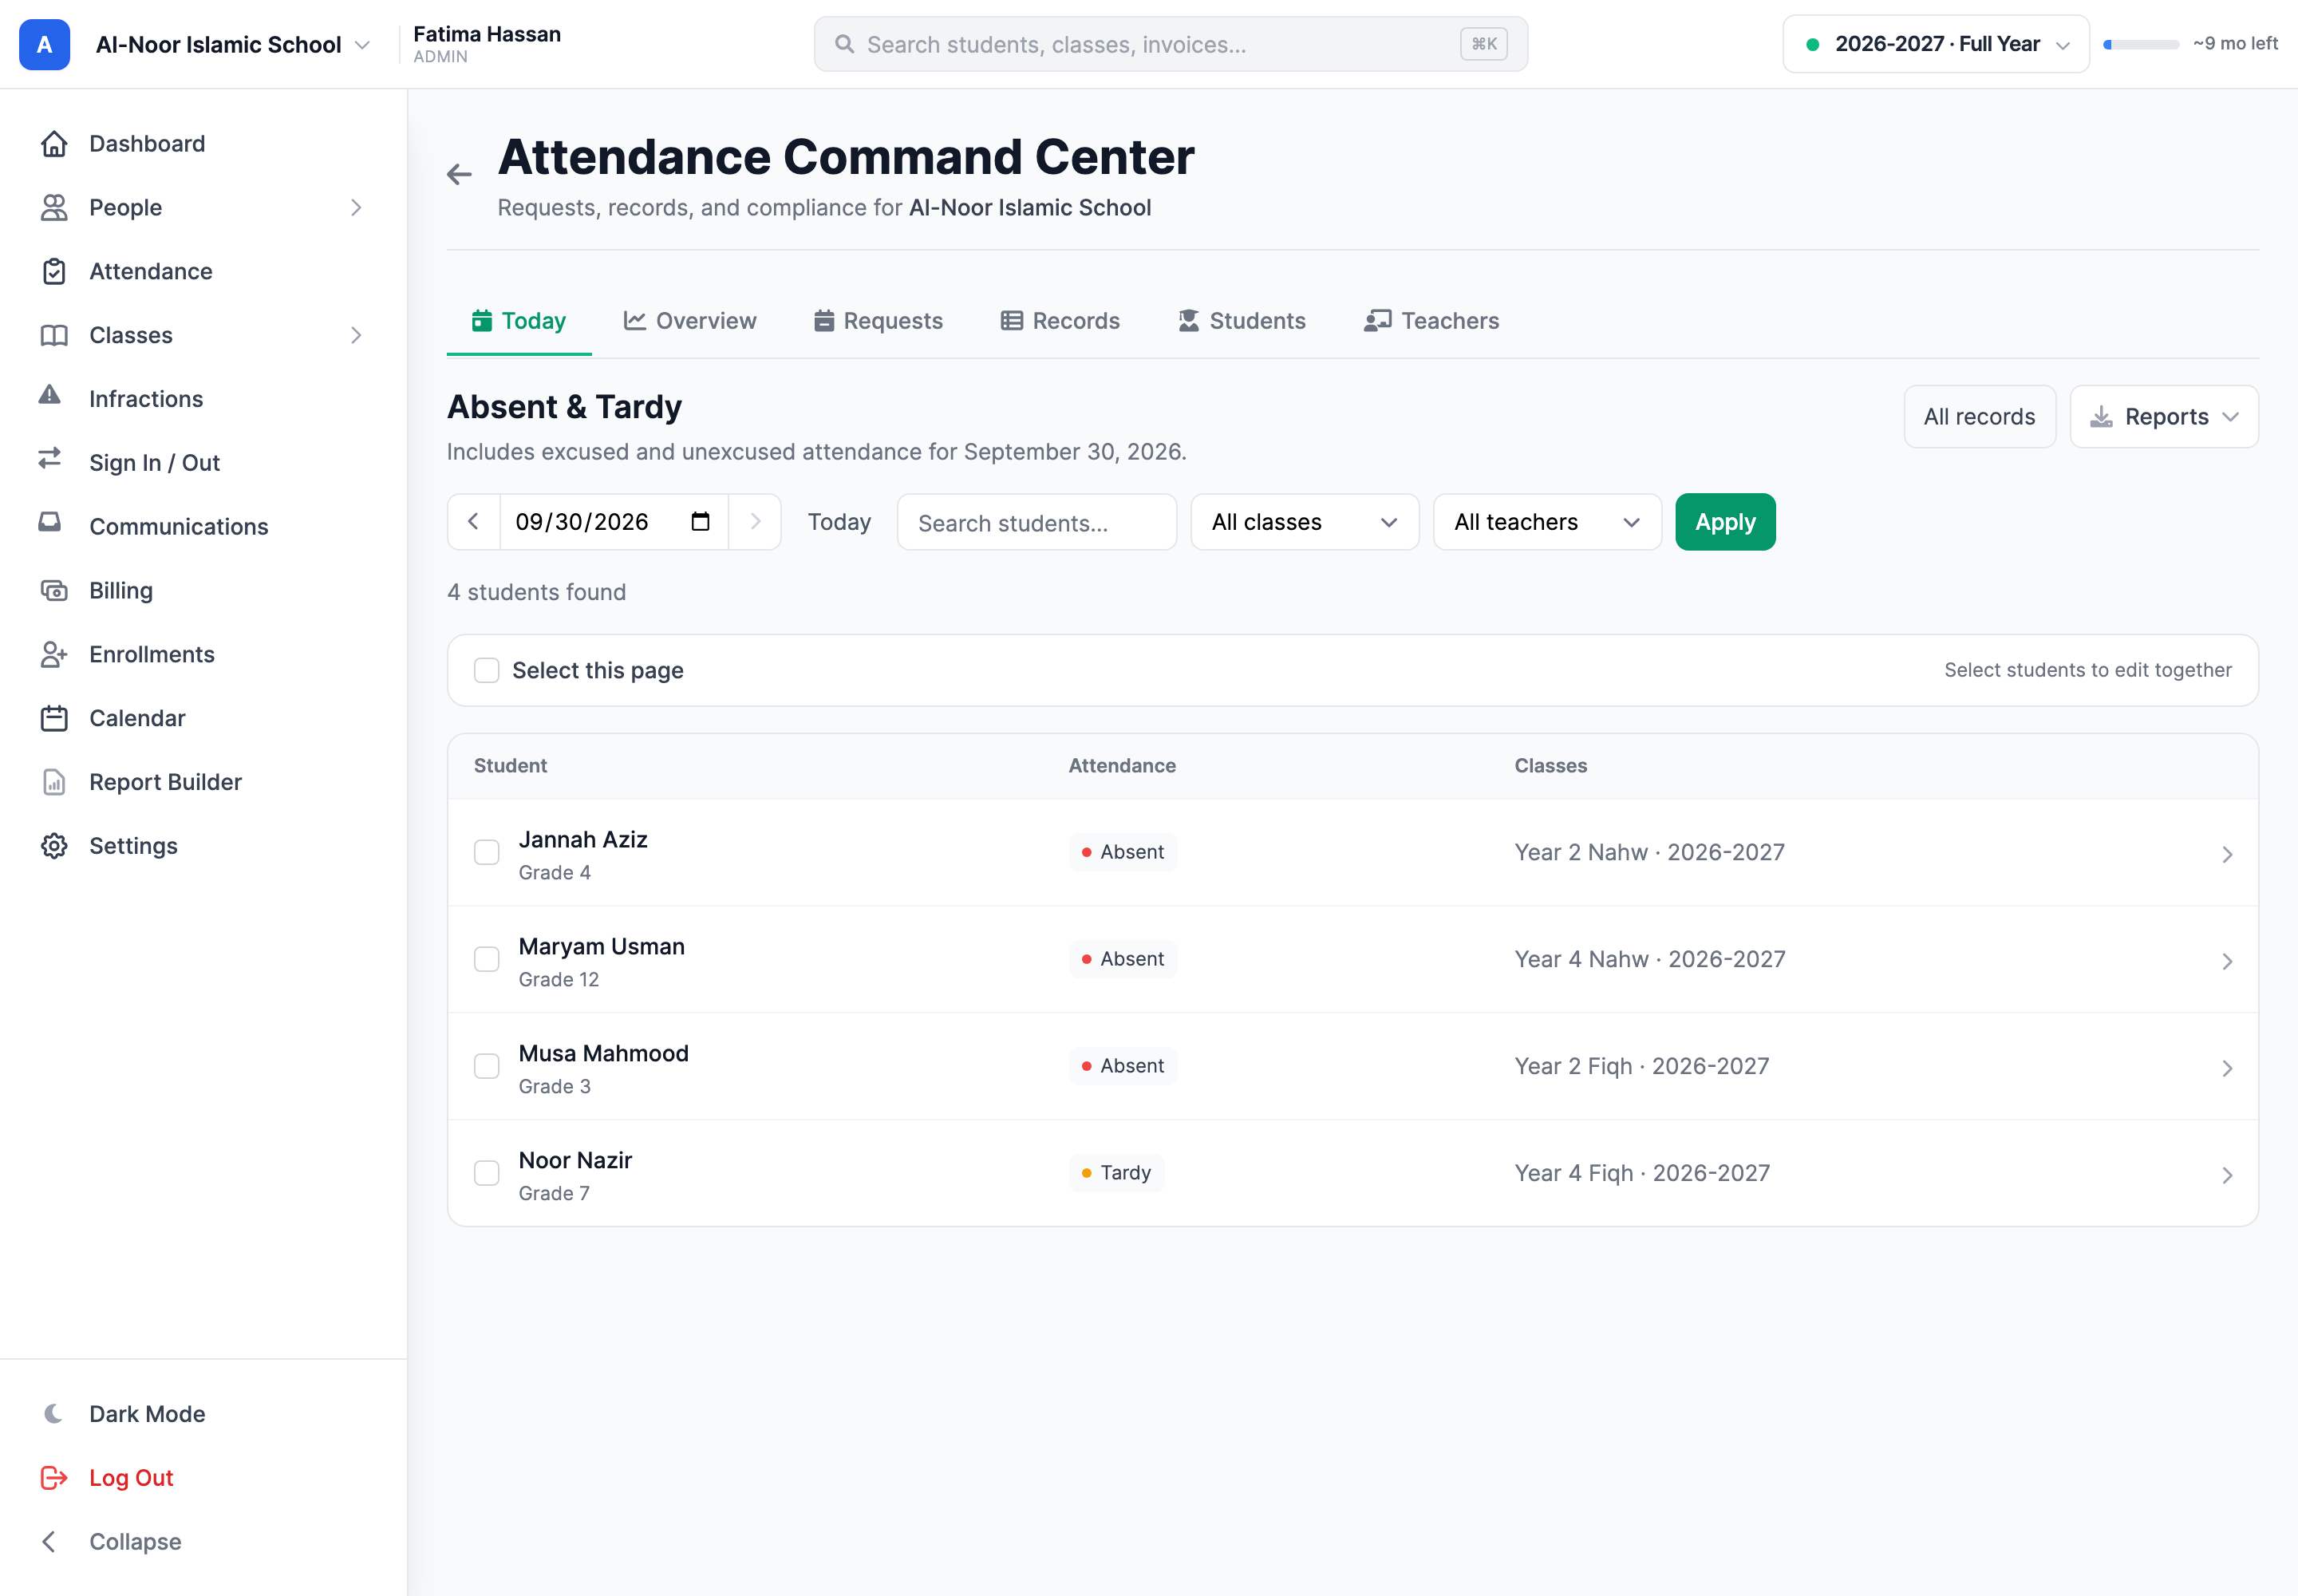
The Command Center opens on Today. Use the date controls to review another day’s absent and tardy students, including excused marks, and search or filter by student, class or teacher. Expand a student's row to inspect their marks. All records opens the broader searchable register; the report menu offers the available school reports for that day.
The Overview tab
The Overview panels follow the Year/Term filters:
- Weekly attendance trend — unexcused absences and tardies over the last 12 weeks.
- Most absences — students with the highest absence counts in the selected period.
- Status breakdown — a donut of every recorded mark: Present, Absent, Tardy, Excused absence, Excused tardy.
- Attendance rate by level — one bar per level (year group), lowest first and capped at eight bars, so the group that needs attention is at the top.
- Pending requests — the five longest-waiting pending requests (not the newest), each with inline Approve and Reject buttons, plus a View all link into the Requests tab.
- Recent activity — the last ten attendance actions and who took them. It reads "No activity yet" until staff start marking.
The Requests tab — review absence requests
This is the queue. Parents and students submit absence requests from their own accounts; every one of them lands here.
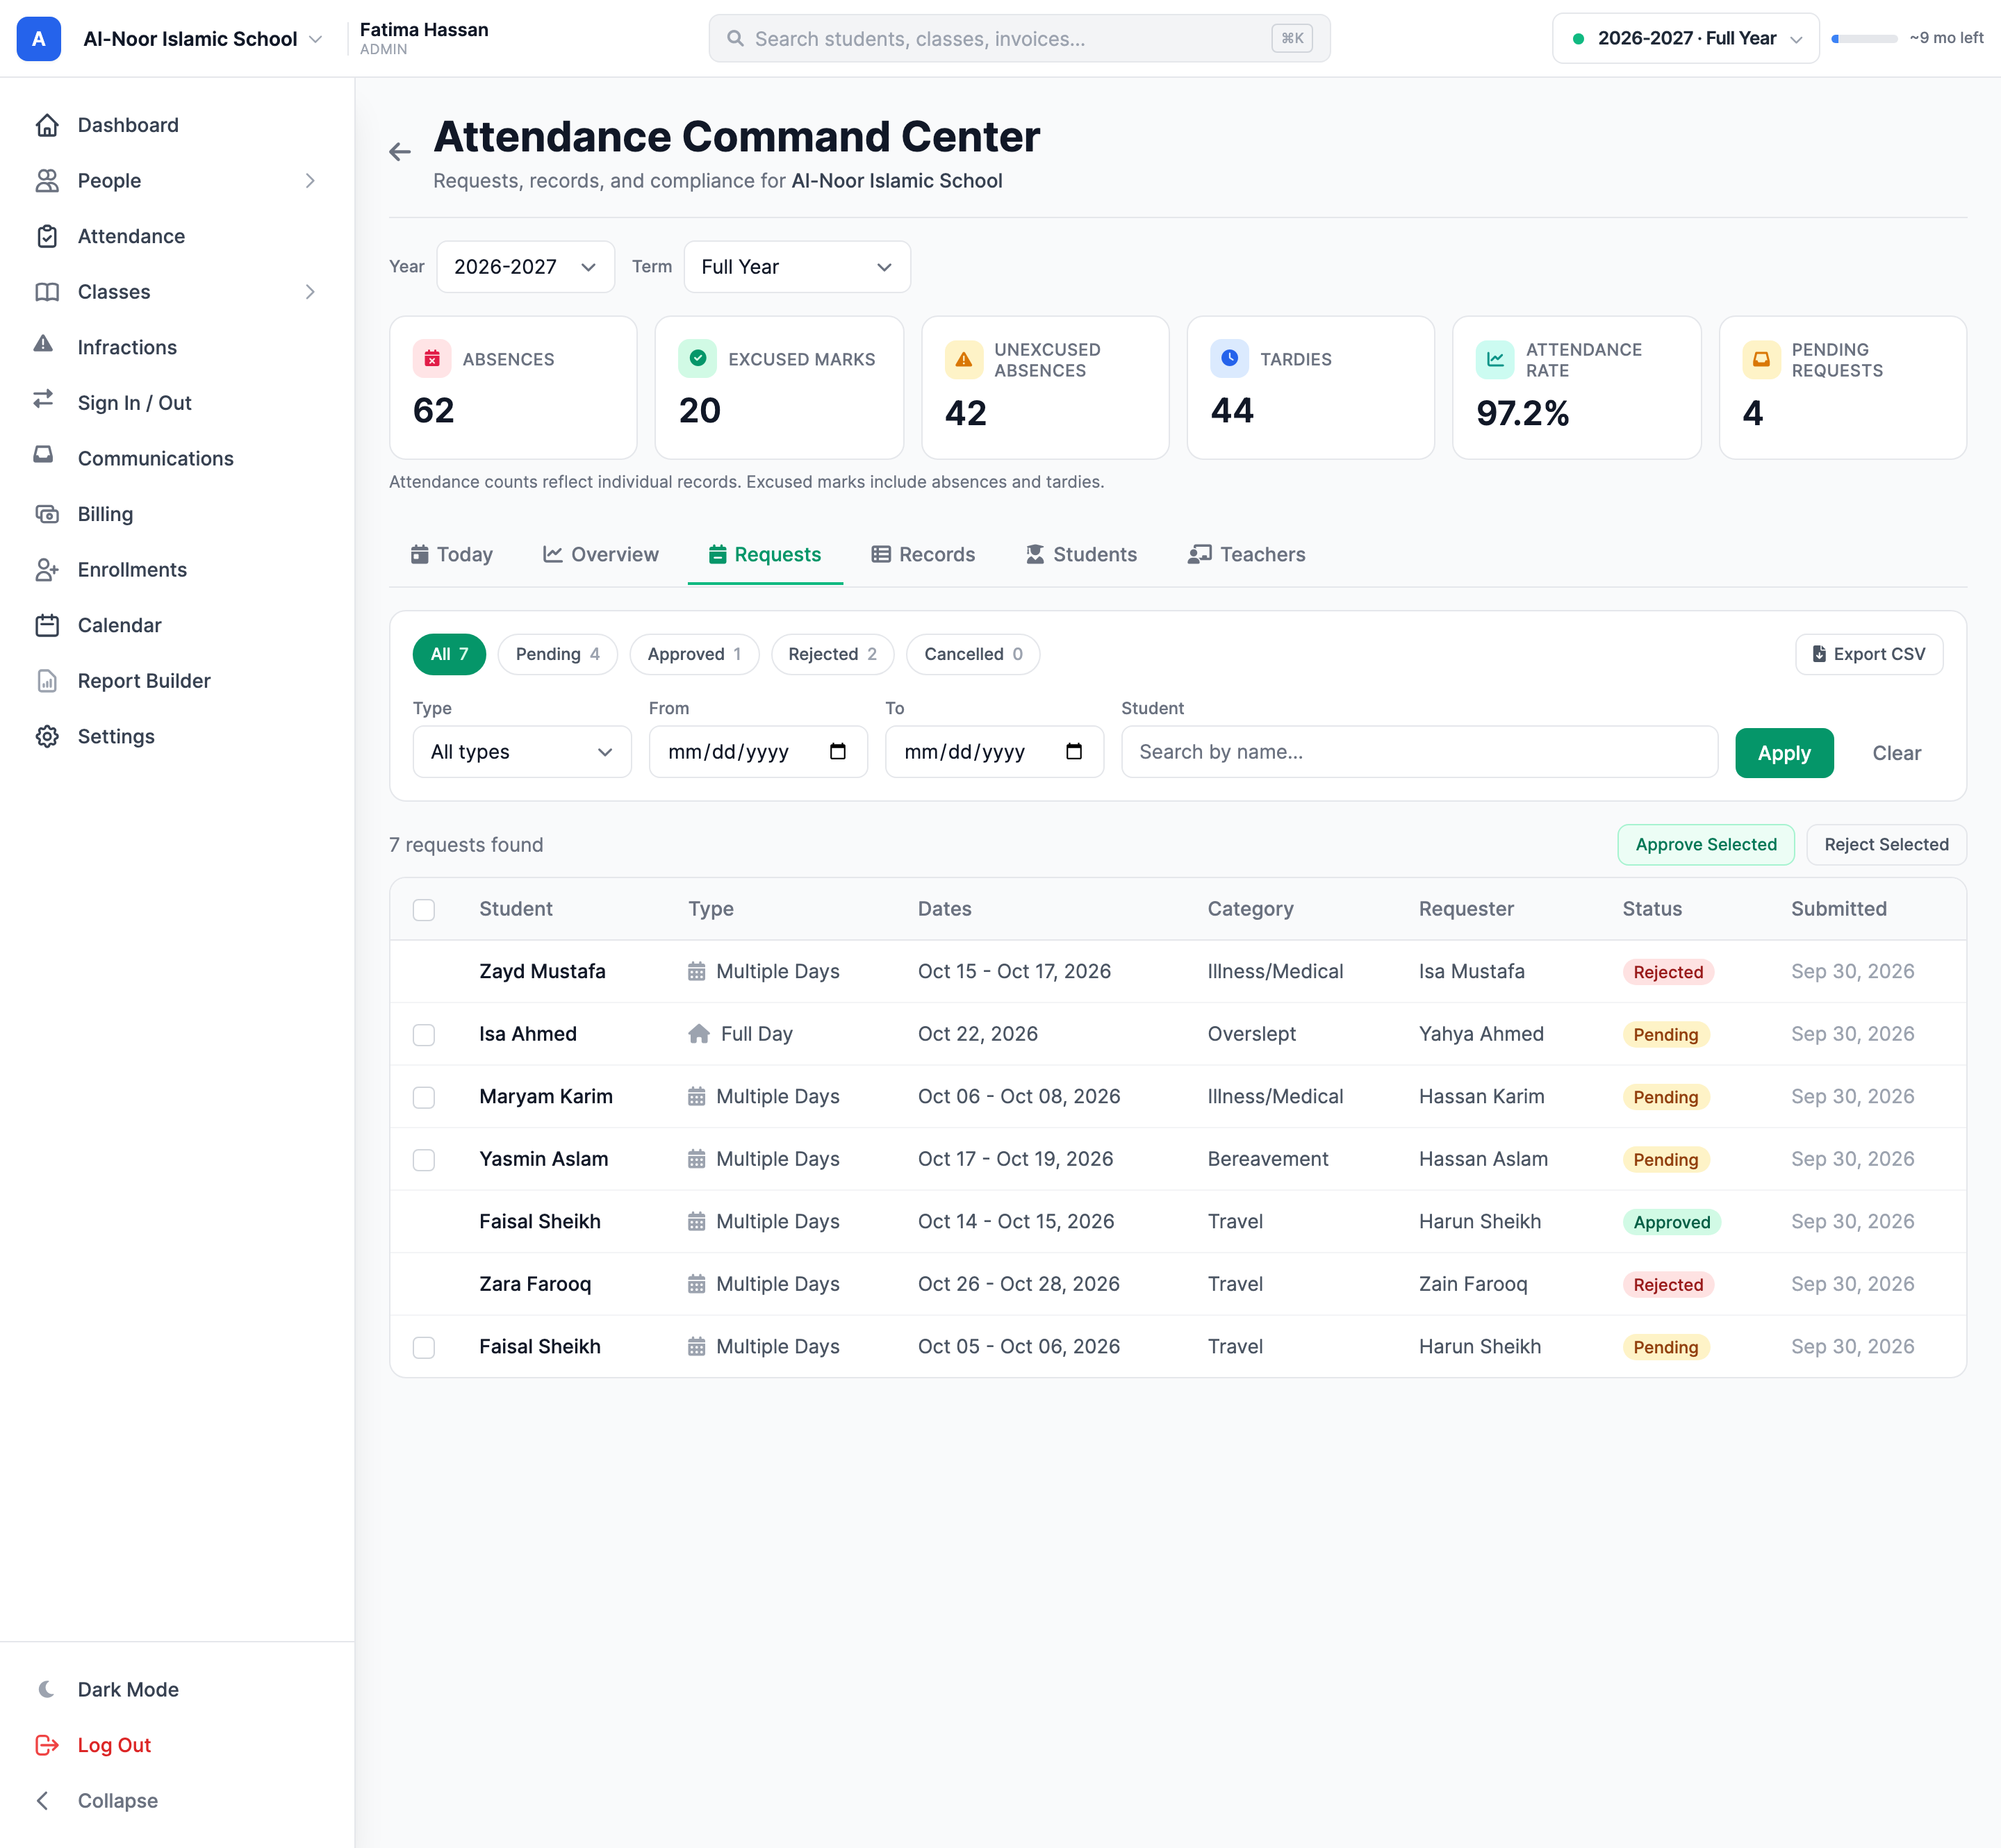
- Click a status pill — All, Pending, Approved, Rejected, Cancelled — to narrow the queue. The number on each pill is the live count.
- Narrow further with Type (Full Day, Multiple Days, Late Arrival, Early Departure), a From/To date range, and a Student name search, then click Apply. Clear resets them all.
- Click anywhere on a request to open the review drawer (next section), or tick the checkboxes and use Approve Selected / Reject Selected to decide several at once.
- Export CSV downloads the currently filtered queue.
The queue is newest-submitted first and pages at 25 rows; a Previous/Next pager appears under the table once there's more than one page.
Only pending rows can be bulk-decided
A request that has already been approved, rejected, or cancelled gets no checkbox at all — so "Select all" and the bulk buttons can never re-decide a settled request by accident.
Review one request in the drawer
Clicking a student's name slides a drawer in from the right with everything you need to make the call, without leaving the queue.
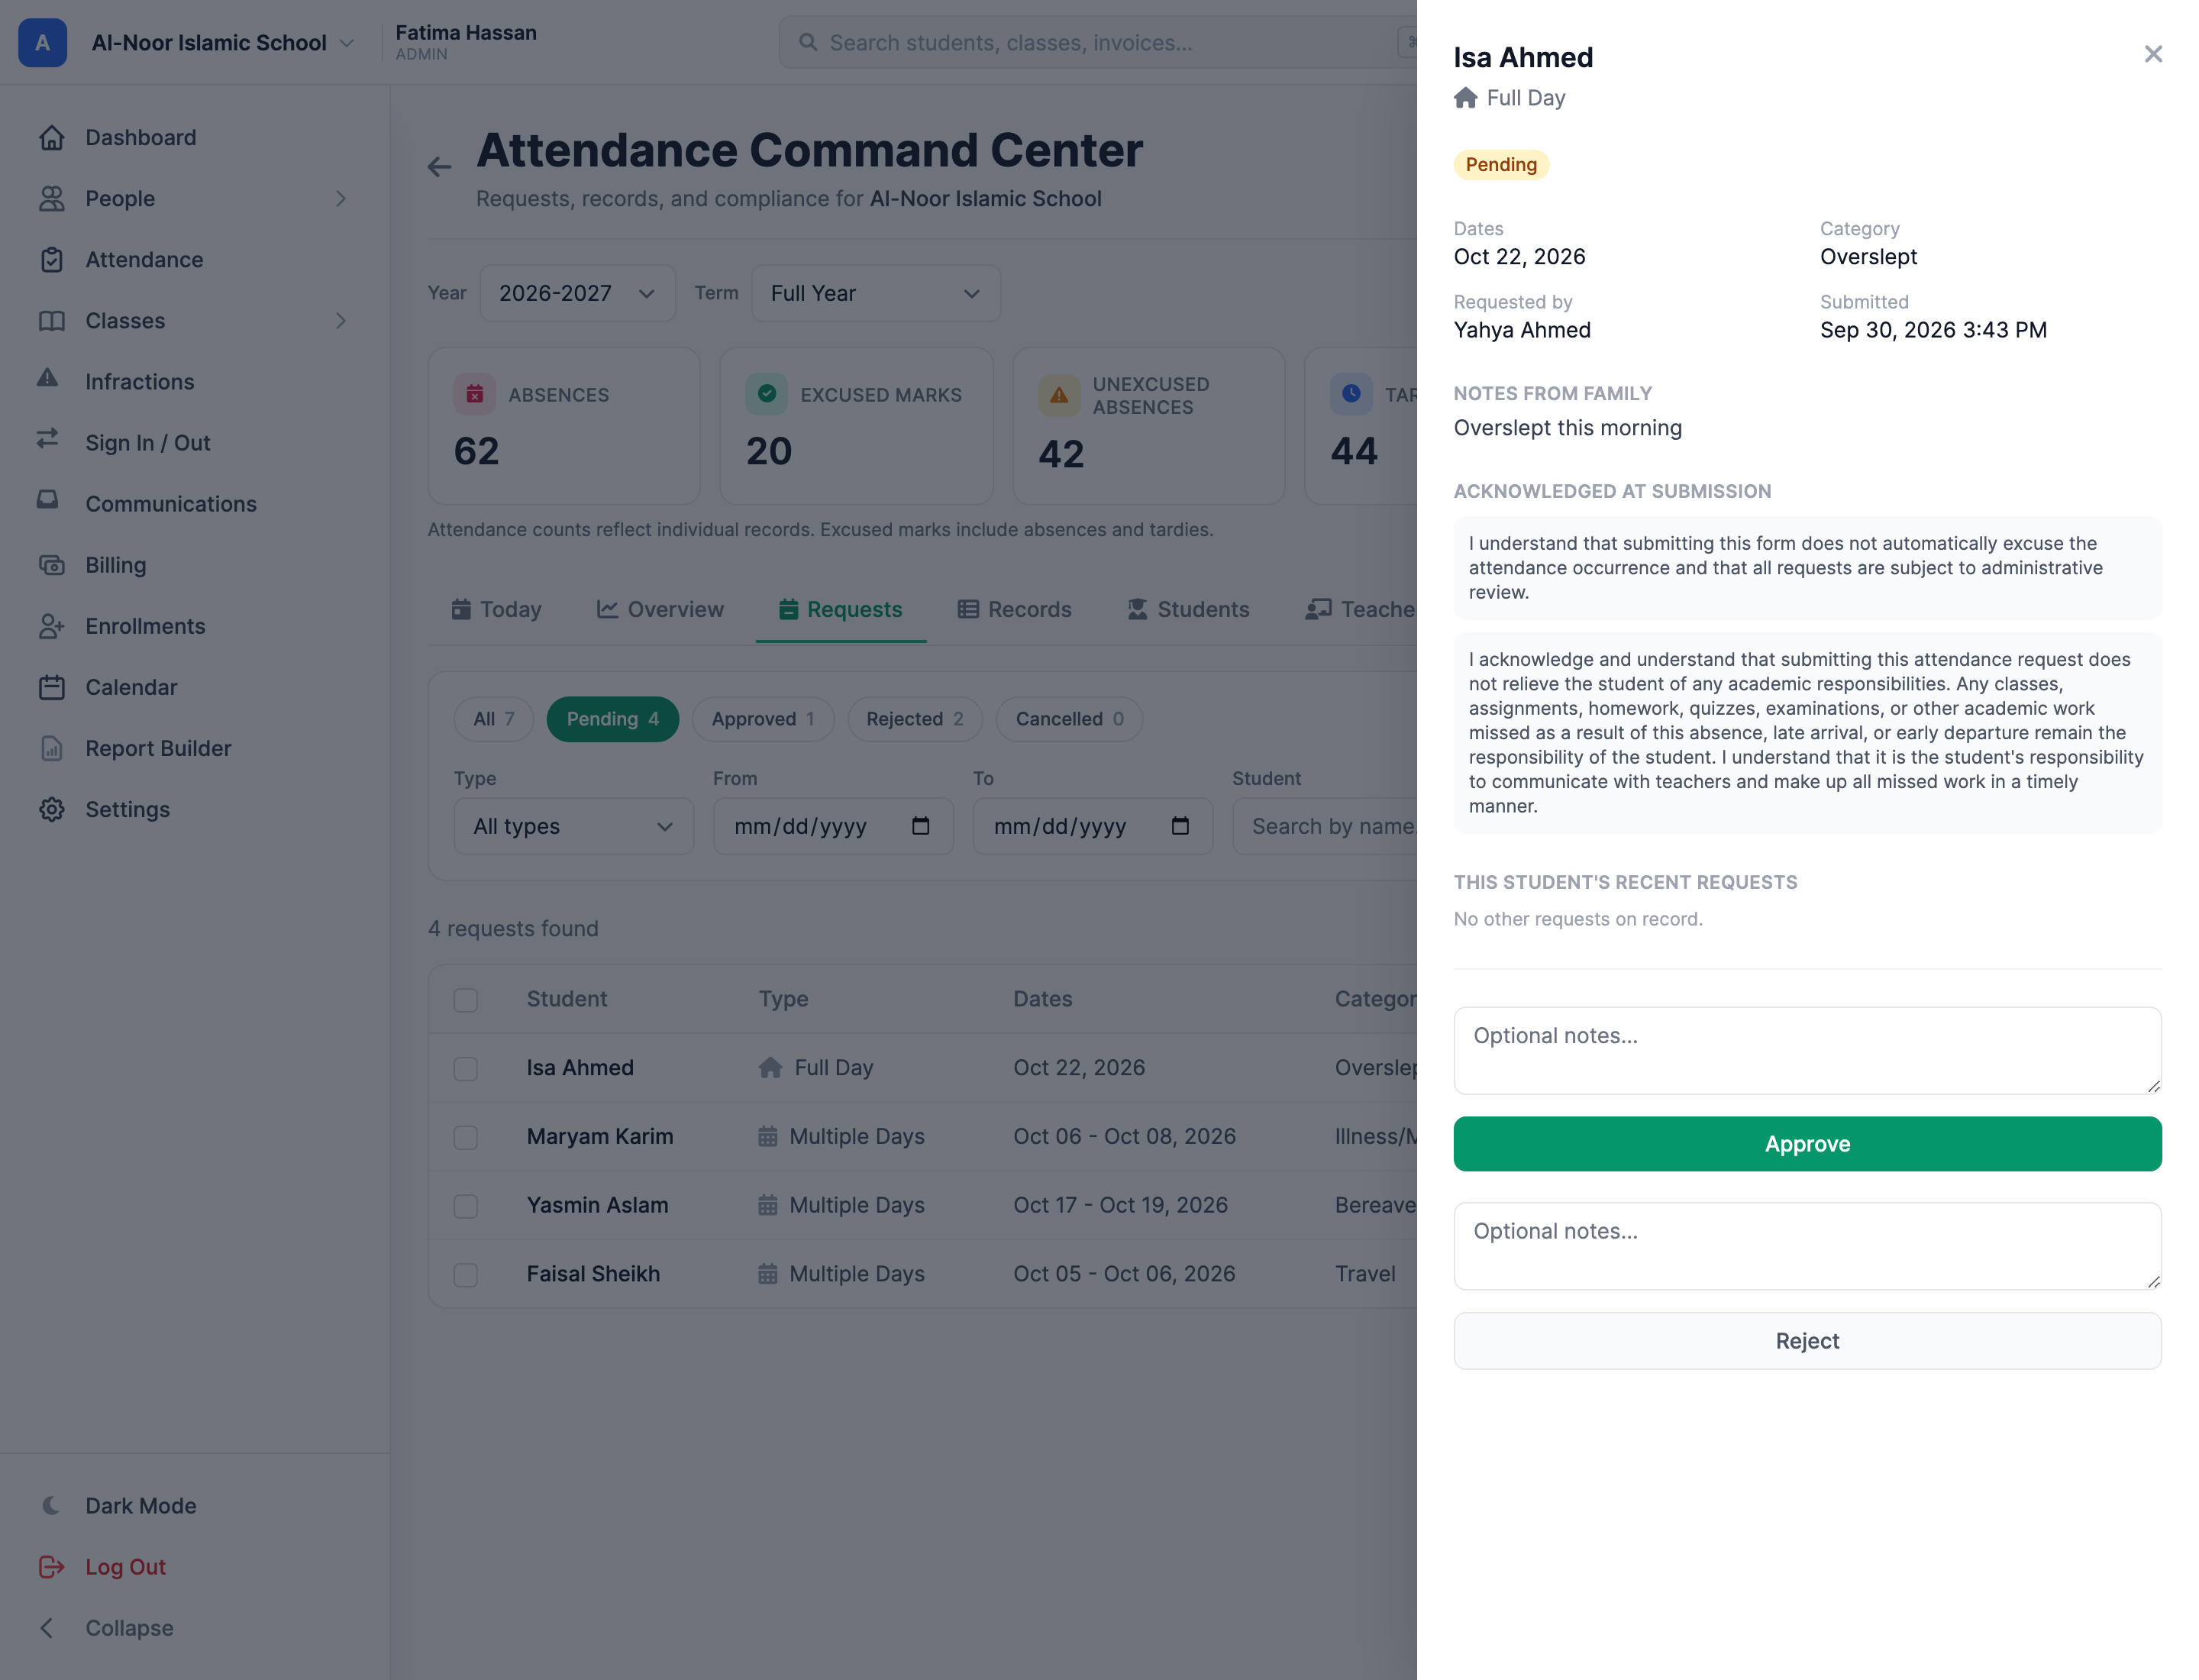
The drawer shows, top to bottom:
- The student and the request type, with the current status pill — and, if it's already been decided, who reviewed it and when.
- Dates, Category (the reason bucket the family picked), Requested by (a parent's name, or "(self)" when the student submitted it), and Submitted.
- Notes from family — their free-text reason, if they wrote one — and Admin notes if a decision note was left.
- Acknowledged at submission — the exact wording of the two statements the family ticked when they submitted. This is a snapshot: if you later reword the acknowledgments in settings, old requests keep showing what was actually agreed to.
- This student's recent requests — quick context for a pattern of absences.
- Approve and Reject, each with an optional notes box. Rejecting asks for confirmation first.
Full-day and multi-day approvals mark applicable meetings in this school Excused Absence. Late Arrival can produce Excused Tardy; Early Departure links an existing mark without changing its status. See absence requests for the exact rules. Rejection leaves attendance untouched; families can see the decision and receive its notification.
"Dates fall outside the current academic year"
If a pending request's dates don't sit inside any academic year for the school, the drawer shows an amber heads-up before you decide. Read the warning and the approval result carefully: a request outside the configured year or class meetings may produce no attendance marks. Check the school’s academic year and meeting dates before expecting excused marks on a grid.
Review today's absences and tardies together
Open the Today tab. The list includes absences and tardies whether excused or unexcused, using today's date in your organization's time zone. Use the date picker or arrows to review another day, and narrow the list by student name, class, or teacher.
Click Edit beside a student to change their attendance in the drawer. For a student who arrives late, the Student arrived? shortcut selects Tardy, or Excused Tardy when the absence was excused. Add an optional reason, then click Save changes. The list and totals update; a student changed to Present leaves this list. The Marked by / when column shows the latest marker and recorded marking time. Existing attendance locks still apply, and the drawer keeps the history of changes. If another person has changed the record, close and reopen the drawer before saving.
To edit several records, select their checkboxes or Select this page. Choose Students arrived to turn absences into tardies while preserving excused status, or choose a specific attendance status. Add an optional reason and click Apply to selected records. Selection is limited to the current page and clears when you change filters or pages. The result names updated, unchanged, and skipped records. Locked records cannot be selected; records changed by someone else are skipped until you refresh. If a save or its notifications could not be confirmed, the result names that record under Needs review: refresh and inspect it before retrying. The PDF is a compact daily sheet with totals, repeated column headings, and page numbers; long notes may be shortened for print.
Student counts are distinct people; record counts include each class mark. An edit changes only the record shown. CSV, Excel, and PDF export all matching records across pages, including the school and selected date. Unmarked attendance is not treated as an absence.
The Records tab — search every mark
Records is the school's full attendance history as a searchable table, plus the exports. Use it to answer "how many unexcused absences did Year 3 have in March?" without opening a single class.
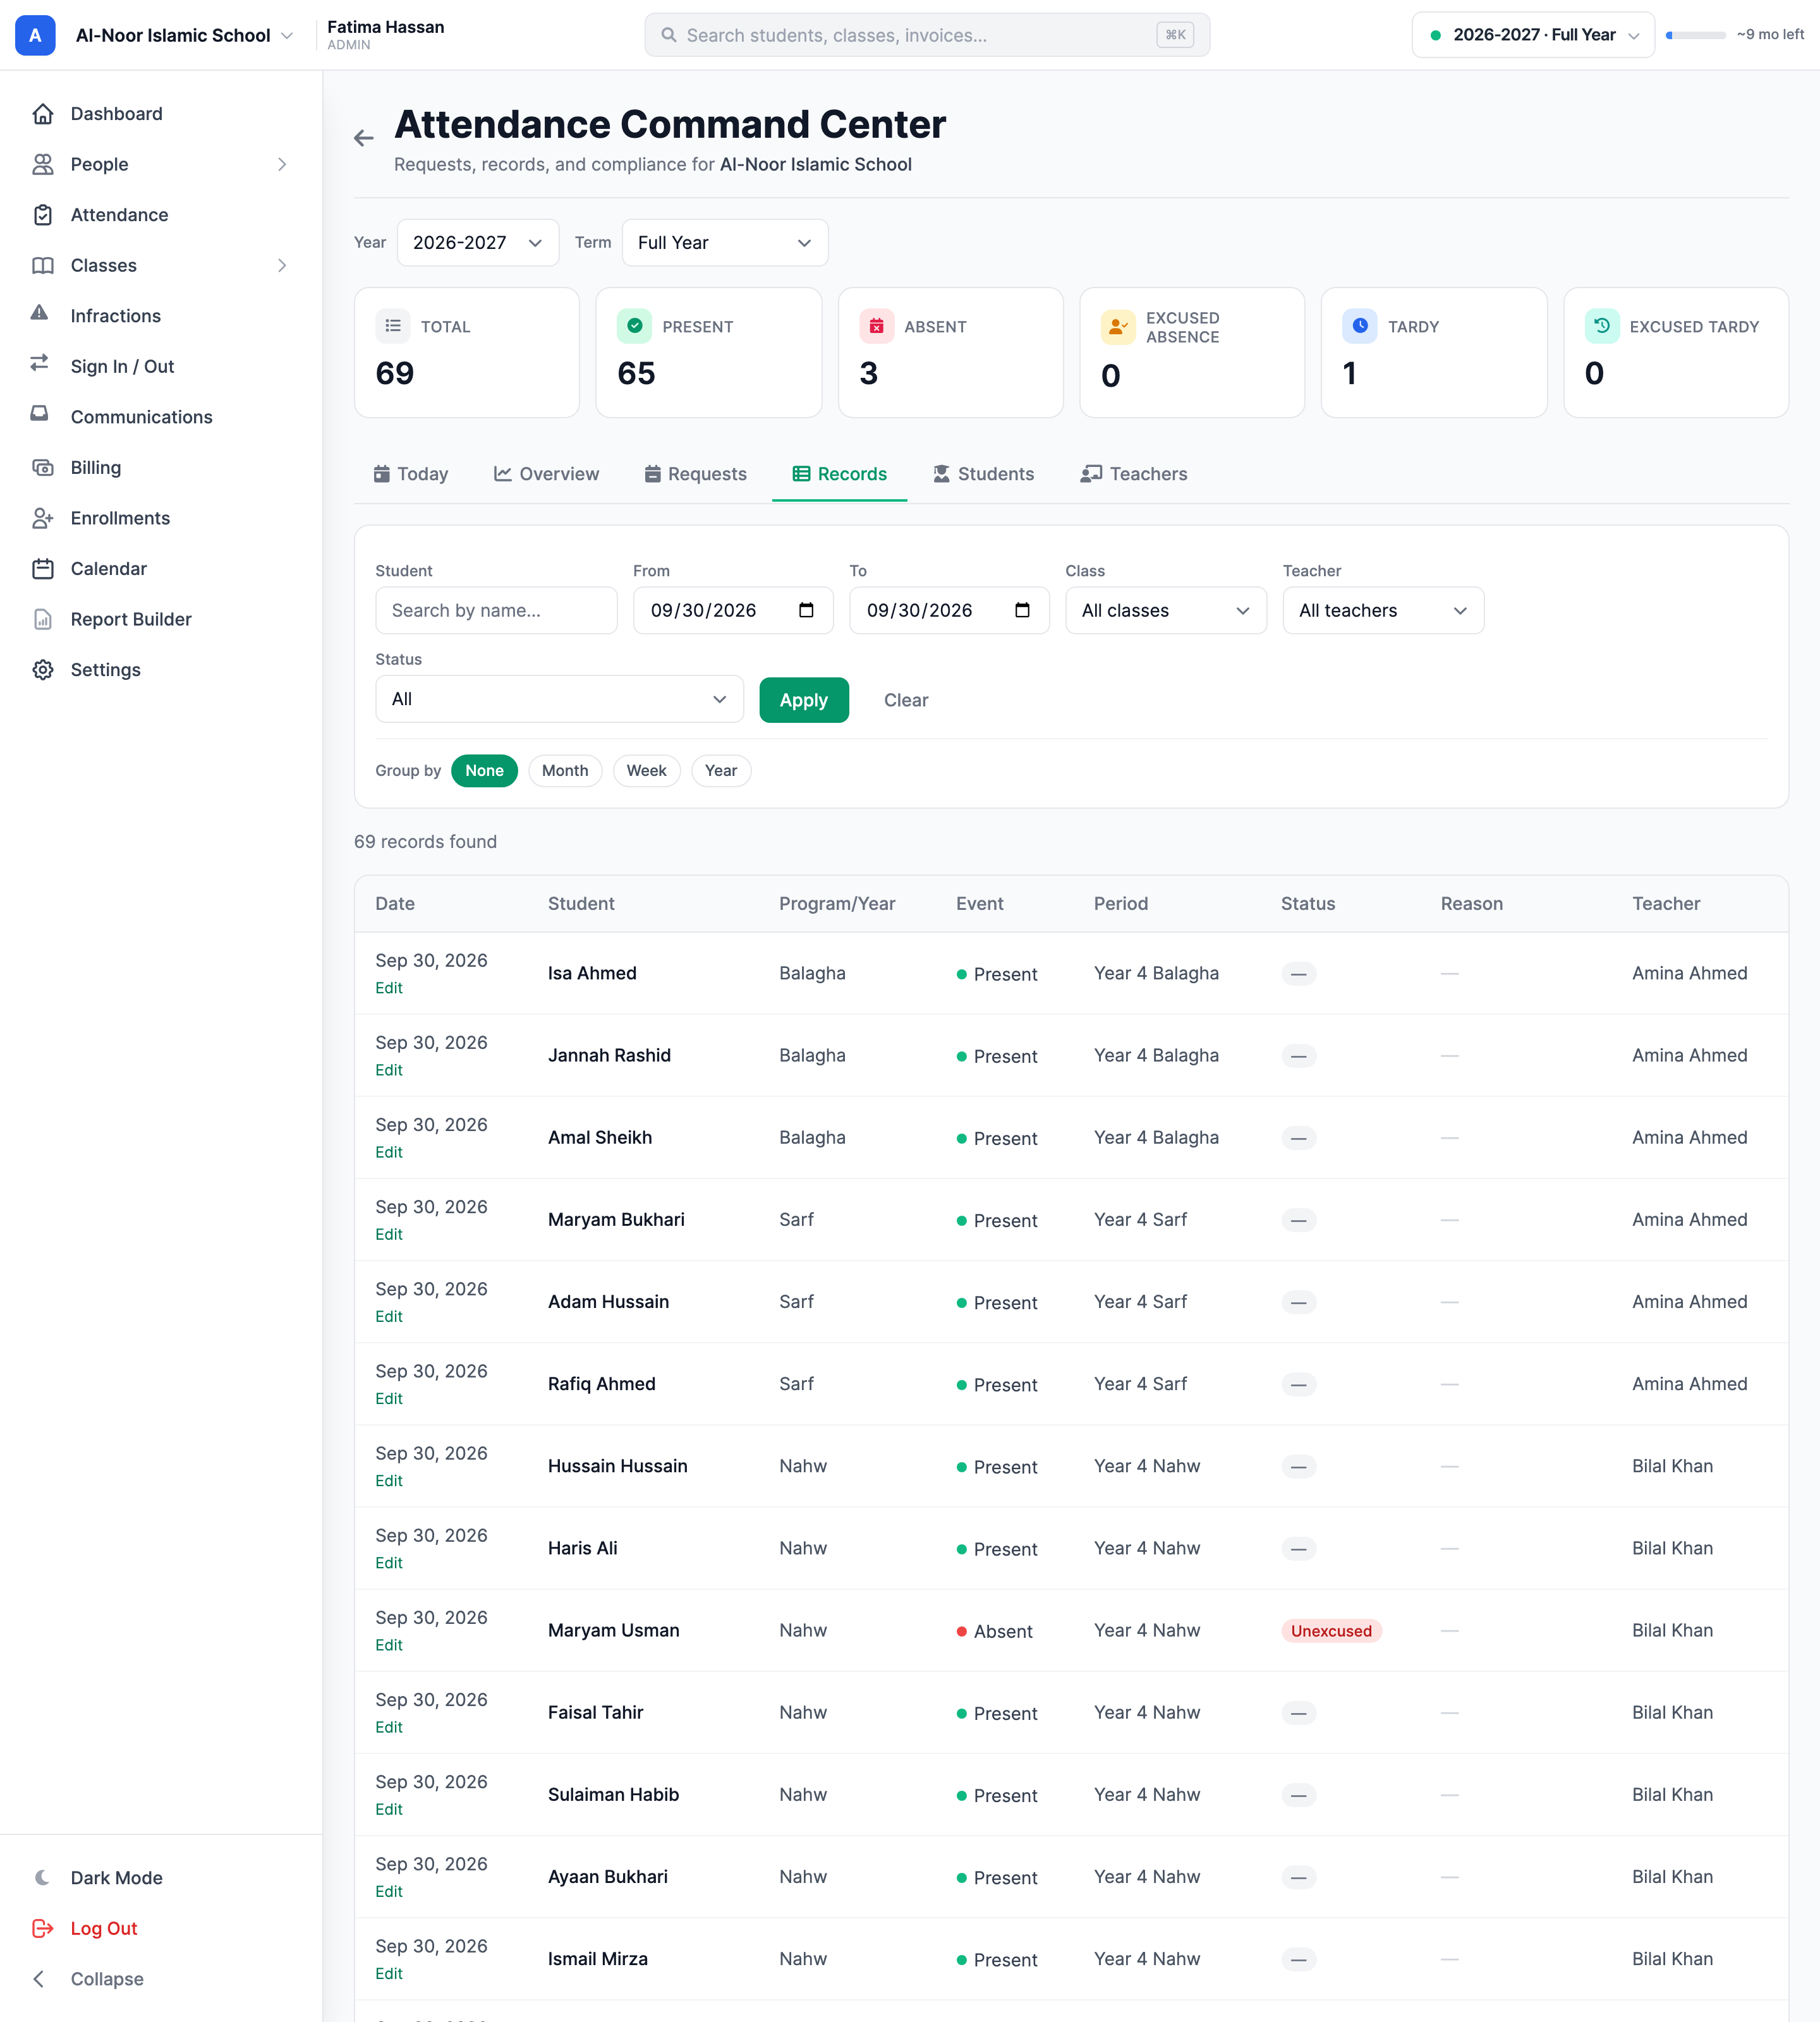
- Set any combination of filters: Student (type a name and pick from the suggestions — it becomes a green chip), From/To dates, Class (grouped by year level), Teacher, and Status.
- Click Apply. The six tiles above the table recount to match, and the table shows the matching rows.
- Optionally click a Group by pill — Month, Week, or Year — to break the table into labelled sections. None turns it back off.
- Export what you're looking at with CSV, XLSX, or PDF. All three honor the current filters.
The Status select is more than the raw statuses: alongside Present, Absent, Tardy, Excused Absence, and Excused Tardy it offers Absent & Tardy — includes excused, All Excused, and All Unexcused.
In the table itself, the Reason column shows the note attached to a mark (hover to read a long one in full), and a small blue Request chip appears on any mark that came from an approved absence request — click it to open that request's drawer. Clicking a student's name jumps to their profile on the Students tab.
Exports cap at 10,000 rows
A CSV, XLSX, or PDF export writes up to 10,000 records — well past a page of the table, but not an entire multi-year school. If your filter matches more than that, narrow the date range and export in chunks.
Open one record's audit timeline
Click the date in any record row — on the Records tab or on a student's profile — and a drawer opens with that single mark's history and attendance editor. You can also click Edit on the row.
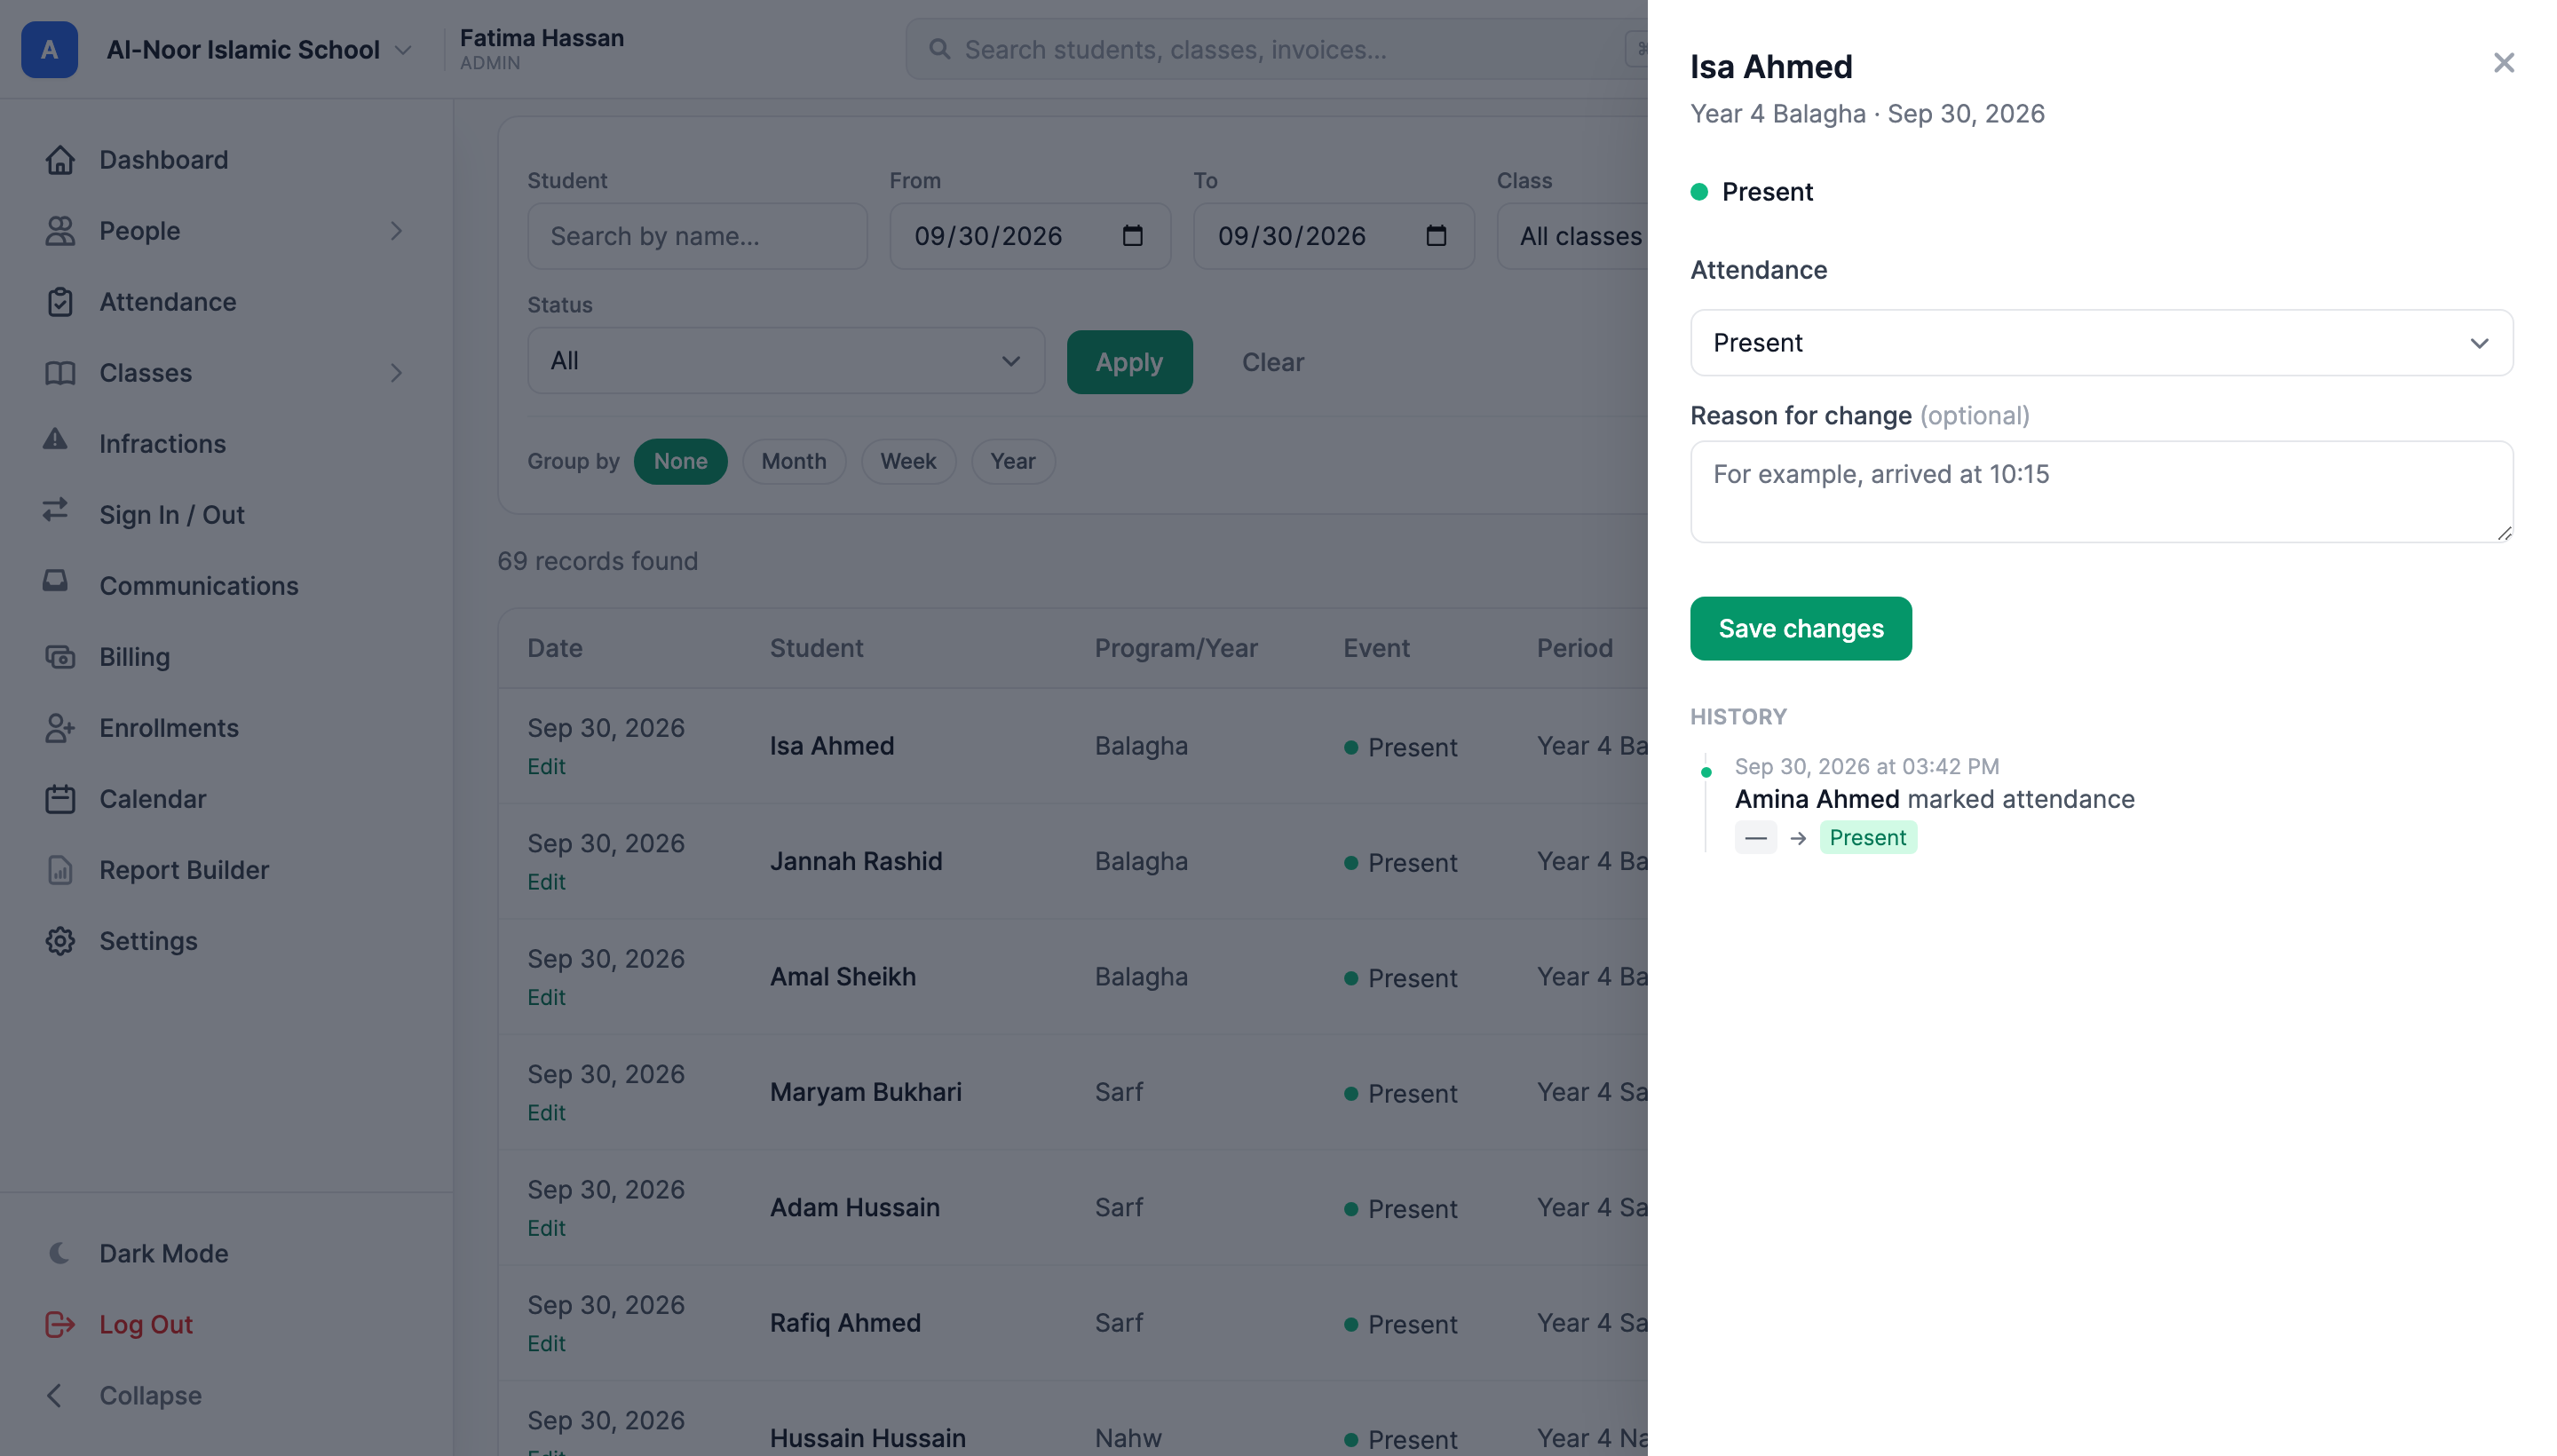
- The current status, with the same colour dot the table uses.
- If the mark came from an absence request, a green linked-request card with its type, dates, category, who reviewed it, and a View request link.
- A History timeline: each entry is a timestamp, the person (or system) responsible, and what changed — status changes render as an old → new chip pair.
This is the answer to "who changed this mark, and when?" — including marks a student self-recorded or a student attendance taker recorded, and any staff correction afterwards. See custom statuses, self-marking, and attendance takers for how those non-staff marks are labelled.
The Students tab — one student's whole picture
Search a student by name (or arrive by clicking a name on the Records tab) and the tab fills with their profile.
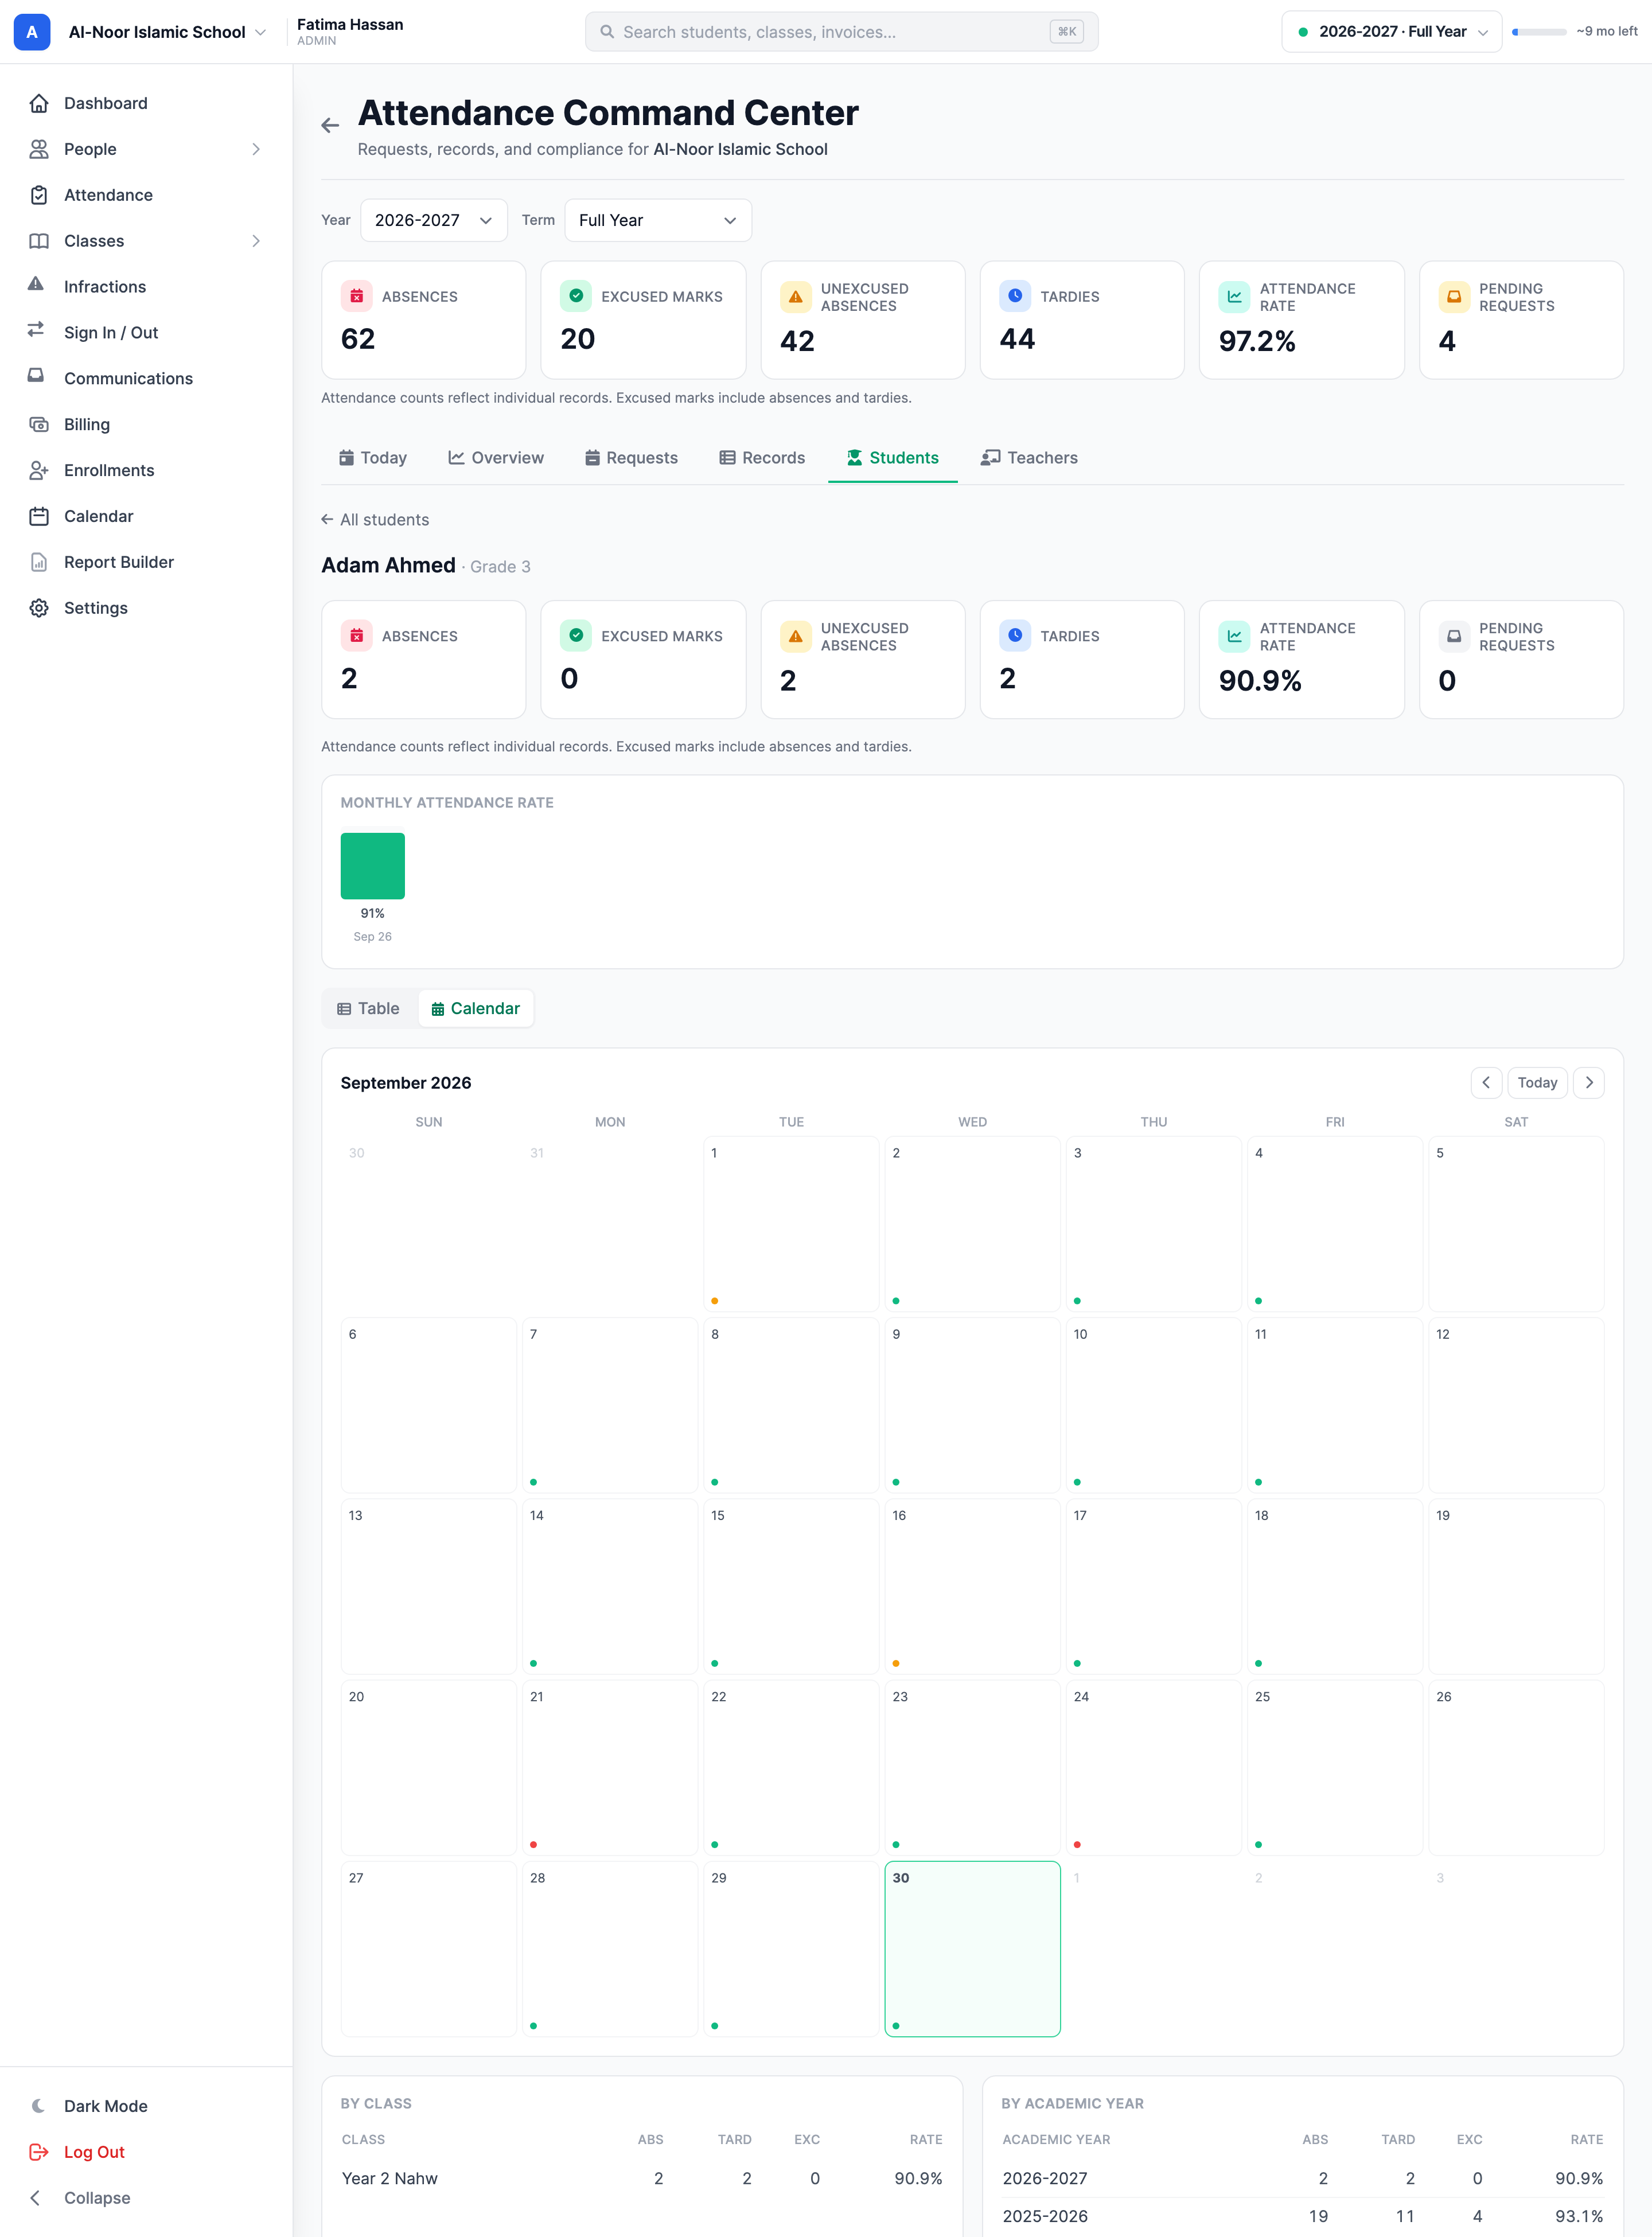
- Stat tiles — the same six KPIs as the school strip, counted for this student alone with the same rules.
- Monthly attendance rate — one bar per month across the year, so a slide shows up immediately.
- Month calendar — coloured dots on each day the student has marks; hover a day to see the status and the class. Use the arrows to step months, or Today to come back.
- Attendance records — the same row format as the Records tab, so the date still opens the audit timeline.
- Absence request history — every request this student was the subject of, with who submitted it, who reviewed it, and when.
The Teachers tab — who actually took attendance
The Teachers tab answers the compliance question: for a given day, which scheduled classes got marked, and by whom.
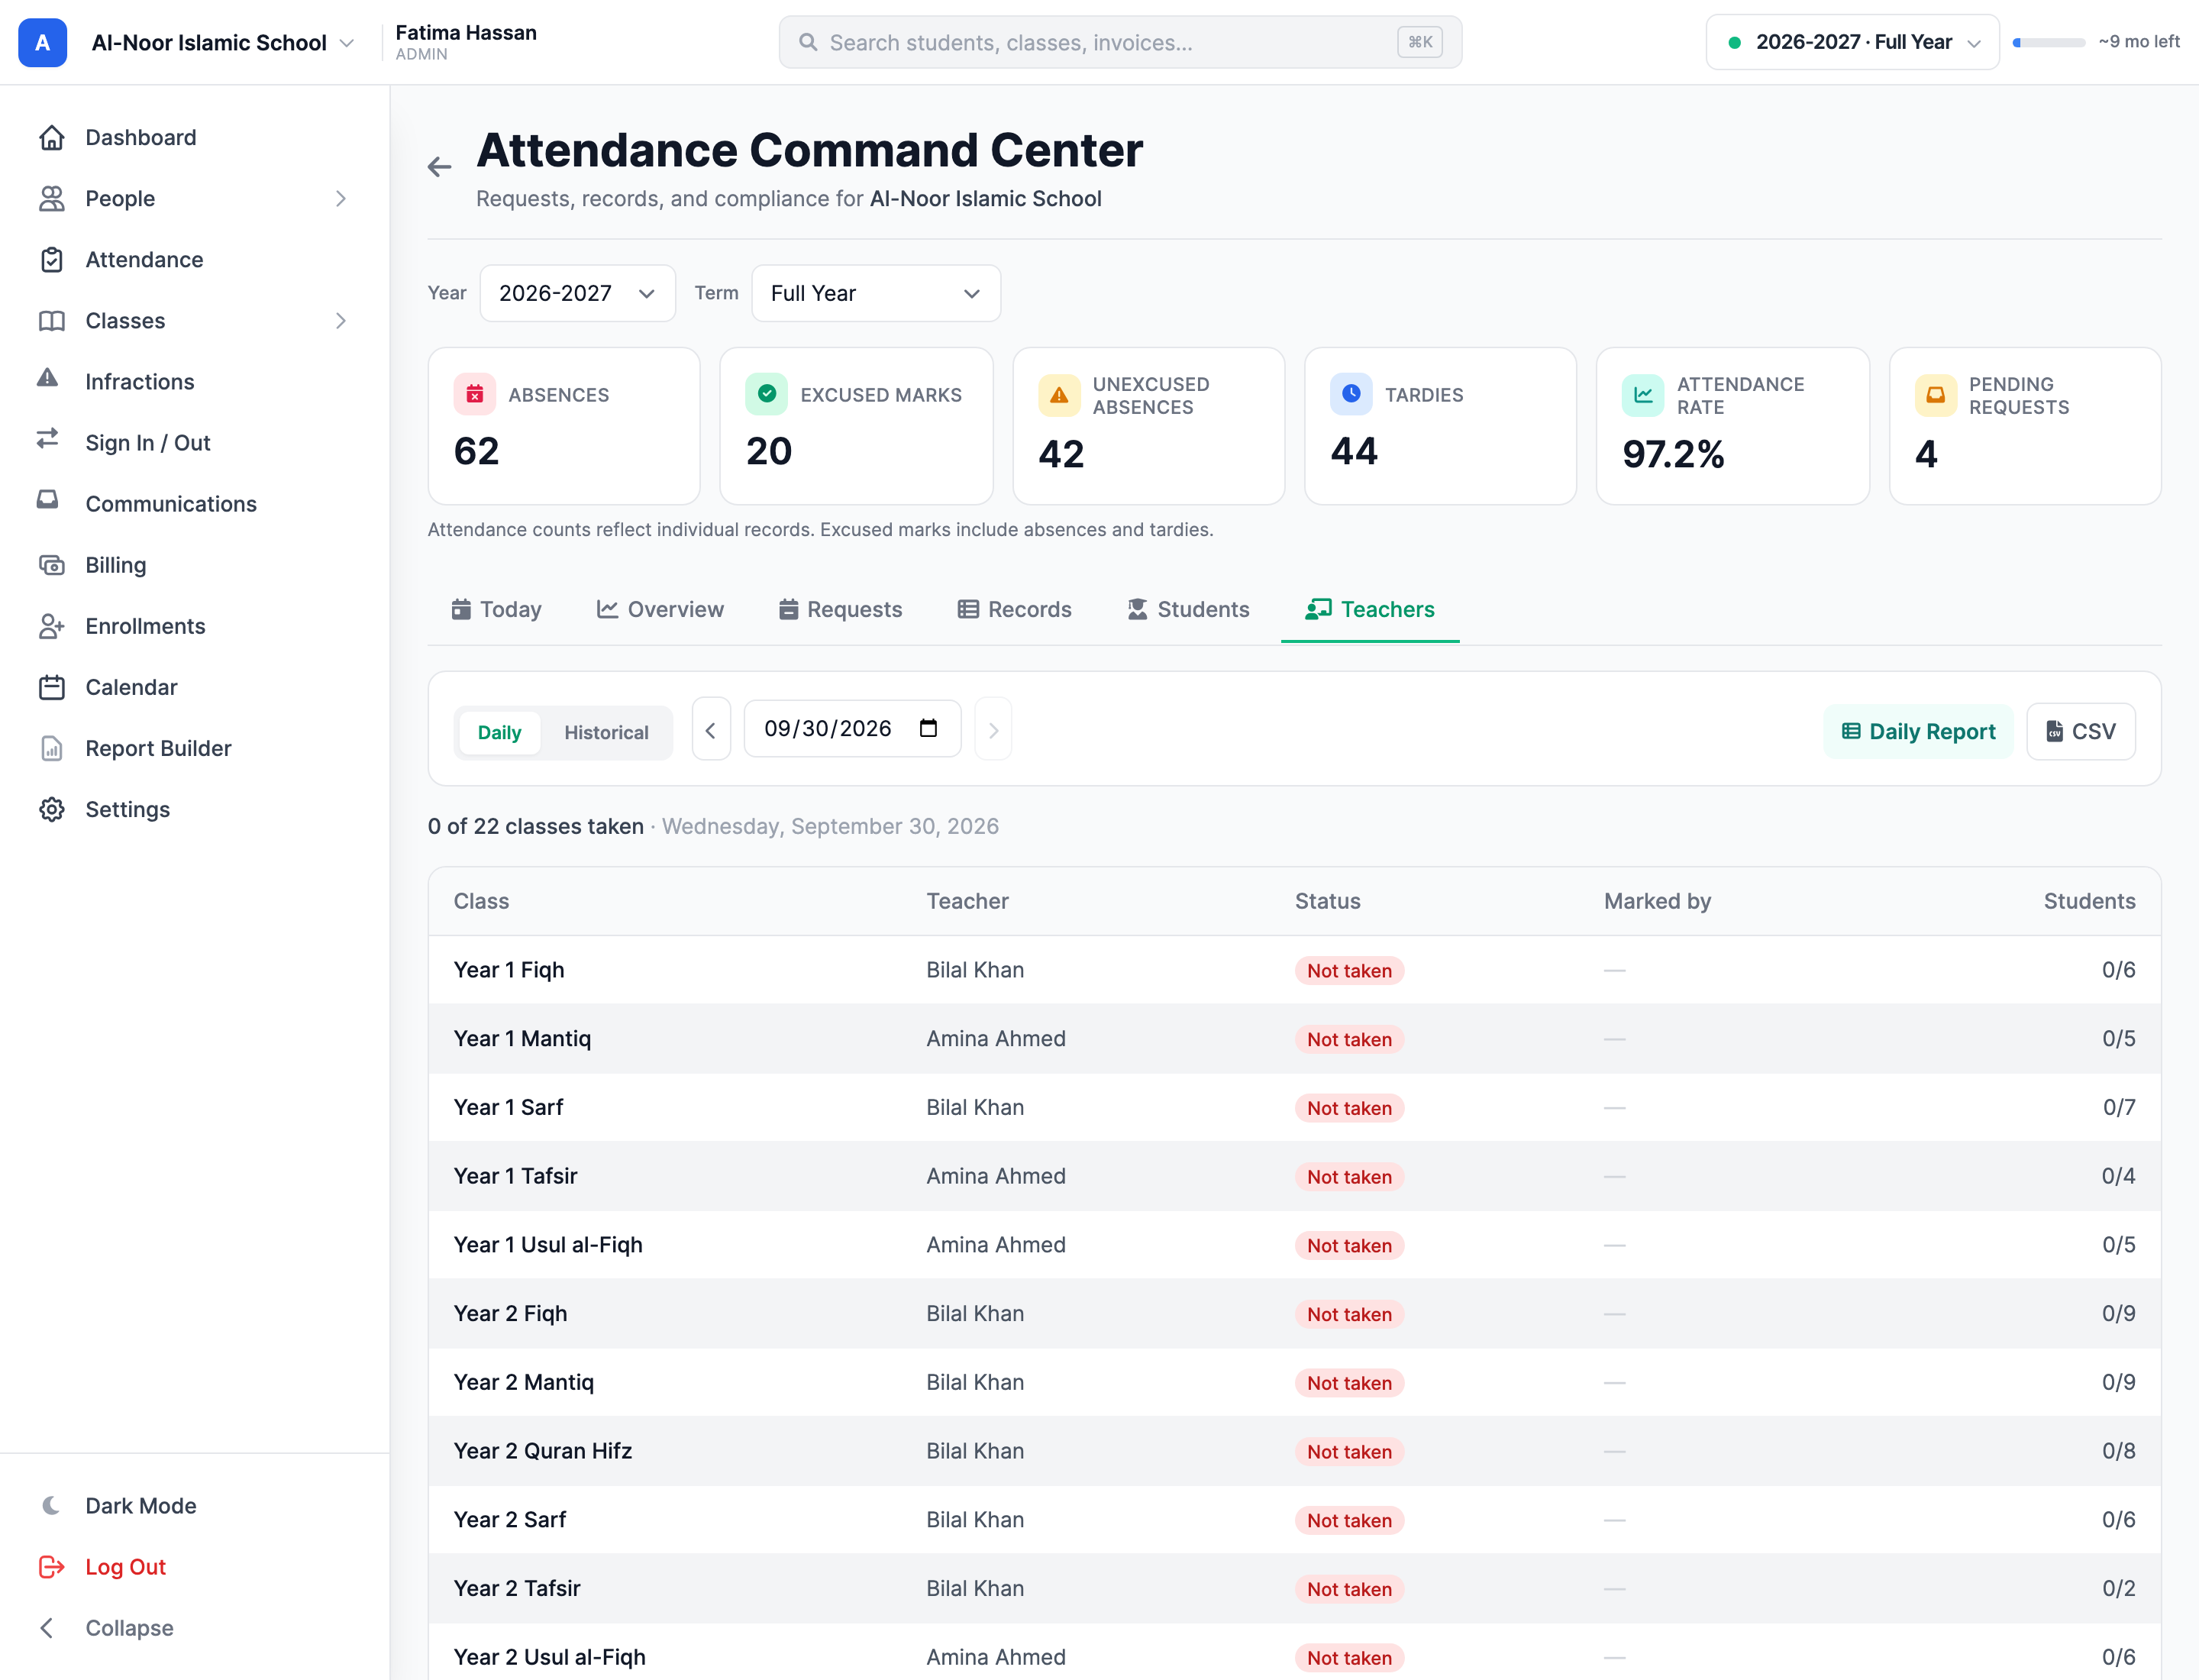
- Stay on Daily and pick a date with the date field or the arrows. You can't go past today.
- Read the summary line — "x of y classes taken" — then scan the table: Class, Teacher, Status, Marked by (name and time), and Students marked out of enrolled.
- Switch to Historical and set a From/To range for a per-teacher rollup instead: expected sessions, taken sessions, a compliance percentage bar, and a small trend sparkline. It opens on the last four weeks.
- CSV exports whichever view you're on.
Three status pills appear in Daily mode:
- Taken — the assigned teacher (or an admin) marked it.
- Taken (delegate) — an appointed student attendance taker marked it.
- Not taken — nobody marked this class on this date.
Compliance percentages are colour-coded the same way as the daily report: green at 90% and above, amber from 75%, red below that.
"Taken" means somebody actually took the class's attendance
Marks written by an approved absence request, and marks students recorded for themselves, do not count as taken — so a class can hold attendance rows for a date and still show Not taken here. That's deliberate: this tab measures staff (or an appointed taker) standing in front of the class and marking it, not whether some row exists.
The whole-school Daily Report lives here now
The teal Daily Report button on this tab is the single-day, all-classes report that used to sit in the attendance grid's Actions menu. It opens for whatever date the tab is showing.
If a tab looks empty
- "No classes were scheduled to meet on …" — the classes exist, but none of them meets on that weekday. Check the class's meeting days, or pick another date.
- "This date hasn't happened yet" — you reached a future date from a bookmark or by typing one. Compliance only exists for days attendance could actually be taken on.
- "No records match these filters" (with a Clear filters button) — the filter set is too tight. That's different from "No attendance recorded yet", which means the window genuinely has no marks.
- Numbers lower than you expect are usually the Year or Term filter, not missing data — widen to Full Year first.
Next up: the day-to-day marking flow in take daily attendance, the family side of the queue in absence requests, or browse the other guides in Attendance.
More in Attendance
Still stuck?
Our team is happy to walk you through it.