Add and manage teachers
A teacher in MarkTrack is a staff member who runs classes — they take attendance, enter grades, build assignments, and (in Hifz programs) log memorization progress. This guide covers every way to add a teacher, how to put them in front of a class, and how to manage their account over time: editing their profile, switching them on or off, and archiving or deleting them when they leave.
There are two ways to add a teacher, and the difference is entirely about who sets the password. Invite by Email sends the teacher a signup link and lets them create their own password. Manual Creation makes the account for them right away with a password MarkTrack generates. Both end with a working teacher account — pick whichever fits how hands-on you want to be.
Teachers belong to schools, not just the organization
MarkTrack can run several schools (programs) under one organization — a weekday school, a Sunday school, a Hifz program. A teacher only appears in, and can only switch into, the schools they've been added to. When you add a teacher you choose which programs they belong to. See Understand multiple schools for the bigger picture.
Step 1 — Open the Teachers page
- In the left sidebar, open People and click Teachers.
- You'll see the staff list for the school you're currently in. At the top right are two buttons: Archived and the blue Add Teacher.
- Use the Search teachers... box to filter the list by name or email.
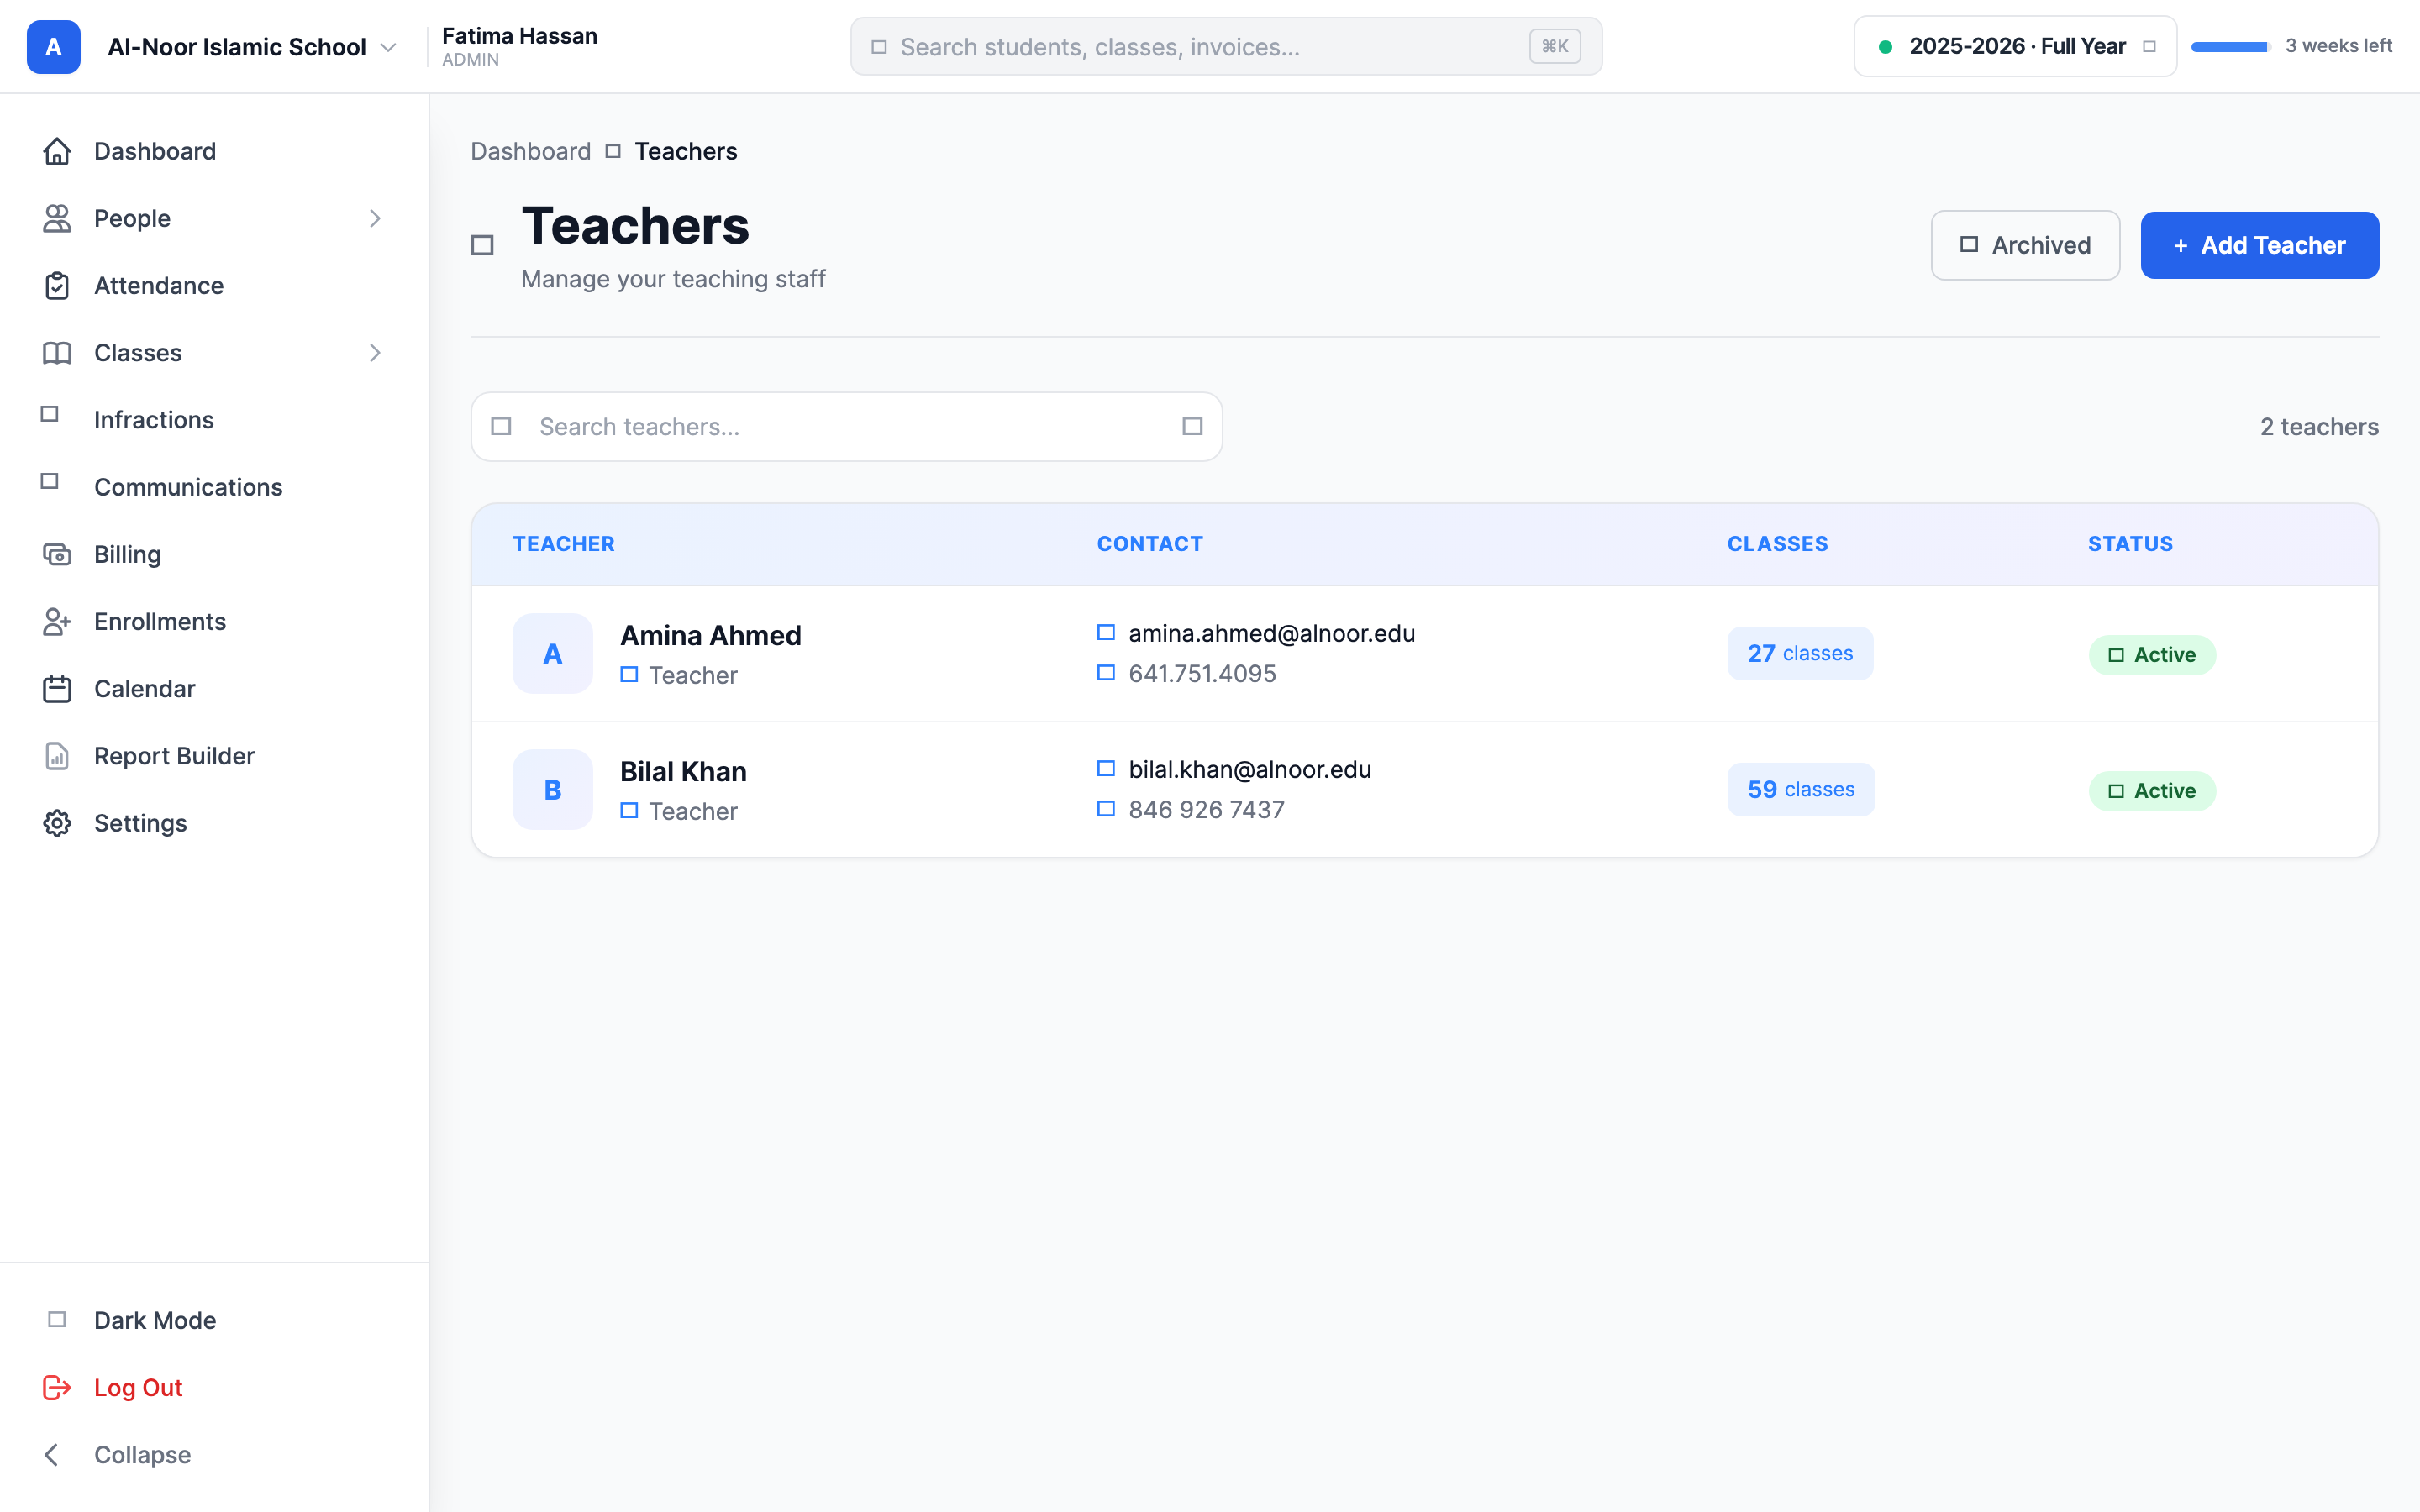
This list is per school
The Teachers page only shows staff who belong to the school you're viewing. The same person can teach in two programs and will appear in both lists. To see staff from a different program, switch schools first using the school switcher.
Step 2 — Add a teacher
- Click Add Teacher. The Add New Teacher window opens.
- At the top, choose How would you like to add this teacher? — pick either Invite by Email or Manual Creation. (Invite is selected by default.)
- Under Assign to Programs, click one or more school pills to choose which programs this teacher belongs to. At least one is required. If you're inside a specific school, that one is pre-selected.
- Fill in the Full Name and Email Address (both required). For an invite you can also add an optional Phone Number and Date of Birth.
- Click the button at the bottom — it reads Send Invitation for an invite, or Create Teacher for manual creation.
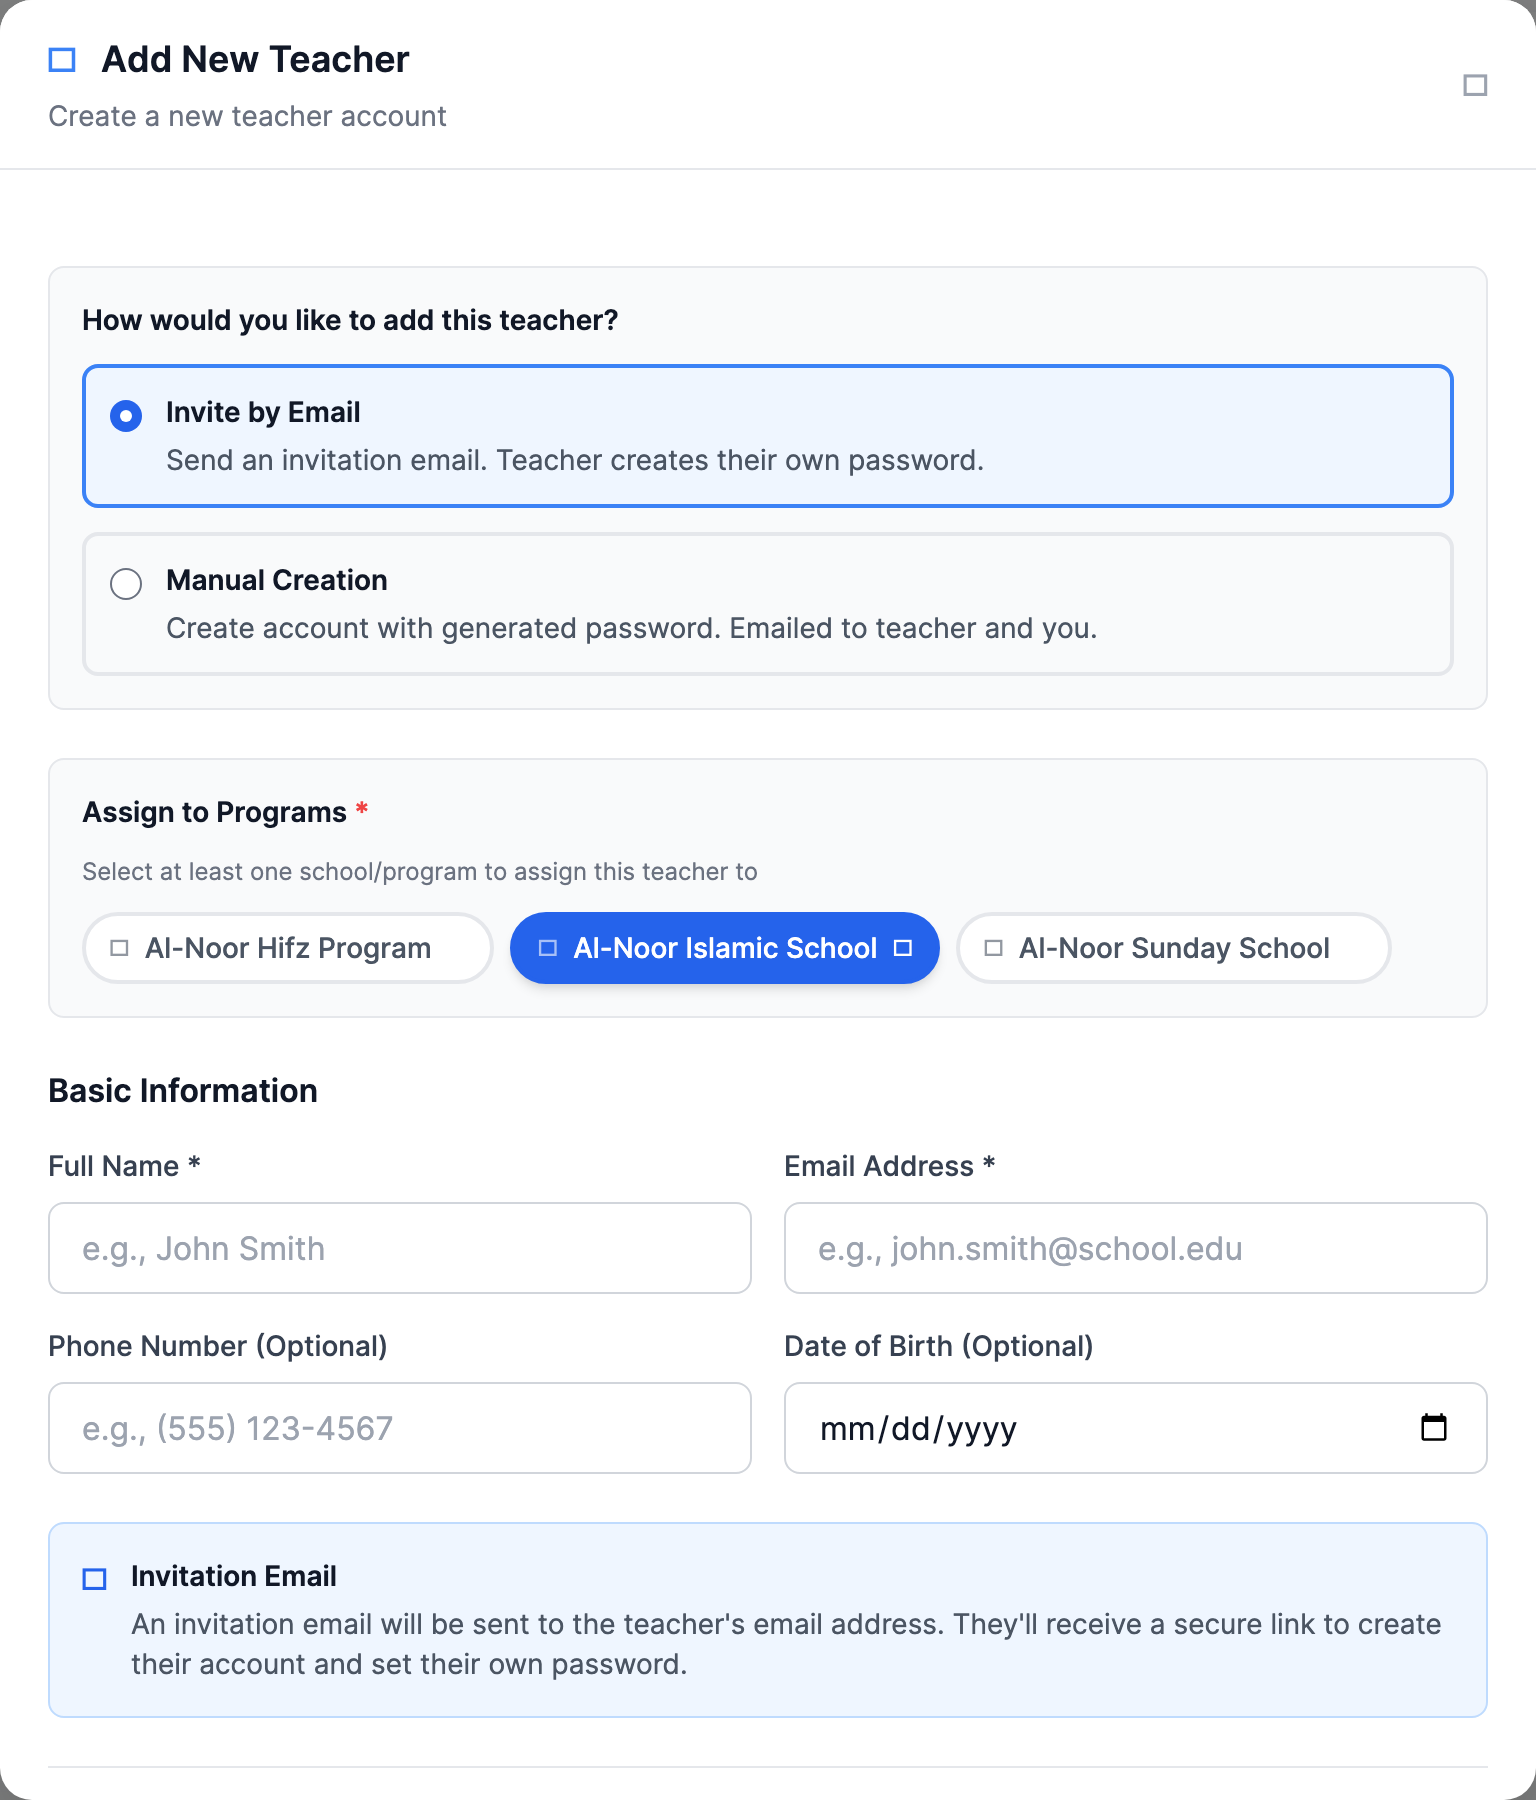
Option A — Invite by Email
- MarkTrack emails the teacher an invitation (subject: "You're invited to join [your organization] on MarkTrack") with a secure signup link.
- The teacher clicks the link, sets their own password, and their account is created when they finish.
- Until they accept, the invite shows on the Teachers page under Pending Invitations with who it was sent to and when. You can Cancel a pending invite from there.
- An invitation belongs to one program. If you ticked several programs, the invite is filed under the first one; the teacher can be added to the rest later (see Step 3).
Option B — Manual Creation
- MarkTrack generates a temporary 6-character password and creates the account immediately.
- Two emails go out: one to the teacher with their login details (subject: "Your [your organization] MarkTrack account has been created"), and one to you, the admin who created them (subject: "Teacher account created: [name]"), so you have a copy of the password.
- The teacher can log in right away and change the password from their profile afterward.
Which emails go out — at a glance
Invite: one email to the teacher (a signup link, no password). Manual: two emails — the password to the teacher and the password to you. The invite never emails you, and manual creation never emails a signup link.
Email is permanent — check the spelling
Every email in MarkTrack is unique across the whole platform, and a teacher's email cannot be changed after the account is created. If you typo it you'll either see "is already registered" (if it belongs to someone) or the credentials land in the wrong inbox. A typo'd account has to be archived, deleted, and recreated. If the email already belongs to a different role in your org (say, a Parent), MarkTrack blocks it and tells you which account it belongs to.
Step 3 — Add an existing teacher to another program
When a teacher who already has an account needs to work in a second program, you don't create them again — you add them to the new school. MarkTrack handles this for you:
- Switch into the program you want to add them to (or just have it ready to tick).
- Click Add Teacher and enter the same Email Address they already use.
- Tick the program(s) you want to add them to under Assign to Programs, then submit.
Because MarkTrack recognizes the email as an existing teacher in your organization, it adds them to the selected programs instead of making a new account. You'll see a confirmation like "[name] has been added to [program]!" If they already belonged to every program you picked, it tells you that too. This works the same whether you chose Invite or Manual Creation — for an existing person, both just attach them to the schools.
Step 4 — Assign a teacher to a class
A new teacher has an account but no classes yet. To put them in front of students, assign them from their profile:
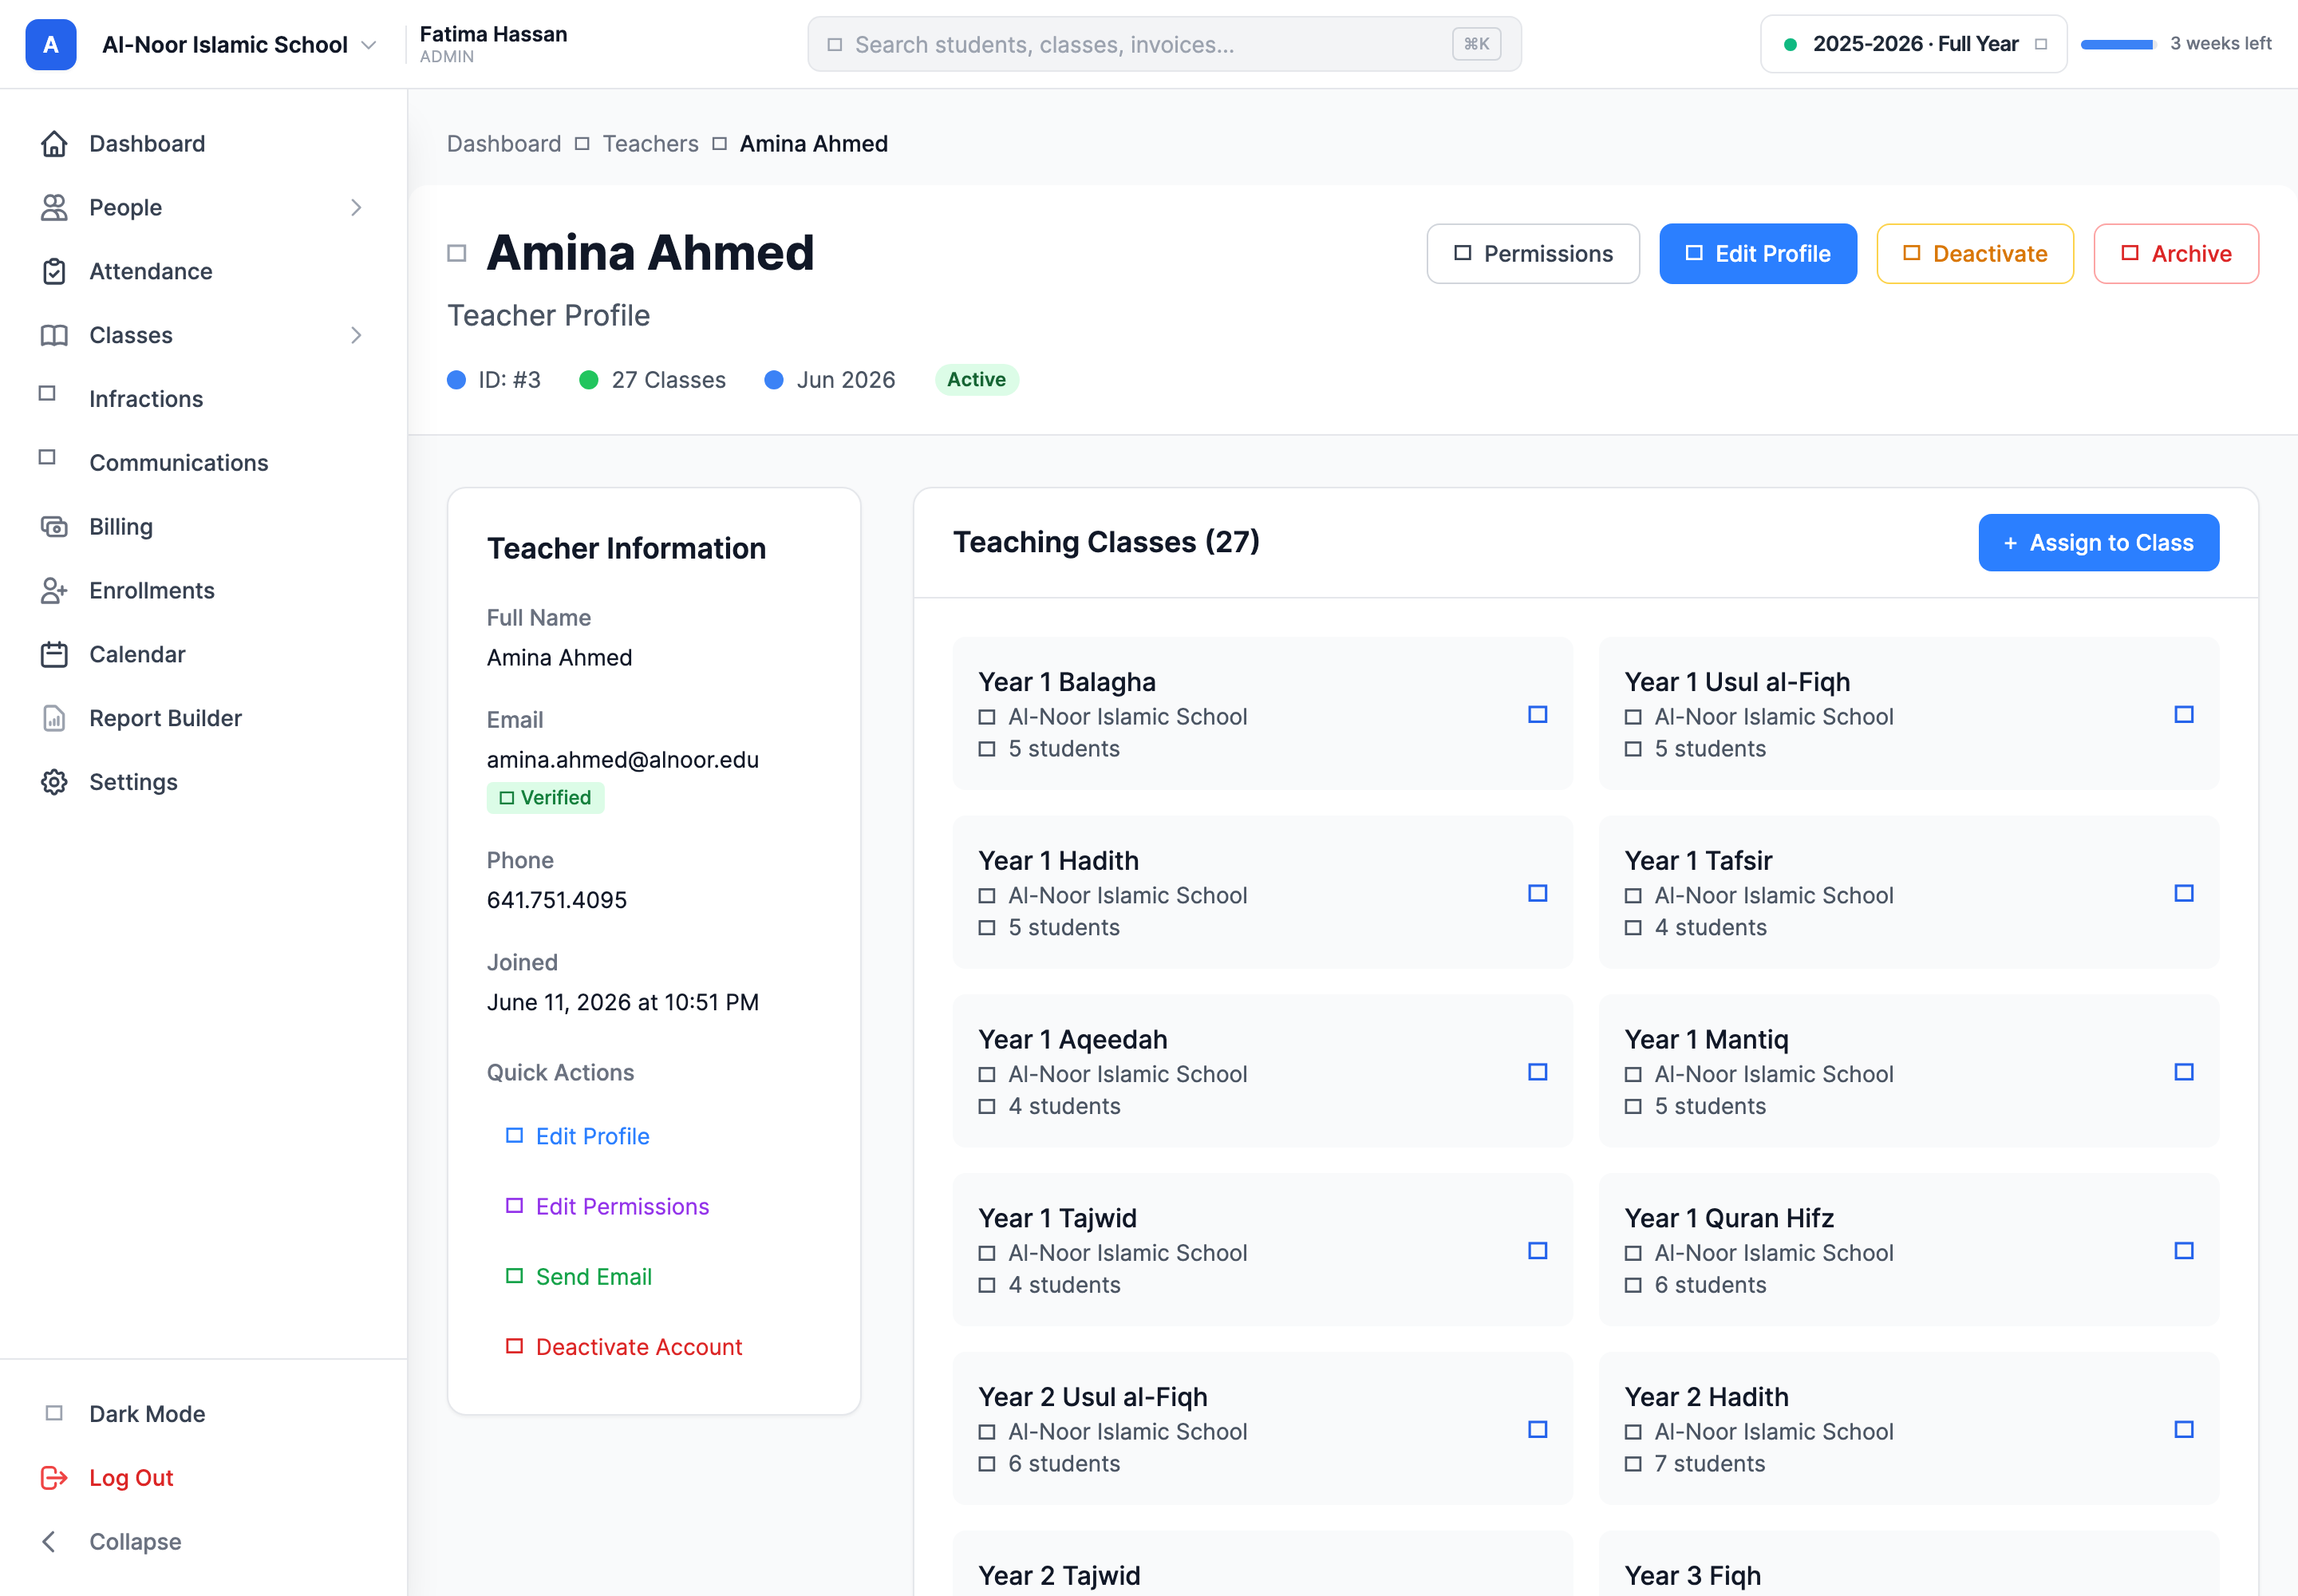
- On the Teachers page, click a teacher's name to open their profile.
- In the Teaching Classes panel, click Assign to Class. The Assign Teacher to Classes window opens.
- Classes are grouped by subject. Tick the boxes for every subject-and-level class you want this teacher to run — you can select several at once (bulk assign).
- Click Assign Selected Classes.
Assigning a class also grants school access
If you assign a teacher to a class that lives in a program they aren't a member of yet, MarkTrack automatically adds them to that program's school — otherwise they couldn't switch in to teach it. You don't have to add them to the school separately; the class assignment does it.
A class assigned to someone else shows an orange badge
Each class can have a teacher already. In the assign window, classes that belong to another teacher carry an orange badge with that teacher's name. Ticking one pops up a Reassign Class? confirmation — going ahead removes the current teacher and puts your teacher in their place. Classes this teacher already runs show a green "Already assigned" tag and can't be re-ticked.
You can also assign a teacher from the class side instead of the teacher side — see Set a class's teacher, schedule, and settings.
Step 5 — Edit a teacher's profile
- On the teacher's profile, click Edit Profile. The Edit Teacher window opens.
- Update the Full Name, Phone Number, or Date of Birth, then save.
Notice the email field isn't here — as covered above, a teacher's email is locked once the account exists. Teachers can change their own password from their profile (it asks for their current password first); admins editing someone else's profile don't touch passwords.
Step 6 — Turn a teacher on or off (active / inactive)
Use this for a temporary pause — a teacher on leave, or one whose access you want to suspend without deleting anything.
- On the teacher's profile, click Deactivate (or Activate if they're already off).
- Confirm in the pop-up.
- An inactive teacher cannot log in until you reactivate them. Their classes, grades, and history all stay put.
- The profile shows a green Active or red Inactive badge so you always know the state.
- You can't deactivate your own account, and you can't deactivate the organization owner (Super Admin).
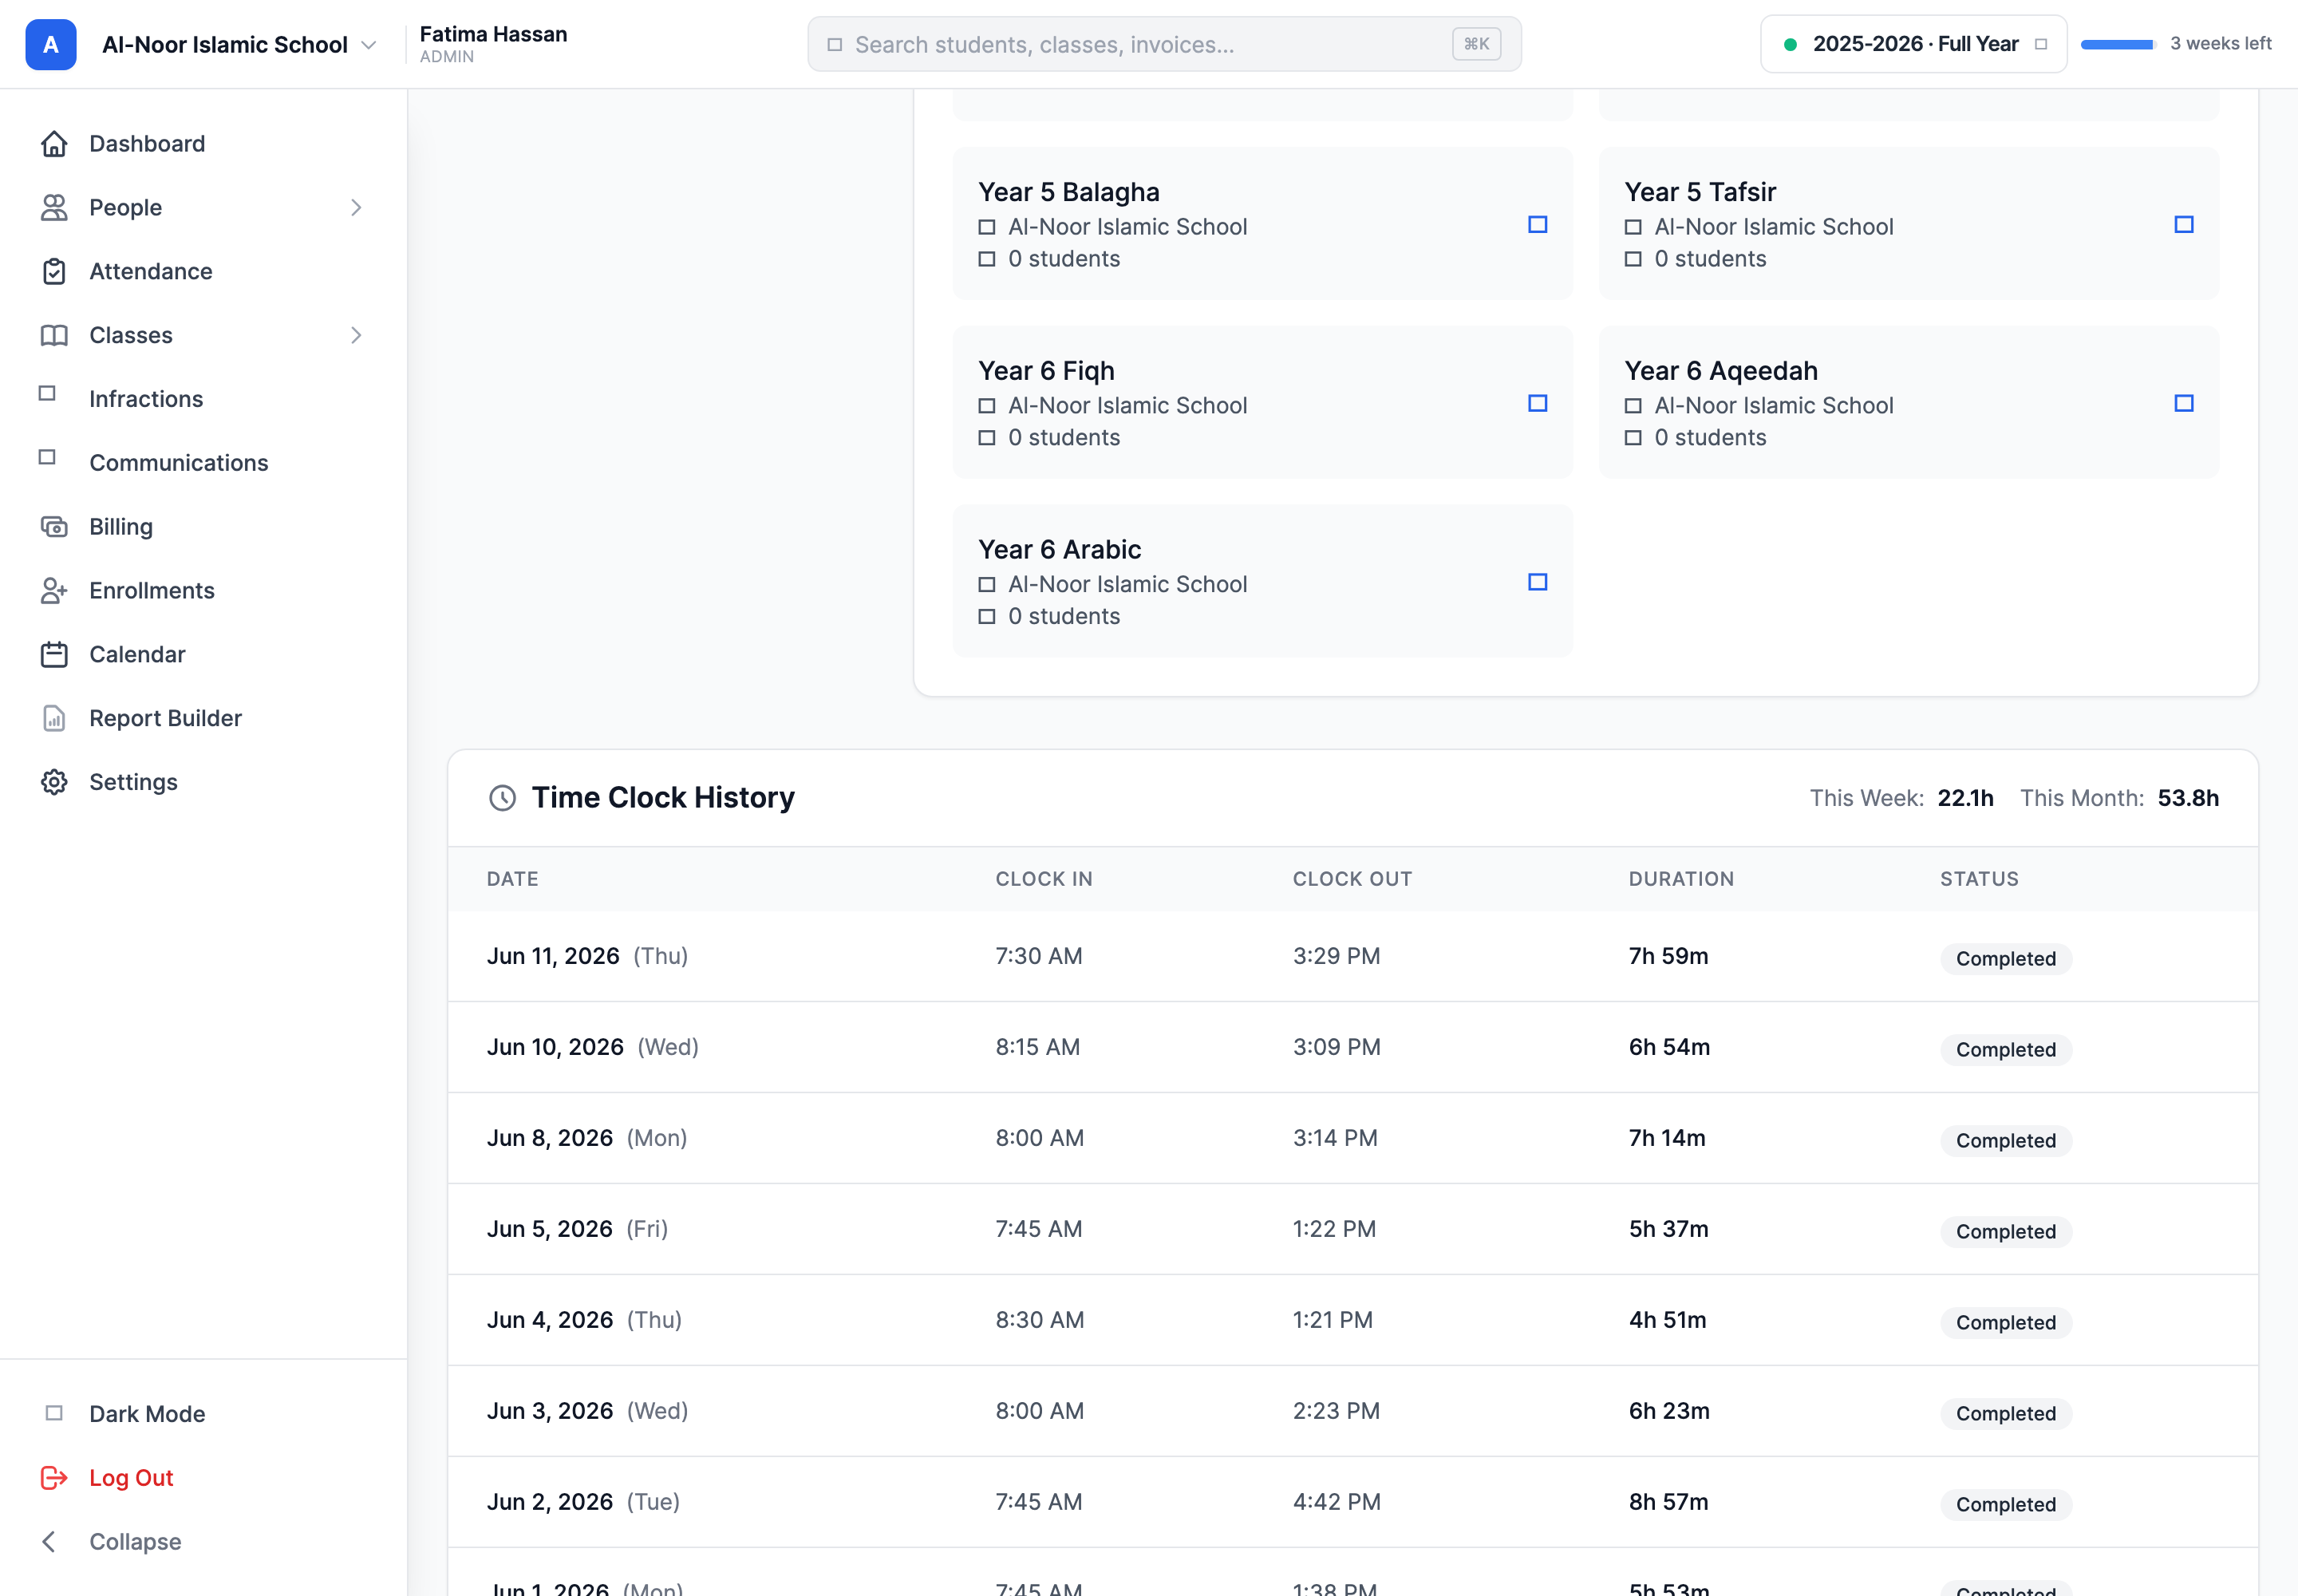
Step 7 — The time clock
MarkTrack has a built-in time clock so teachers can log their working hours. It's a self-service tool: teachers see a Time Clock widget on their own dashboard with a single button to Clock In and, once running, a live timer and a Clock Out button.
- As an admin, you don't clock teachers in — they do it themselves from their dashboard.
- On a teacher's profile you'll see a read-only Time Clock History table: each shift's date, clock-in and clock-out times, duration, and status, plus This Week and This Month totals.
- A shift the teacher forgot to close is marked Auto-closed; a finished one reads Completed; an open one shows a pulsing Active tag.
Step 8 — Archive, restore, or delete a teacher
When a teacher leaves, archiving is the safe first step — it's a reversible soft-delete. Permanent deletion is a separate, final action you can only do after archiving.
- On the teacher's profile, click Archive and confirm. They drop off the active Teachers list, but their data is preserved and their classes are released (the class's teacher slot is cleared, the class itself stays).
- To bring them back, open Archived on the Teachers page, find the teacher, and click Restore.
- To remove them for good, they must already be archived. From the Archived list, choose Delete to permanently remove the account.
Archive first, then delete — and deletion is forever
MarkTrack won't permanently delete a teacher who is still active; you'll be told "Teacher must be archived before permanent deletion." Once a teacher is deleted there is no undo. When in doubt, archive and leave it — an archived teacher costs you nothing and can be restored any time.
What about permissions?
Every teacher gets a sensible default set of permissions, and you can fine-tune what an individual teacher can see and do with the Permissions button on their profile. Because permissions work the same for teachers and admins, they're covered in their own guide — see the admins and permissions guide.
That's the full teacher lifecycle: invite or create, assign to classes, manage day to day, and archive cleanly when they move on. To add the families and pupils they'll be teaching, see Add students. Stuck on something? Contact us and we'll help.
More in Users & Accounts
Still stuck?
Our team is happy to walk you through it.