Add admins and control permissions
An admin is a staff member who helps run your organization in MarkTrack: managing students, teachers, parents, classes, grades, billing, enrollment, and settings. This guide shows the two ways to add an admin (invite a brand-new person, or add an existing admin to another school), explains the difference between the owner and a regular admin, and walks through the granular permissions system that lets you control exactly what each staff member can see and do.
Every admin starts with full access to everything except one thing: only the owner can turn other admins on or off. From there you can dial any admin down to a smaller, safer set of permissions — for example, a billing clerk who only touches invoices, or a front-desk admin who can view students but not delete them.
Owner vs. regular admin
Your organization has exactly one owner (shown with a gold Super Admin crown). The owner has unrestricted access to every school and every setting, and their permissions can never be limited. Everyone else is a regular admin whose access you can fine-tune. Permissions also work for teachers — the same editor shrinks to the areas a teacher is allowed to touch.
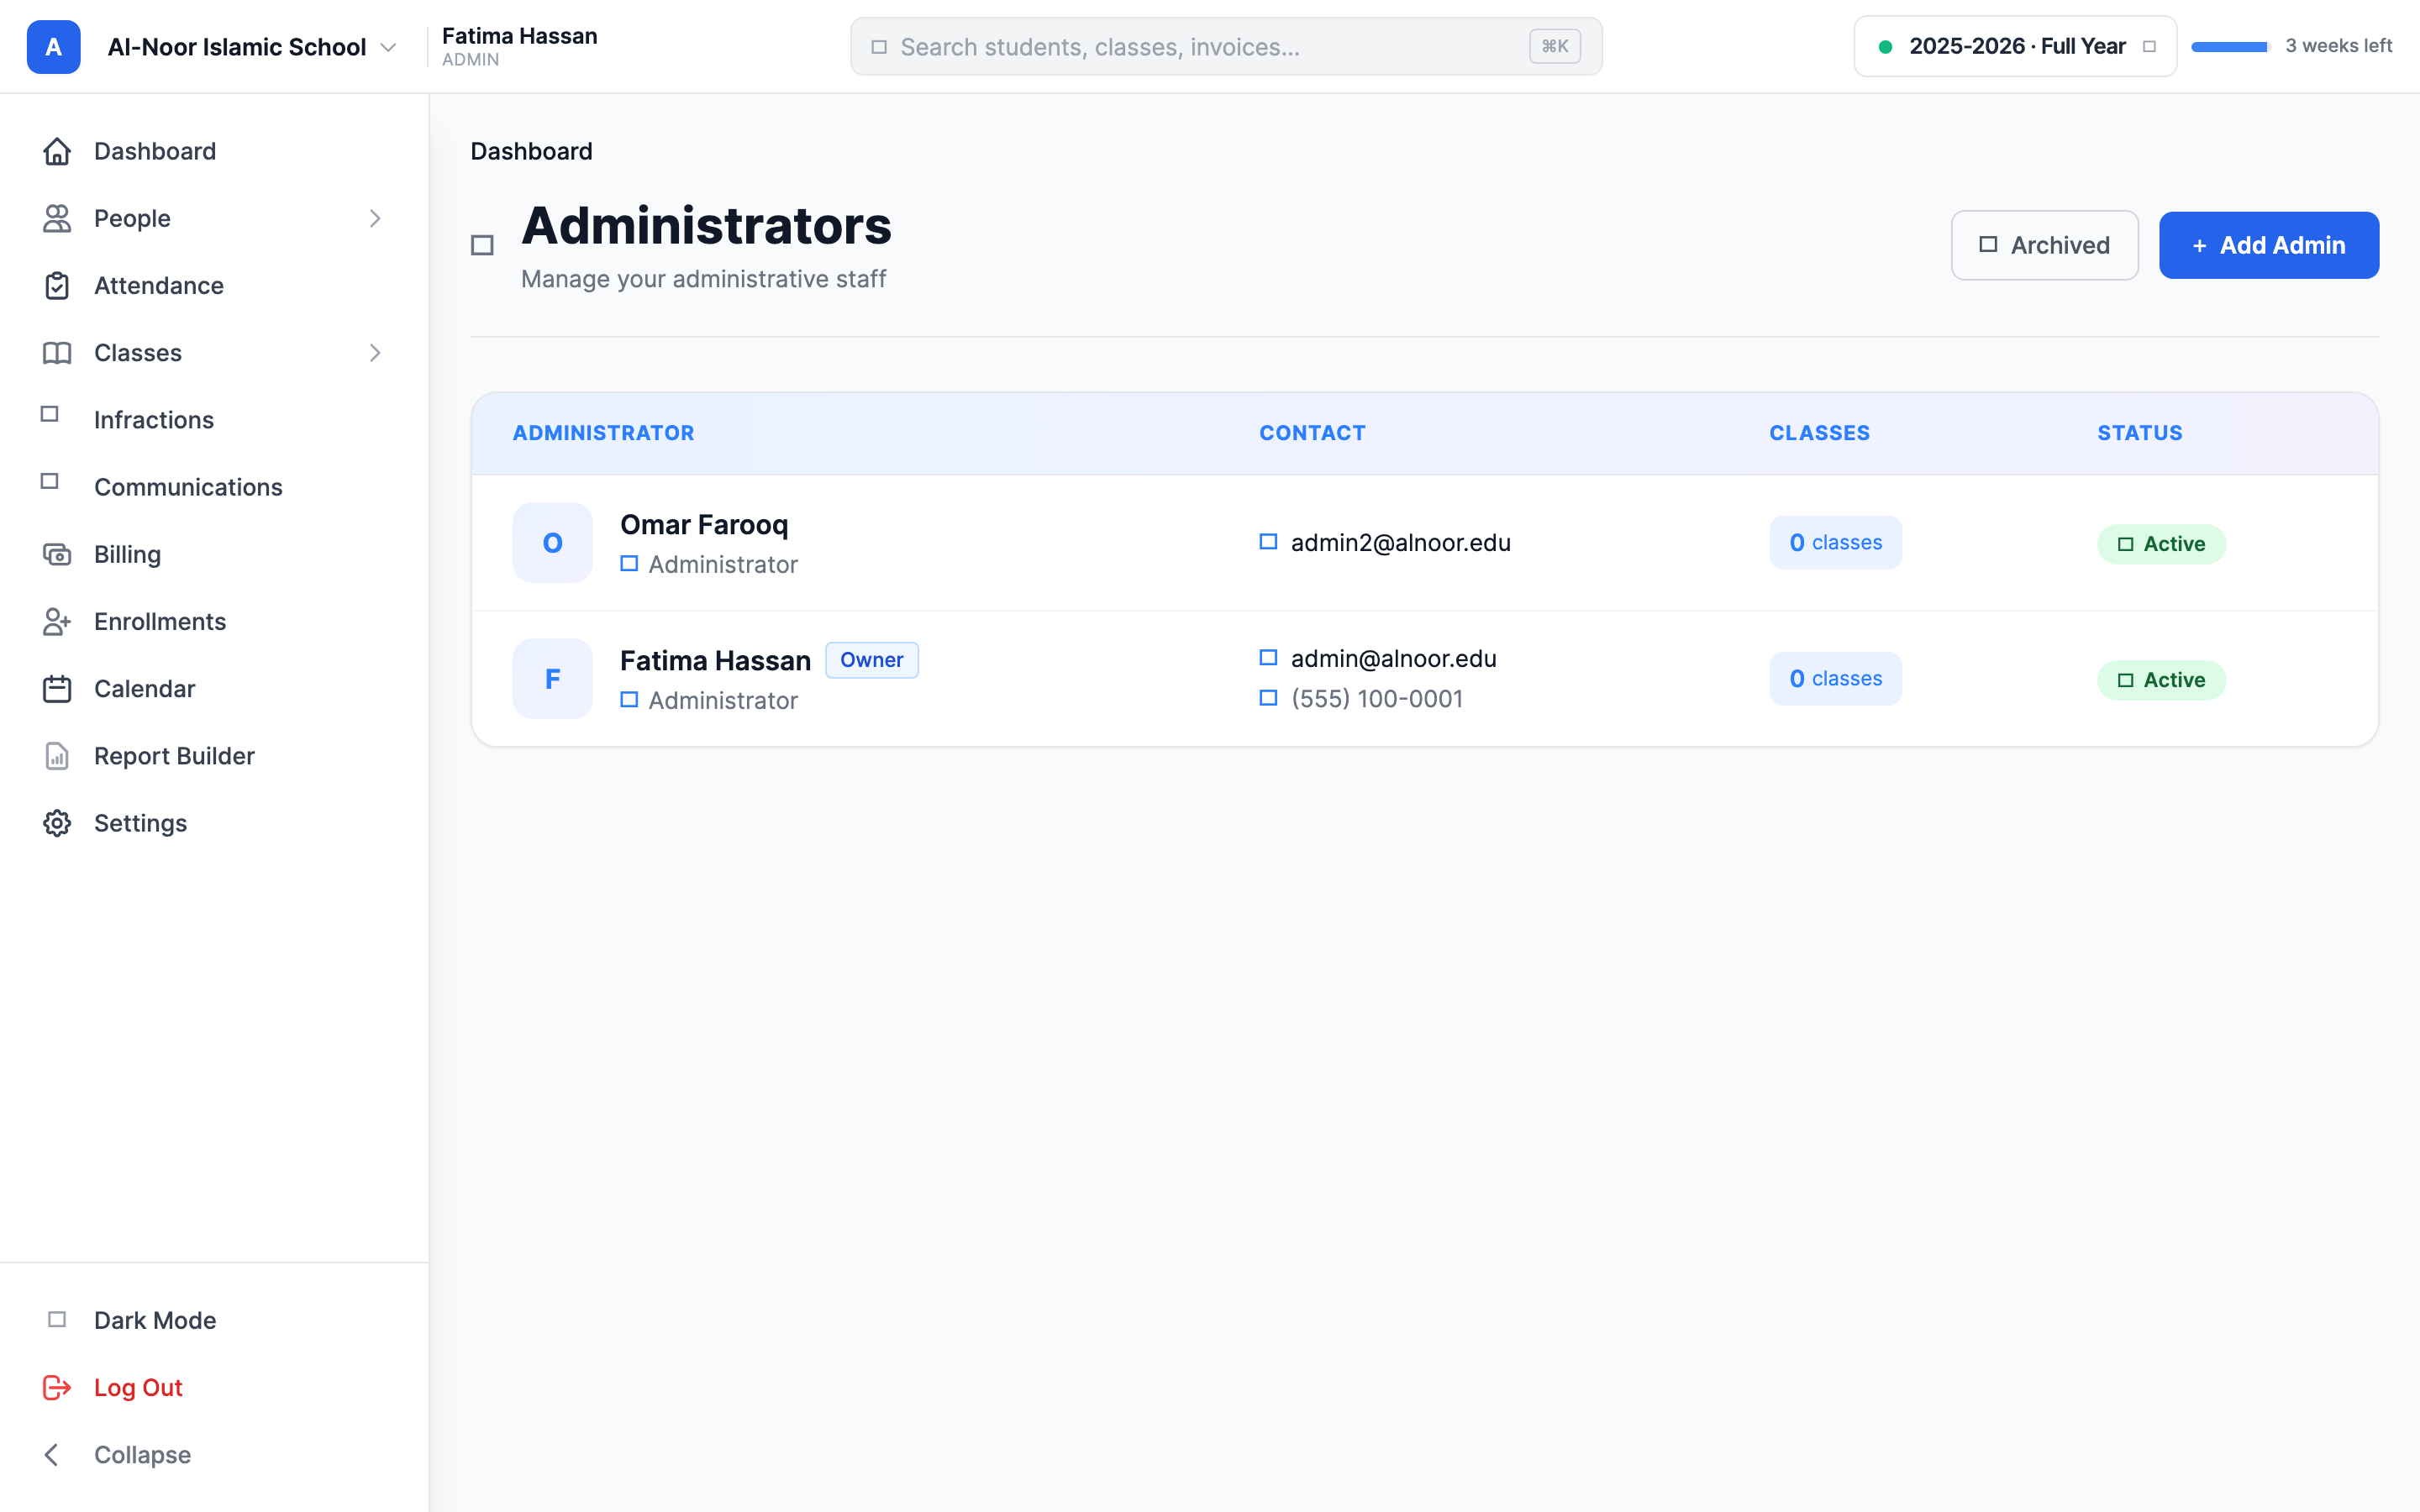
Step 1 — Open the Administrators page
- In the left sidebar, open People and click Admins.
- You'll land on the Administrators list for the school you're currently in. At the top right are two controls: an Archived link and a blue Add Admin button.
- If you've invited someone who hasn't finished signing up yet, they appear in a Pending Invitations box above the list.
Step 2 — Add an admin
There are two outcomes when you add an admin, and MarkTrack decides automatically based on the email you type.
- Click Add Admin. The Add New Administrator window opens.
- Fill in Full Name (required) and Email Address (required). Phone Number and Date of Birth are optional.
- Click Send Invitation.
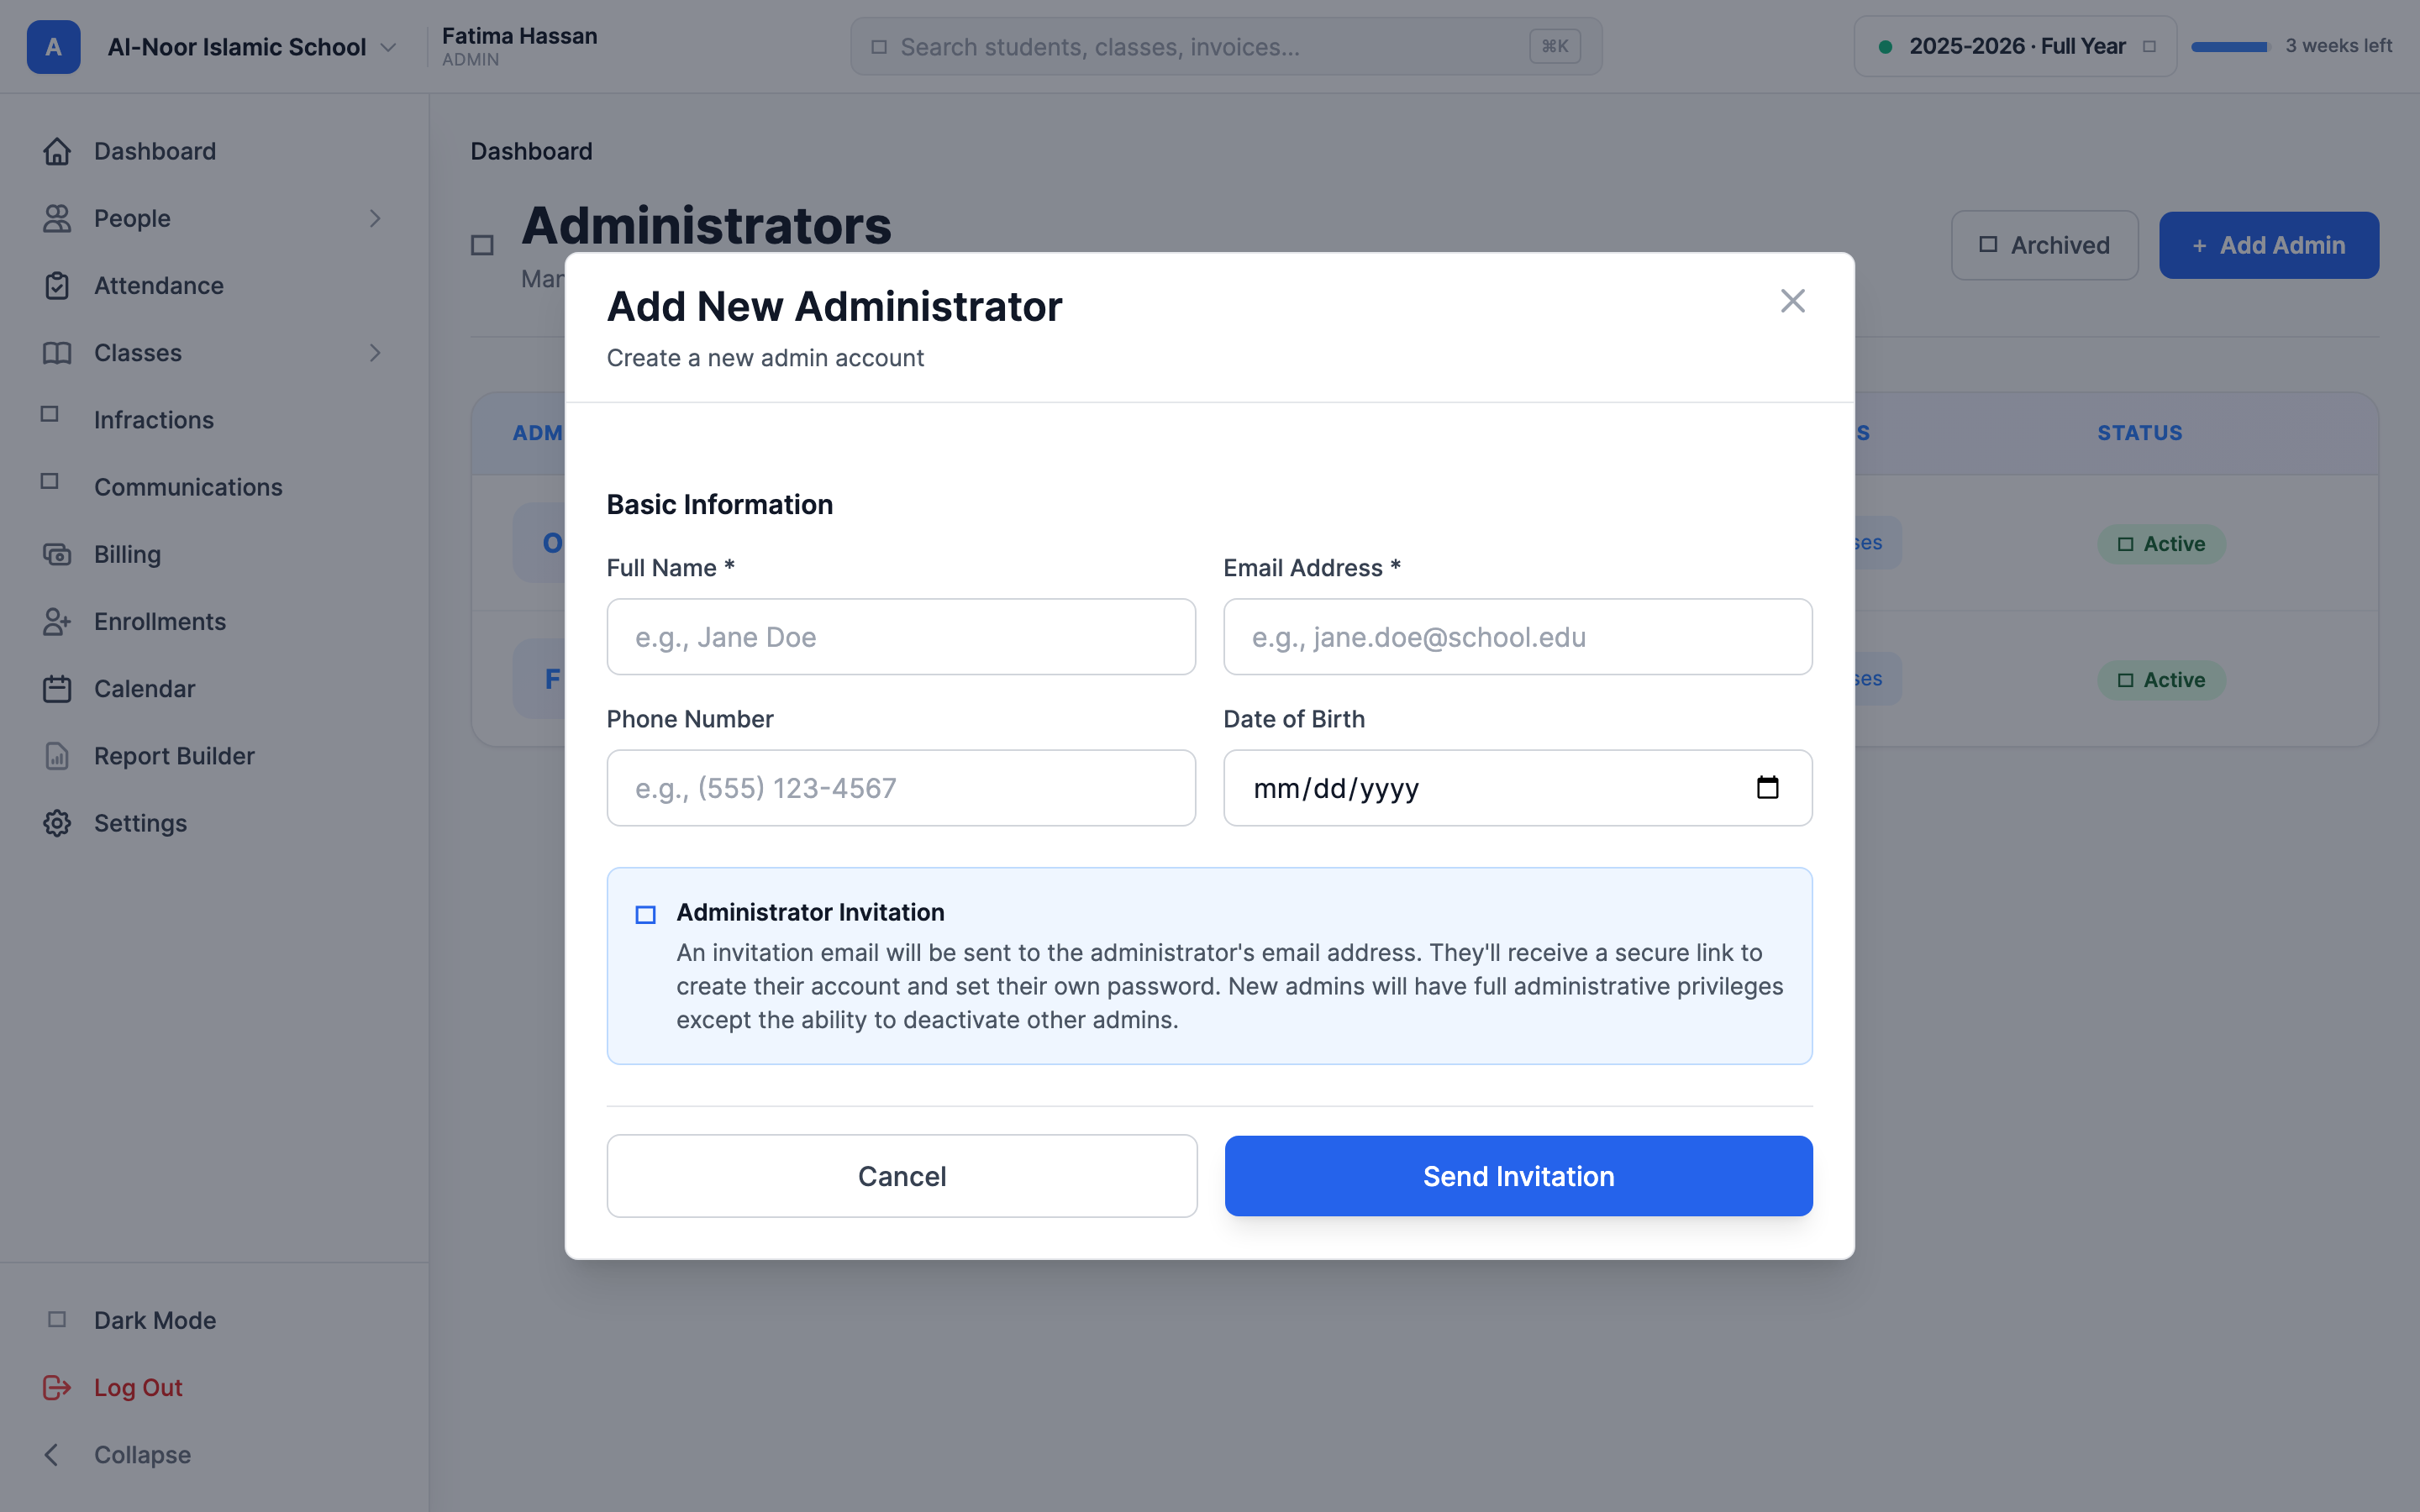
Option A — Invite a brand-new person
- If the email doesn't belong to anyone in your organization yet, MarkTrack sends an invitation email to that address.
- The new admin clicks the secure link in the email to create their account and set their own password. You'll see them in the Pending Invitations box until they finish.
- Once they sign up, they get full administrative privileges — everything except the ability to activate or deactivate other admins (that's owner-only).
Option B — Add an existing admin to this school
- If the email already belongs to an admin in your organization, no new account is created. MarkTrack simply adds that admin to the school you're currently in, so they can now manage it too. You'll see a confirmation like "Jane Doe has been added to Al Noor Islamic School."
- This is how one admin works across several schools in a multi-school organization.
Email mismatches are blocked
If the email already belongs to a parent, teacher, or student (not an admin), the form stops you — one email can only ever be one type of account. And if the person is already an admin in the school you're in, you'll be told so instead of getting a duplicate.
Step 3 — Understand the permission areas
Open any admin's profile (click their name in the list) and click Permissions in the header. The Edit Permissions window shows a grid: one row per area of the app, and up to four columns of actions — View, Create, Edit, and Delete. A checked box means "this person can do that action in that area."
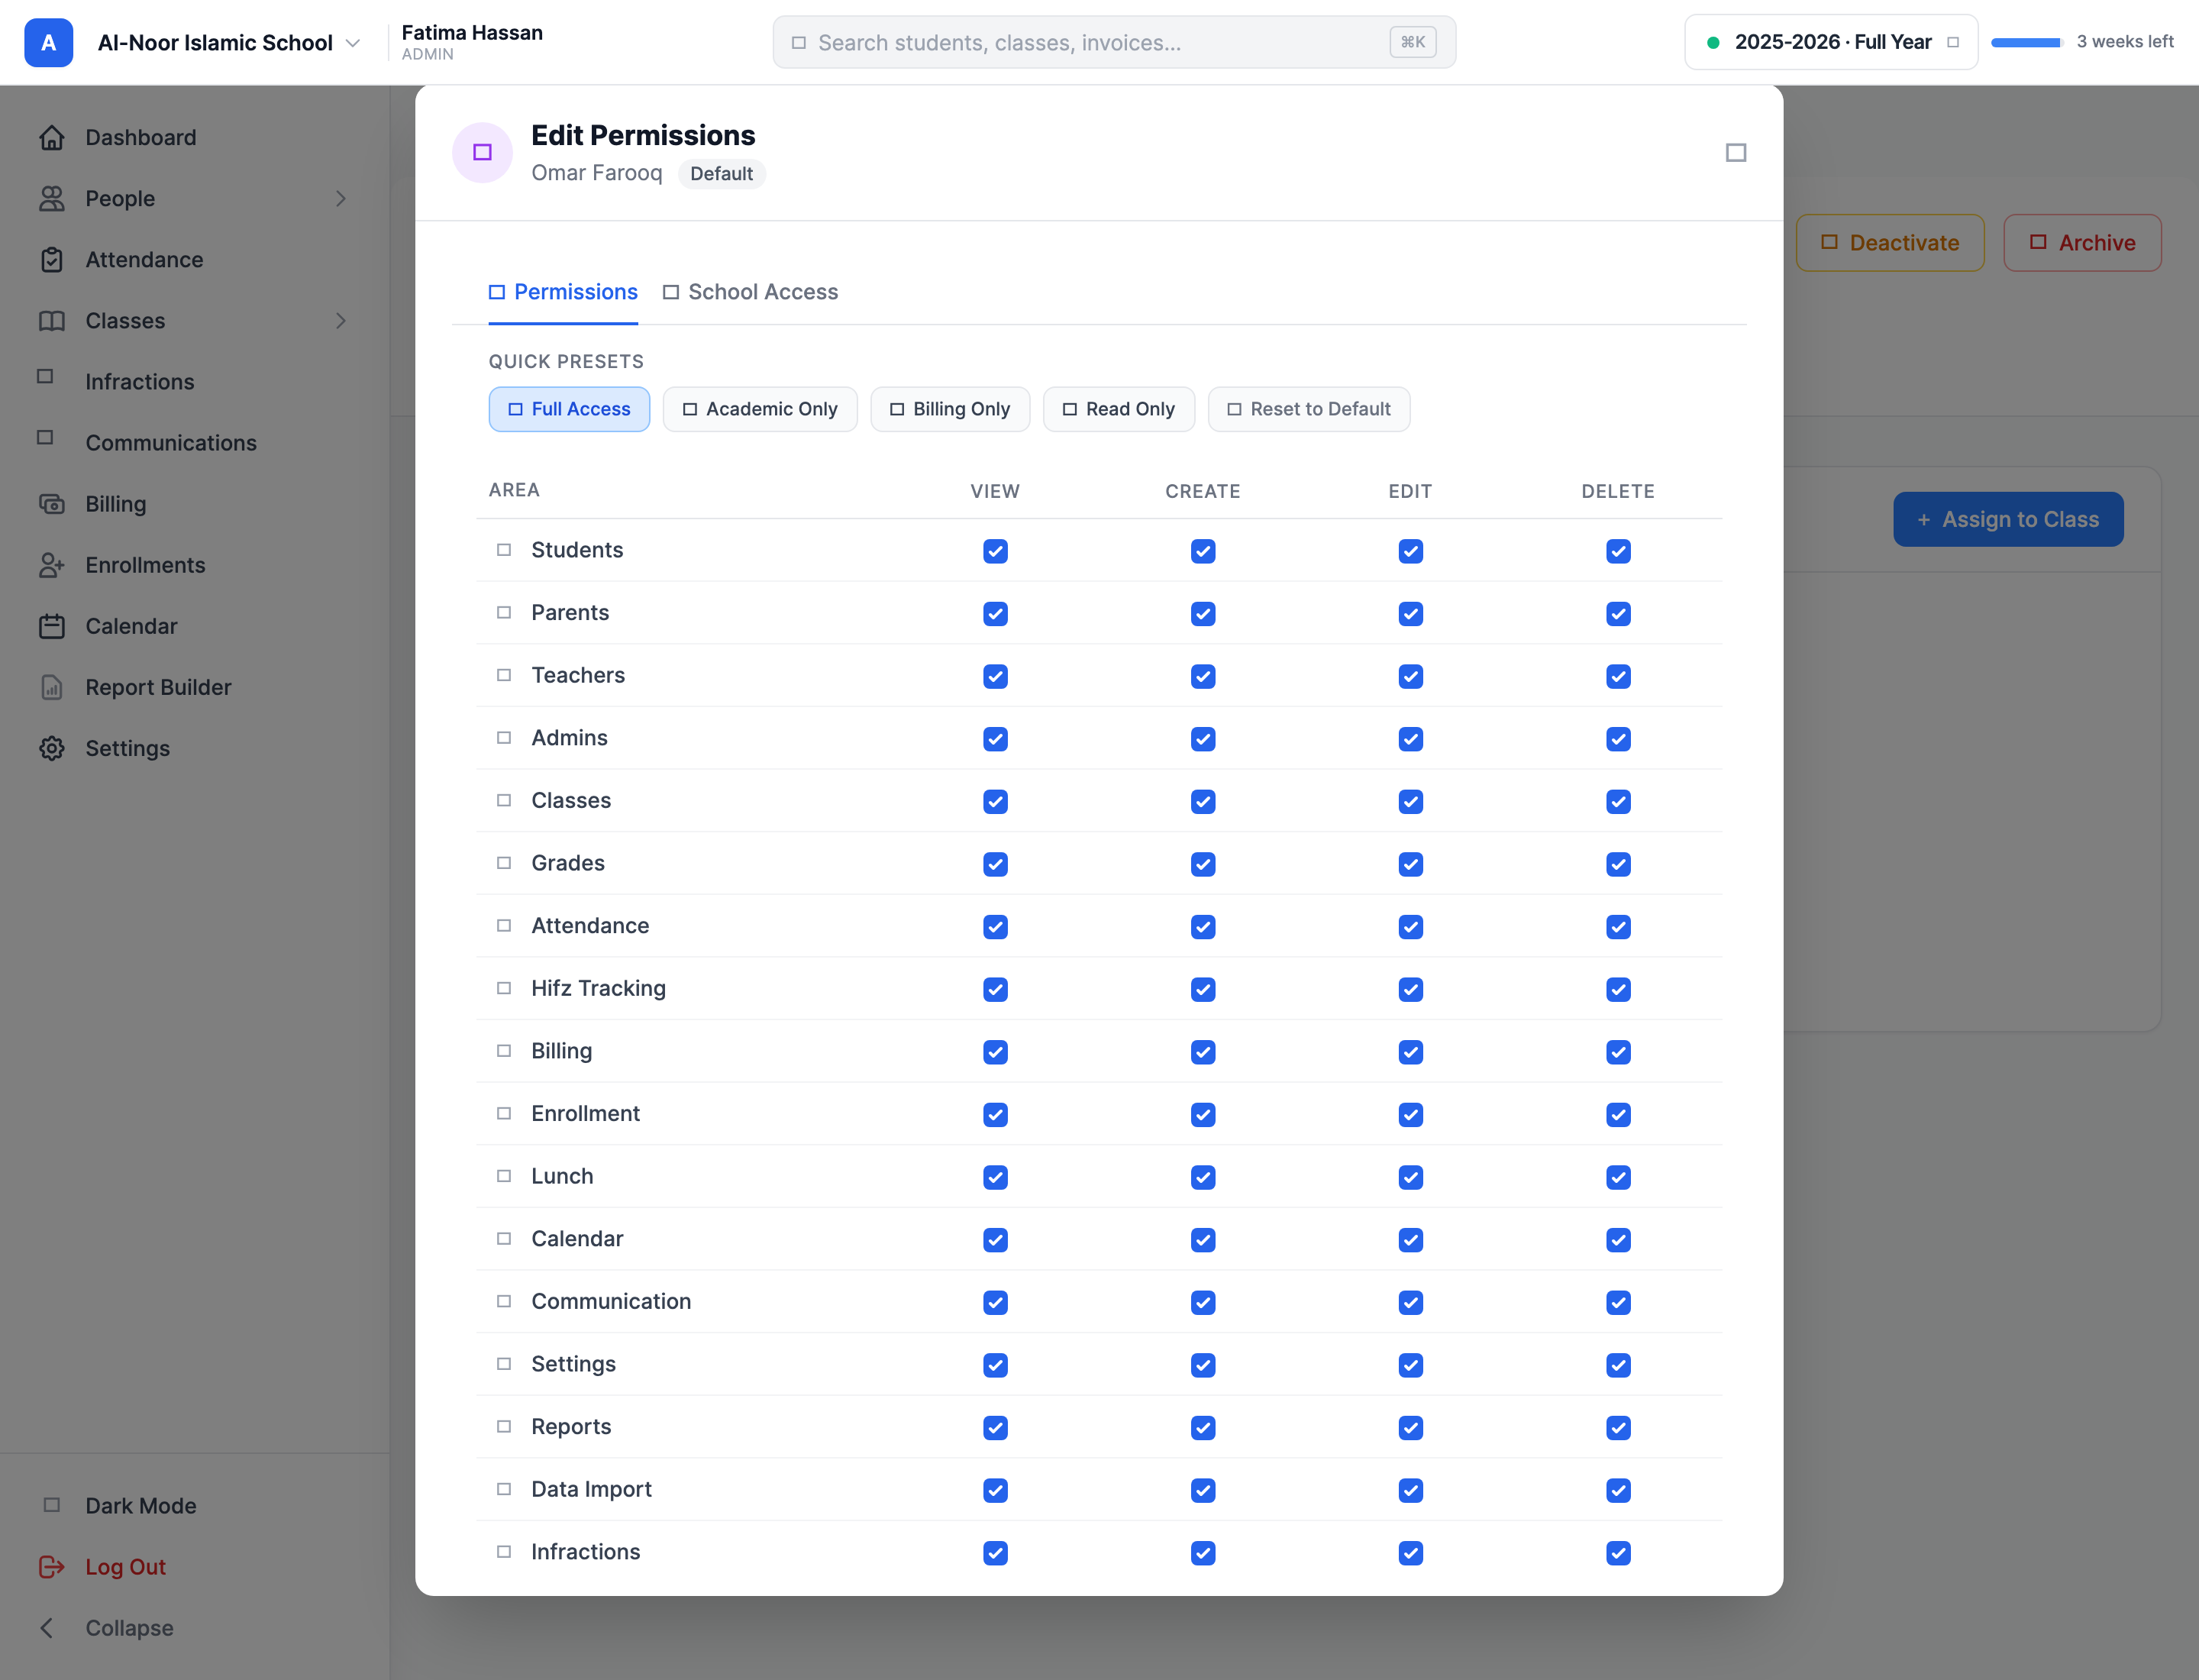
The areas you can control are:
- Students, Parents, Teachers, Admins — managing people. View lets them see the list; Create adds new ones; Edit changes details; Delete archives/removes them.
- Classes — the class structure, schedules, and rosters.
- Grades — gradebooks, assignments, and scores.
- Attendance — taking and editing attendance.
- Hifz Tracking — Quran memorization progress.
- Infractions — discipline records.
- Communication — sending emails and texts to families.
- Billing — tuition invoices and payments.
- Enrollment — enrollment forms and applications.
- Lunch, Calendar, Reports (Report Builder) — those features.
- Settings and Data Import — organization-wide controls. These three (Admins, Settings, Data Import) only appear for admins; teachers never see them in their editor.
Not every area has all four actions
The grid always shows four columns, but some areas only really use a couple. Practically: people areas use all of View/Create/Edit/Delete; Classes uses View and Edit; Grades uses View/Edit/Delete; Attendance uses View and Edit. Just check the actions you want — leaving the rest unchecked simply withholds them.
Step 4 — Grant "view but not edit" access
This is the most common reason to use permissions: you want someone to see data without being able to change it. To do that, check View for an area and leave Create, Edit, and Delete unchecked.
- On the admin's profile, click Permissions.
- For each area you want them to read only, tick the View box and clear the others. Click an area name to toggle that whole row, or a column heading (like Edit) to toggle that action across every area at once.
- Click Save Permissions.
For example, a front-desk admin might get View on Students, Parents, Classes, and Attendance, plus View + Create on Enrollment — so they can look things up and take new applications, but can't delete a student or edit a grade. The same idea works for a teacher: give them View on Students and Parents but full control of their own Grades and Attendance.
Step 5 — Use a preset to start fast
Instead of clicking every box, start from a Quick Preset at the top of the editor, then adjust:
- Full Access — everything checked. The default for a new admin.
- Academic Only — full control of students, parents, classes, grades, attendance, Hifz, calendar, and infractions; can send communication; view-only reports. No billing, settings, or admins.
- Billing Only — full billing and reports, plus view-only students and parents. Nothing else.
- Read Only — View on every area, no editing anywhere.
- Reset to Default — puts the person back on the standard set for their role (full access for admins; the teacher defaults for teachers).
Picking a preset just fills in the checkboxes — nothing saves until you click Save Permissions, so you can tweak it first.
Multi-school access lives in the same window
If your organization has more than one school, the permissions window shows a second tab, School Access. Tick the schools this admin should be able to open. (The owner always has access to every school and can't be limited.)
Step 6 — Turn an admin on or off
Deactivating an admin keeps all their data but blocks them from logging in — useful when someone leaves or is away. Only the owner can do this.
- Open the admin's profile.
- Click Deactivate (or Activate to bring them back). Confirm the prompt.
- Their status badge flips between Active and Inactive.
The owner can't be deactivated
MarkTrack won't let anyone deactivate the Super Admin — that would leave the organization without an owner. If you need the current owner to step back, transfer ownership first (see Transfer organization ownership), then deactivate them as a regular admin.
Step 7 — Archive, restore, or delete an admin
Archiving is the safe way to remove someone: their account and history are kept and can be brought back. Deleting is permanent. Both are owner-only.
- To archive, open the admin's profile and click Archive. Confirm the prompt. They move off the main list.
- To bring them back, go to the Administrators page and click Archived, find the person, and choose Restore.
- To delete permanently, the admin must already be archived. From their archived profile, choose delete. This can't be undone.
You must archive before you can delete
MarkTrack blocks permanent deletion of an admin who hasn't been archived first — and the owner can never be archived or deleted at all. This two-step gate is deliberate, so nobody wipes an account by accident.
That's the full lifecycle of an admin account. When you need to hand the owner role to someone else, see Transfer organization ownership. Teachers are managed almost identically — see Add and manage teachers. Stuck on a permission that isn't behaving as expected? Contact us and we'll help.
More in Users & Accounts
Still stuck?
Our team is happy to walk you through it.