
Report cards from scratch: the complete beginner's guide
This is the complete beginner's guide to report cards in MarkTrack. It assumes you have never made one before. We start with a school that has classes and grades but no report card yet, and finish with a printed card in a parent's inbox, one click at a time. You can watch the video, read the steps, or do both side by side.
The big picture: what a report card is made of
A report card in MarkTrack is not something you type up by hand. It is a page that collects things you have already set up, and fills them in for every student automatically:
- Your school year — when it starts and ends.
- The grading periods inside it — semesters, quarters or trimesters.
- Your grading scale and GPA — what a score of 92 means: an A, worth 4 points.
- The grades teachers enter in each class's gradebook.
When a teacher grades a piece of work, the work's due date puts that grade in a quarter. The quarters add up to a semester, there is a grade for the whole year, and the report card prints whichever of these you choose to show. So the order of this guide is the order things depend on each other: set up the year, set up grading, then make the card.
A few words you'll see
- Term
- Any grading period: a semester, a quarter, a trimester, or an exam.
- Parent term
- The term another one sits inside. Quarter 1's parent is Fall Semester.
- Card design (template)
- Your report card's design. You make it once; every student gets their own copy. (Not to be confused with a term template, which sets up a year's terms.)
- Field
- A blank on the card that fills itself in, like "Quarter 1 grade" or "Student name".
- Draft
- A card that isn't published yet. Nobody can download or receive it (Preview still shows it for one student).
- Published
- A finished card. Only published cards can be downloaded or sent.
Step 1 — Set up your school year, semesters & quarters
Grades are grouped by terms, and terms live inside an academic year. You only do this once a year.
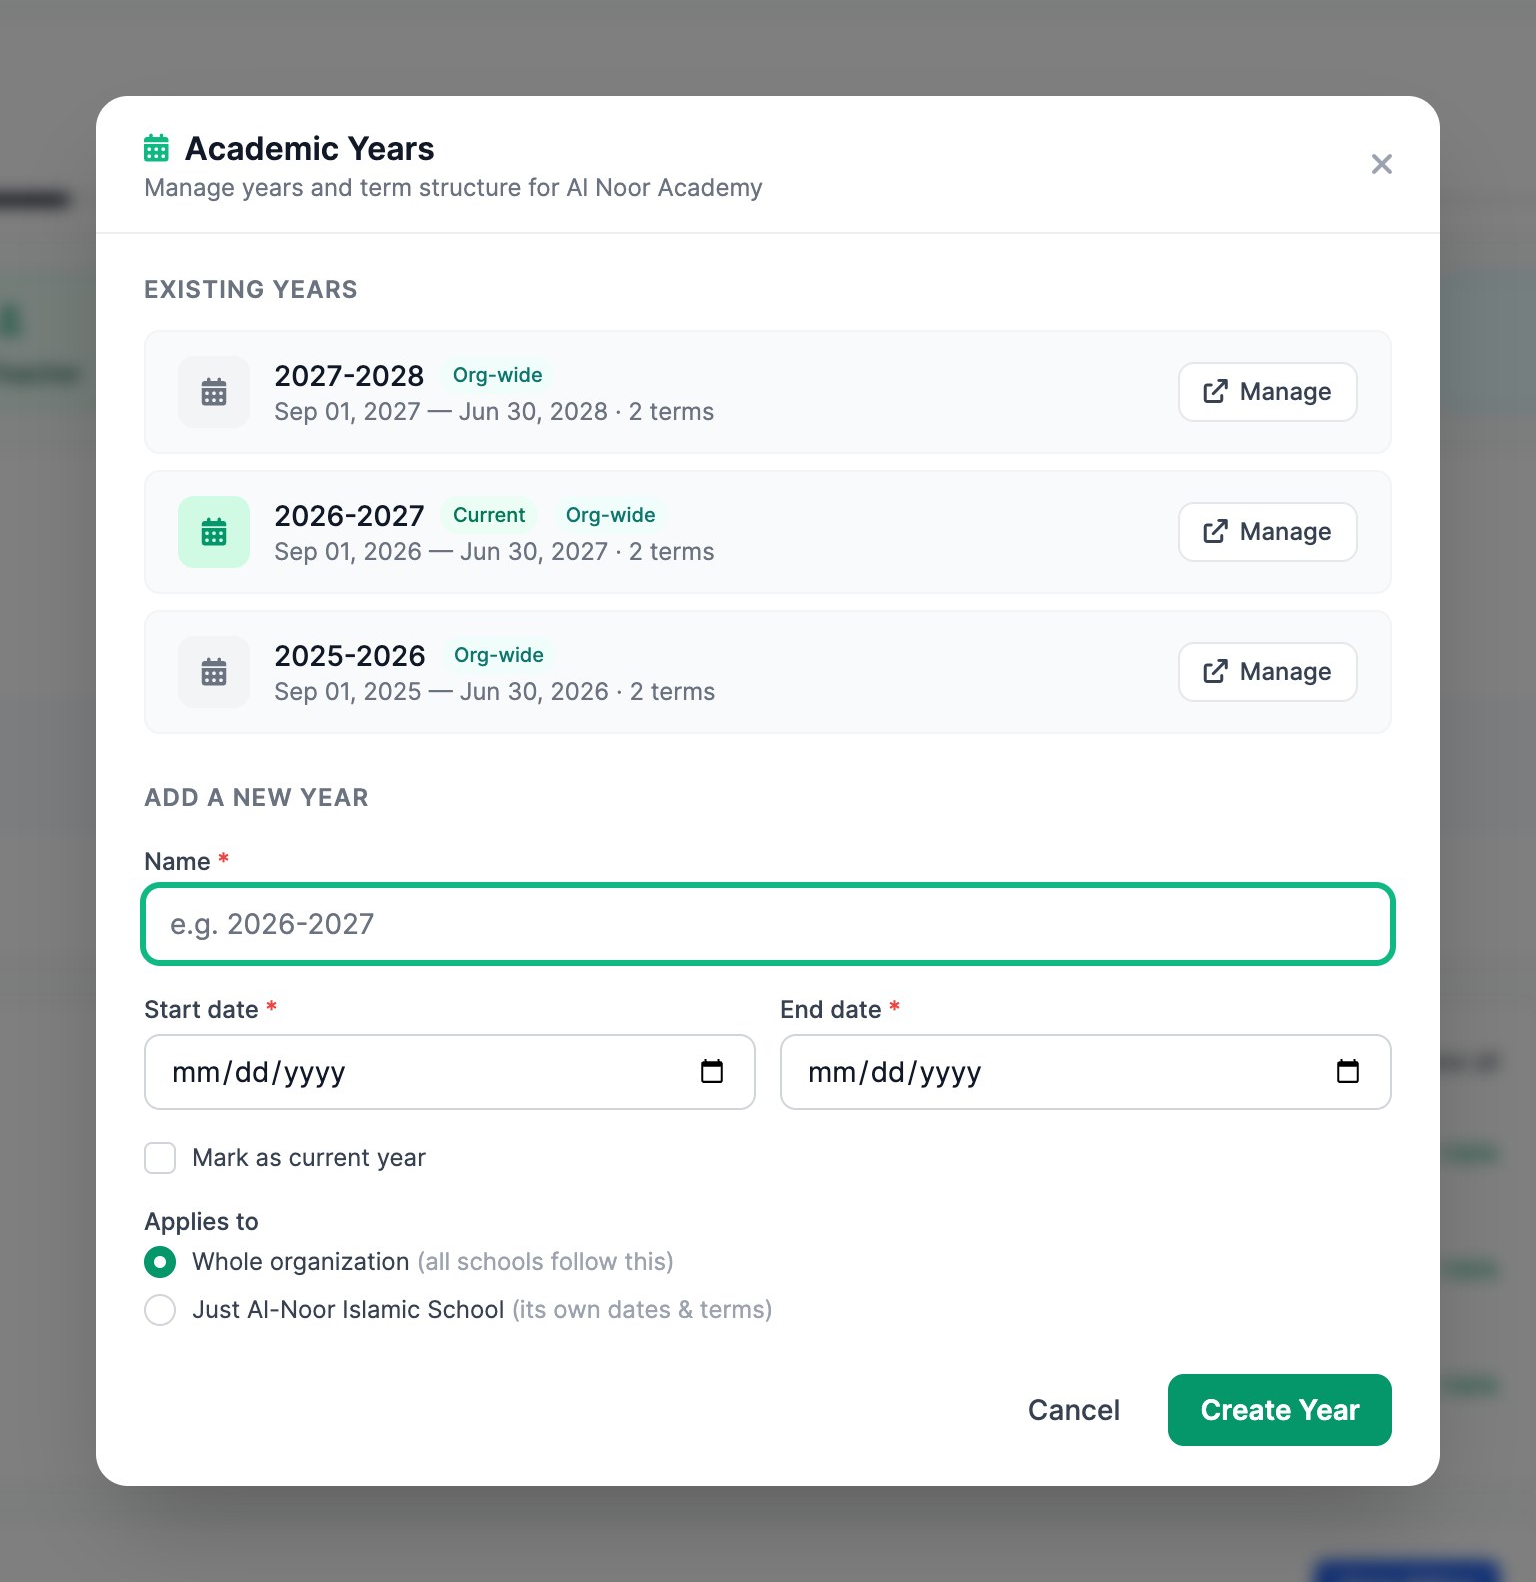
- On the Dashboard, click the Academic Years button in the row of coloured buttons.
- A window lists your school years. To add a year, fill in Name, Start date and End date under Add a new year and click Create Year. Under Applies to, Whole organization means every school shares this year's terms and weights; choose your school alone if it keeps its own calendar.
- Click Manage next to the year you're setting up.
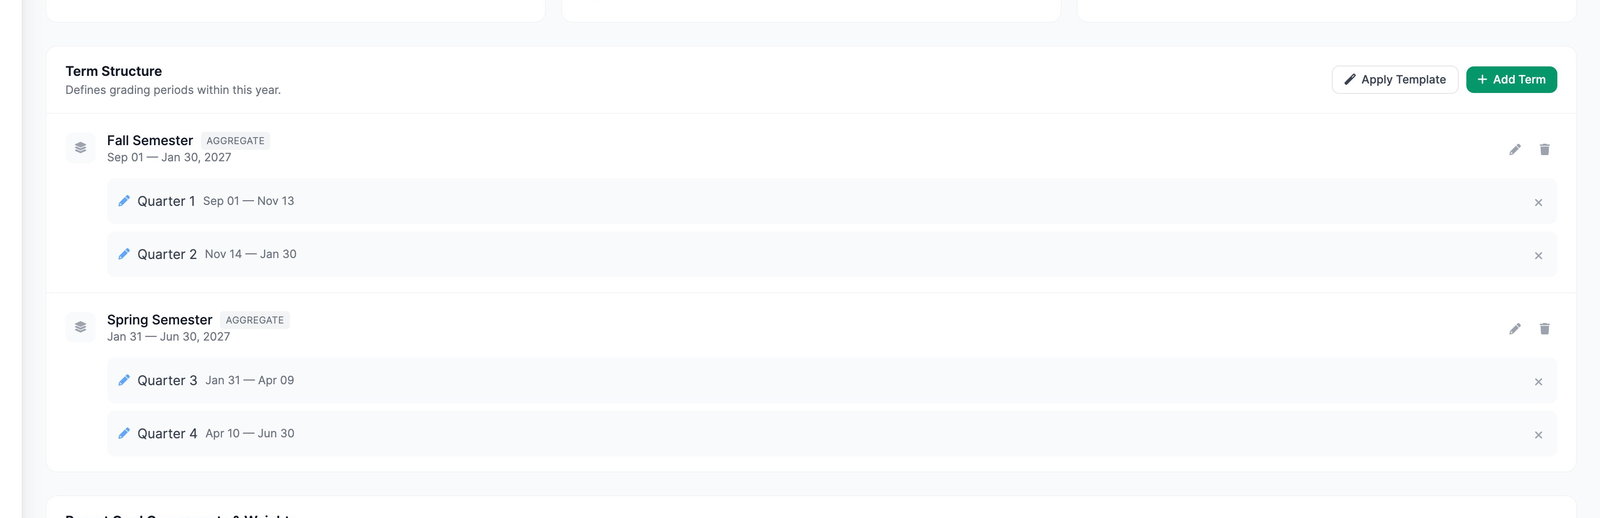
The year's page shows its Term Structure. There are two ways to fill it:
- Apply Template — the quickest way for a brand-new year. Choose 2 Semesters, 3 Trimesters, 4 Quarters, or 2 Semesters + 4 Quarters, and MarkTrack names the terms and splits the year's dates evenly for you.
- Add Term — add one term at a time. Use this when the year already has grades in it.
A term template replaces every term in the year
Apply Template deletes the year's existing terms, their weights, and everything attached to them — semester comments teachers wrote and typed scores such as final exams — before it builds new ones. Use it only at the very start of the year. If teachers have already entered grades, MarkTrack warns you first; add terms one at a time instead.
Adding quarters inside your semesters
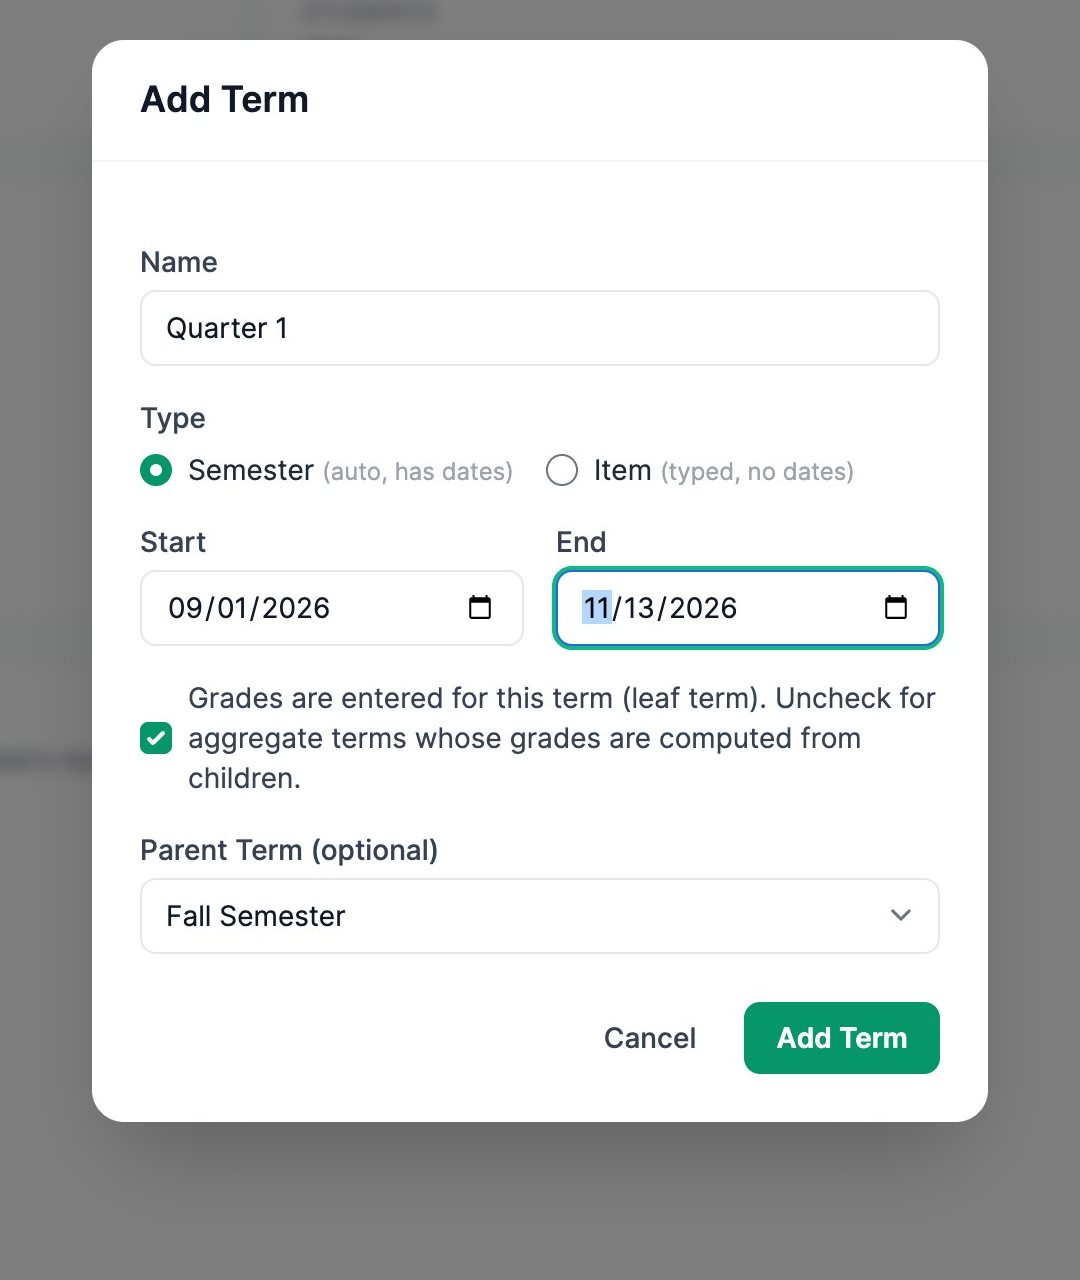
To put Quarter 1 inside the Fall Semester, click Add Term and fill in:
- Name — "Quarter 1".
- Type — leave it on Semester (auto, has dates). Here "semester" just means a period with dates; MarkTrack works out its grade from the assignments dated inside it. Choose Item only for something teachers type in directly, like a final exam score.
- Grades are entered for this term — leave it ticked. A quarter always needs it; unticking it leaves that quarter blank on every card.
- Start and End — the quarter's first and last day.
- Parent Term — choose Fall Semester. This is the important part: it tells MarkTrack the quarter lives inside that semester.
Get the quarter dates right the first time
Start Quarter 1 on the semester's first day, start Quarter 2 the day after Quarter 1 ends, and end Quarter 2 on the semester's last day. Work due in a gap between quarters counts toward no quarter at all, and work in an overlap counts twice. A quarter can't be edited after you add it — only deleted and added again. A re-added quarter is listed (and printed) after the others, and any published card that shows it stops downloading and sending until you open it in the designer and choose the quarter again.
Repeat for Quarter 2, then Quarters 3 and 4 inside the Spring Semester. Each semester is now marked Aggregate: its grade is the average of its two quarters, rather than graded directly. Your report card can then show a column for every quarter, every semester, and the whole year.
How much each semester counts
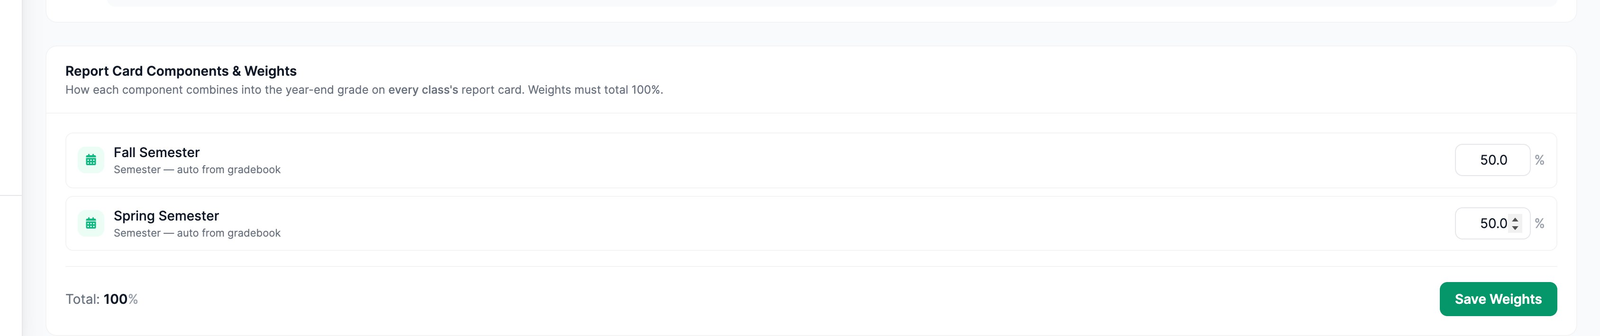
Under Report Card Components & Weights, give each semester a percentage of the year grade — for example 50% and 50%, which makes each quarter count for about a quarter of the year — and click Save Weights. If you use weights, they must add up to 100%. Weights are optional: leave them all empty and the year grade is simply the average of all the year's work. The same weights combine term GPAs into the year GPA.
Step 2 — Set your grading scale and turn on GPA
The grading scale turns a score into a letter. GPA turns the letter into points.
- In the menu on the left, click Settings, then the Gradebook tab.
- Open your school's section by clicking its name. (The first school in the list is already open; clicking a name opens or closes it.)
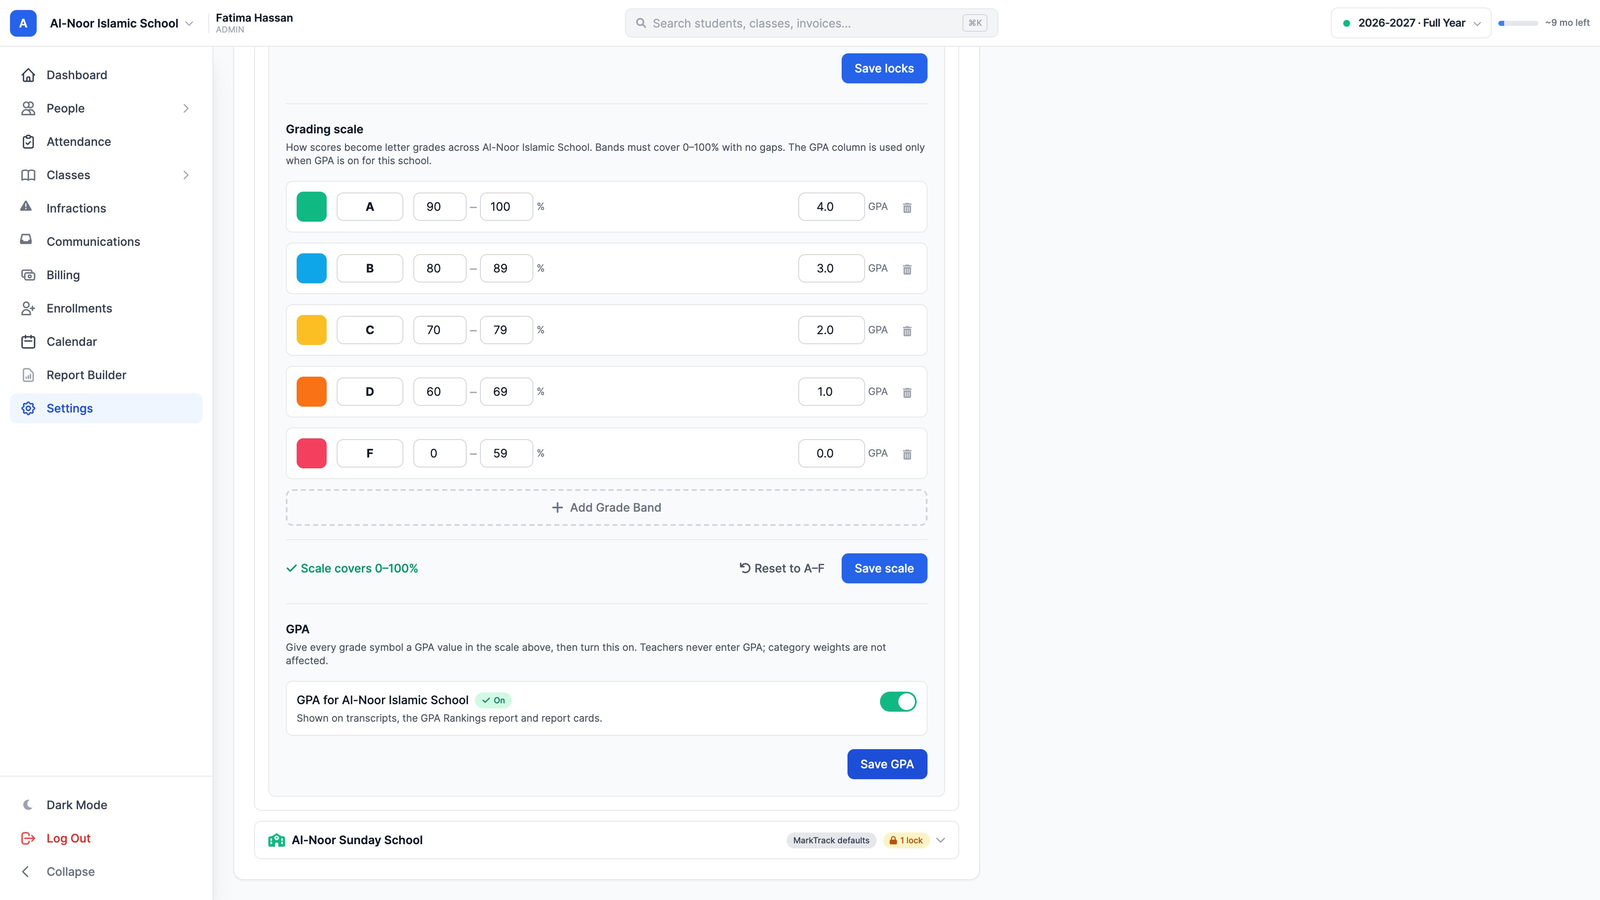
- Scroll to Grading scale. MarkTrack starts every school on A 90–100, B 80–89, C 70–79, D 60–69 and F below 60. Change the bands if your school uses different ones.
- In the box marked GPA next to each letter, type how many points it is worth. On a 4-point scale that is A 4, B 3, C 2, D 1, F 0. Values up to 10 are allowed, so a 5-point scale works too.
- Click Save scale.
- Under GPA, turn on the switch next to GPA for your school. It says Not saved yet until you click Save GPA.
How GPA is worked out
Each class's letter grade becomes its points. A term's GPA is the plain average of those points across the student's classes (every class counts equally). The year GPA combines the term GPAs using the weights from Step 1, and cumulative GPA covers every year. Classes set up as Hifz classes are left out (their GPA points show as a dash). While GPA is on, the school's grading scale is locked and every class uses it, even a class that had its own scale.
Turning GPA on doesn't change any card by itself: it makes GPA fields available in the designer (Step 4), and it appears straight away on transcripts and the GPA Rankings report. If you later turn GPA off, any card that shows a GPA can't be downloaded or sent until you take the GPA out or turn it back on.
Step 3 — The gradebook: where every number comes from
Report cards read grades straight from each class's gradebook; there is nothing to copy across. To look at one, open Classes in the menu, click Gradebooks (they're grouped by level), and click View next to a class.
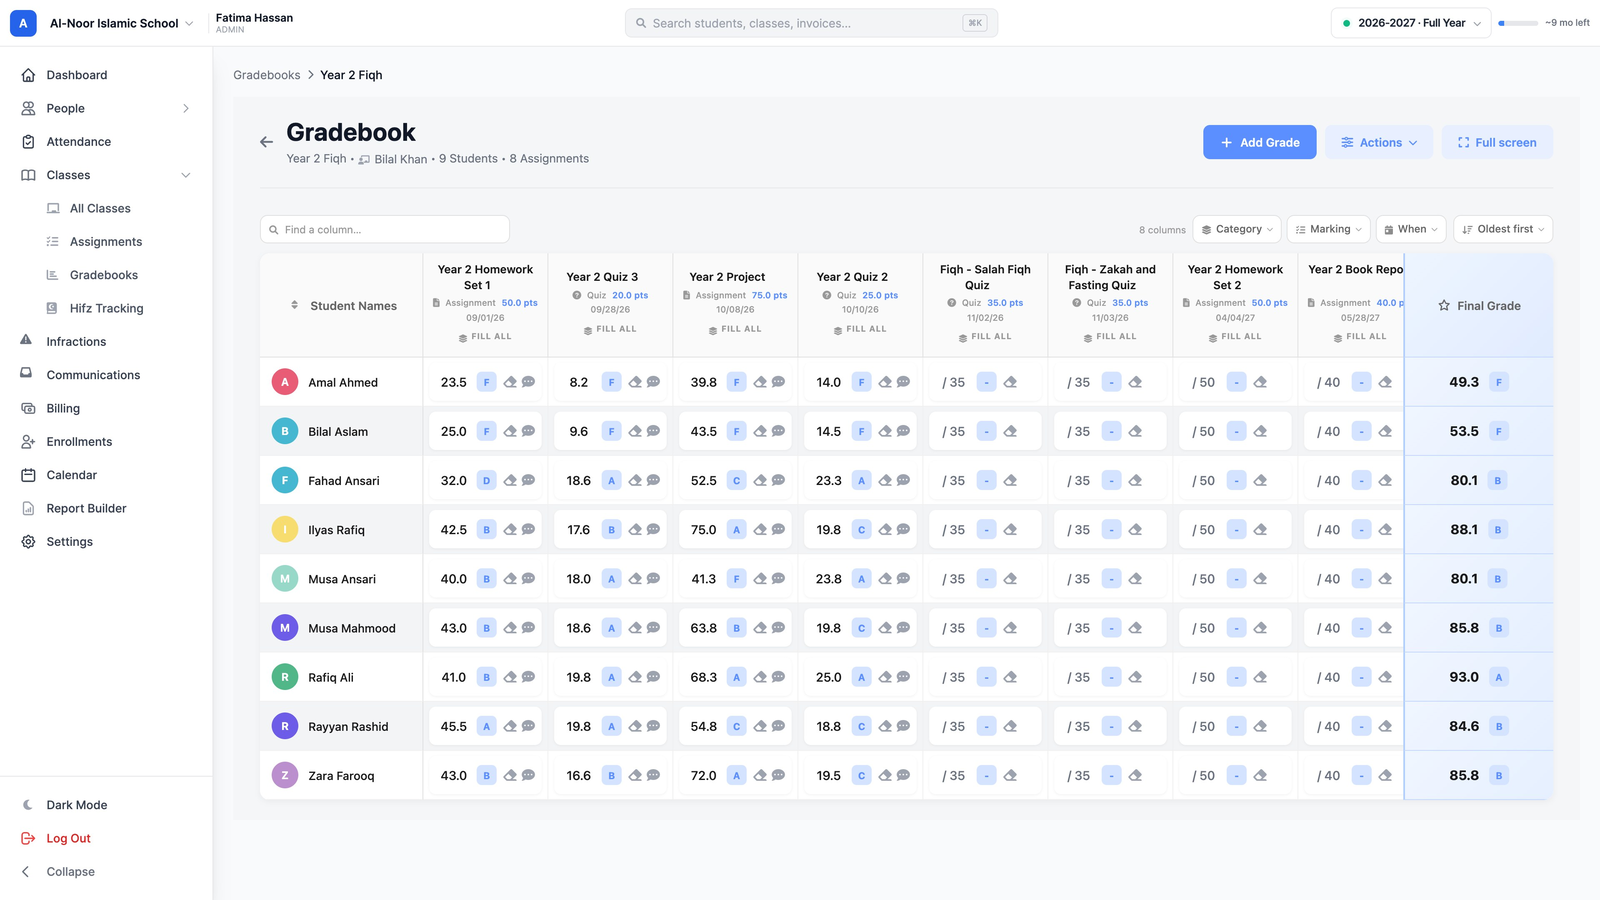
- The due date under each assignment decides its term — not the day the score was typed. Work due between September 1 and November 13 counts toward Quarter 1 in our example. Work with no due date counts toward no term (it still counts in the gradebook's Final Grade).
- Terms that haven't happened yet are empty. Early in the year, a card shows a dash for later quarters; they fill in as teachers keep grading.
- The gradebook's Final Grade is the overall average so far. The gradebook has no quarter columns; quarter and semester grades are worked out for the card from the due dates. Because the card averages quarters into semesters, and semesters into the year by your weights, its year grade can differ a little from the gradebook's Final Grade.
Teacher comments
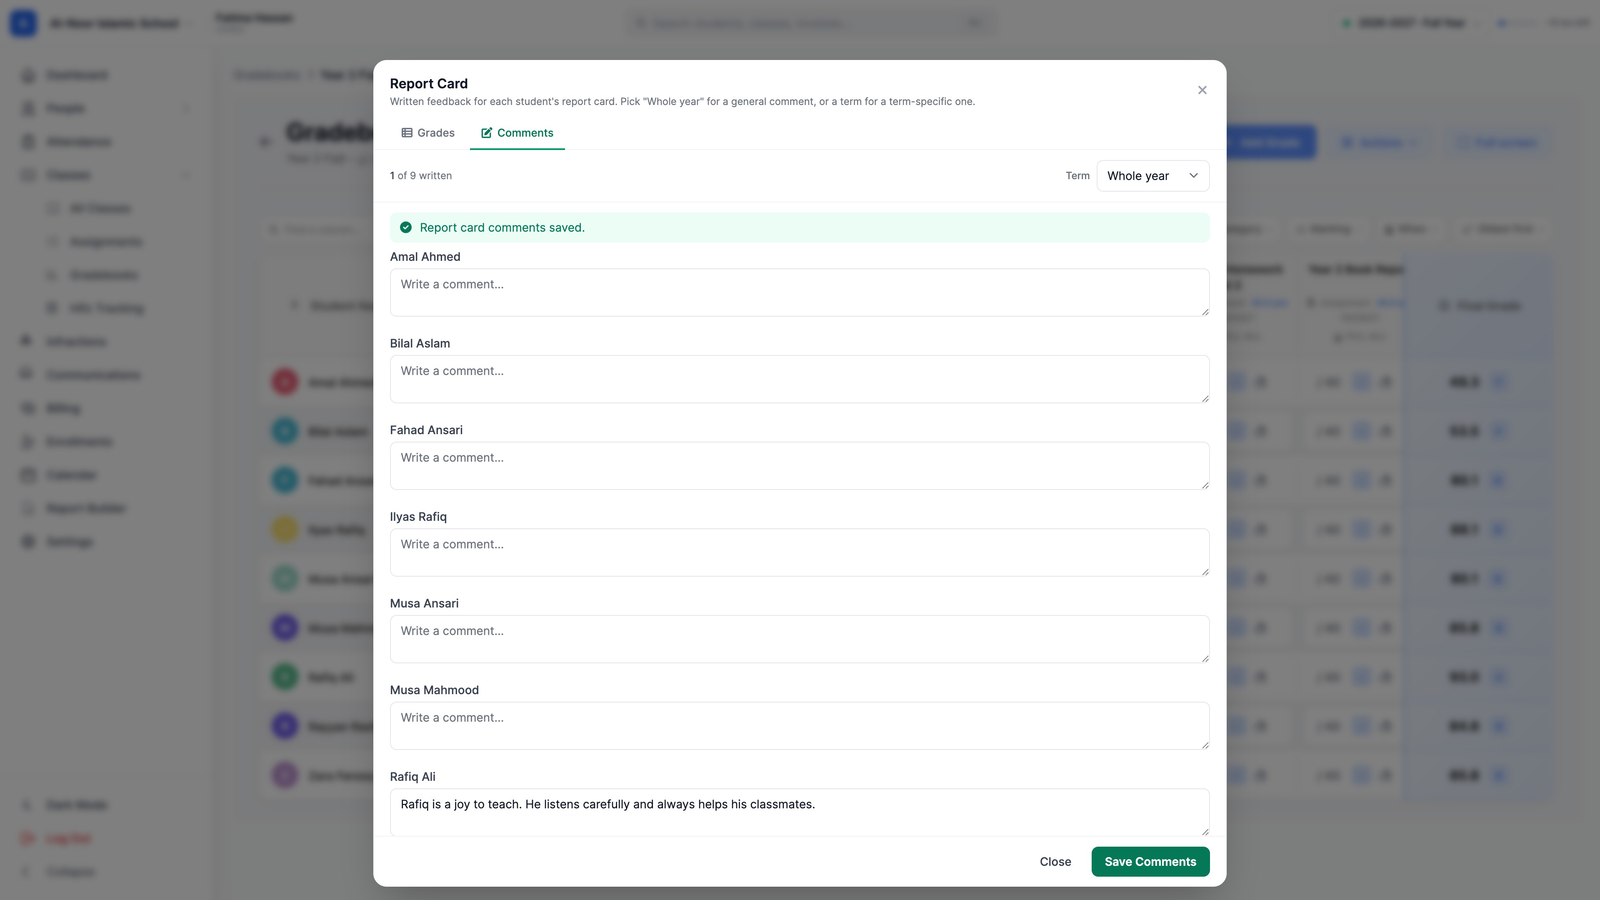
Teachers can write a comment for each student's card. In the gradebook, click Actions, then Report Card, then the Comments tab. Choose Whole year or a term from the Term list, type in each student's box, and click Save Comments.
Comments are for the whole year or a top-level term
The Term list offers Whole year and your top-level terms (the semesters). Quarters inside a semester don't get their own comments, so leave quarter comment fields off your card. On the card, a "Teacher comment (year)" field prints every comment the student has that year — whole-year and semester ones — as "Class name: comment"; a semester's comment field prints that semester's comments plus any whole-year ones.
Step 4 — Make the card
Report cards live in Report Builder: click it in the menu, then click Report Cards at the top of the page. There are three ways to make a card, and they all end in the same designer, where you can change anything.
✨
Generate with AI
Describe the look; get four designs built around your real classes and terms.
📄
Import your old card
Upload the PDF you use today; AI rebuilds it as an editable card in a few minutes.
🛠️
Build it by hand
Start from a ready-made card and change anything you like.
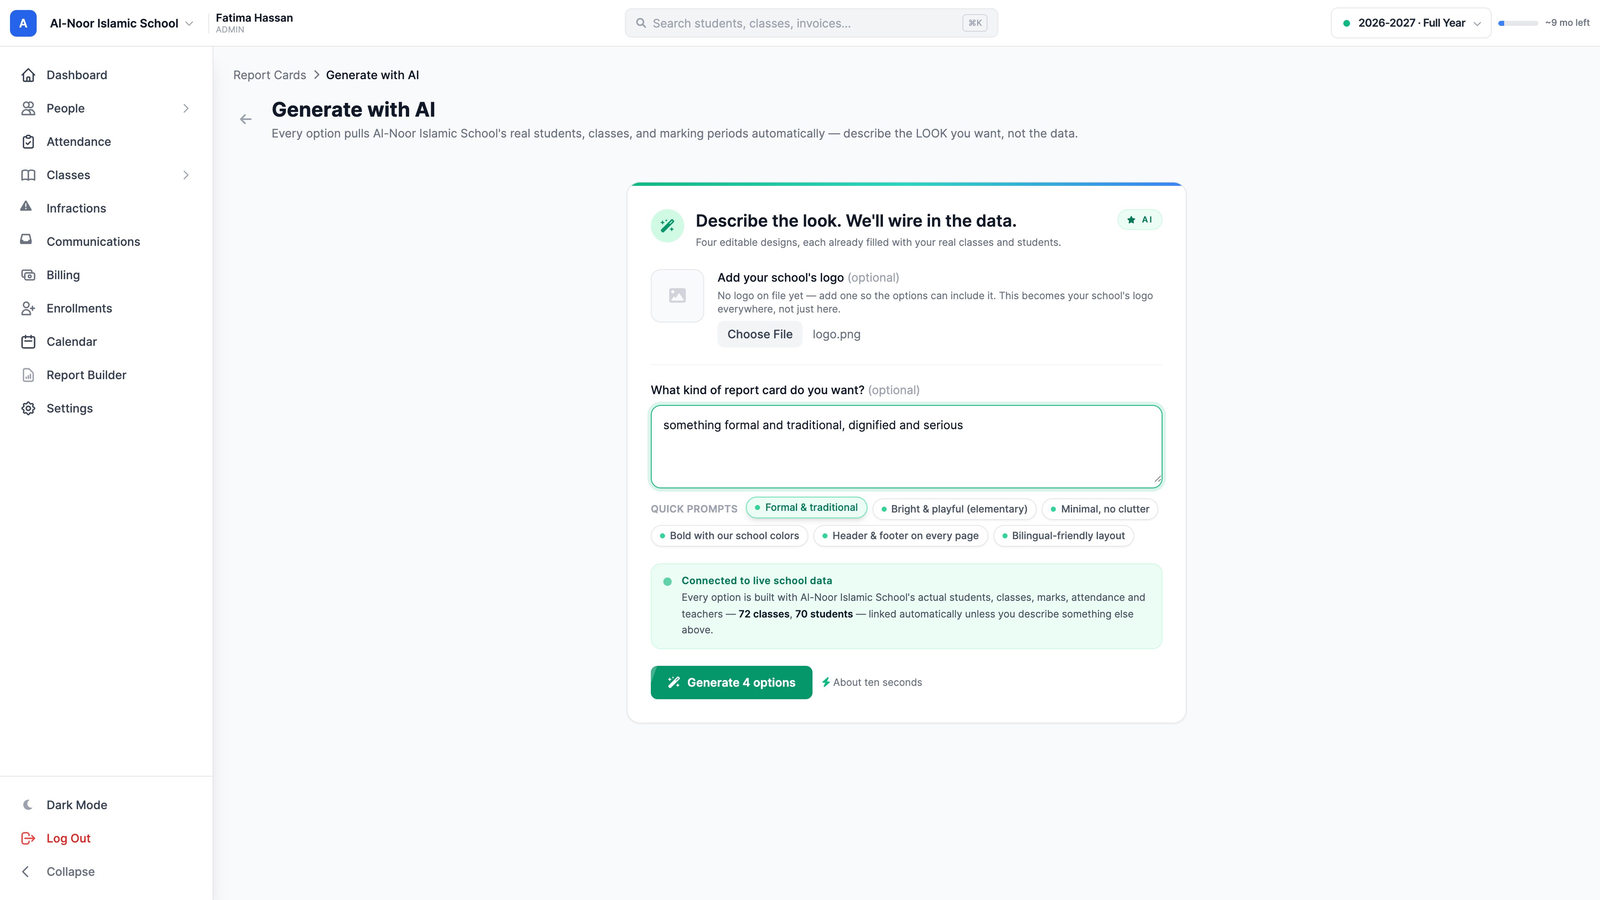
Way 1: Generate with AI
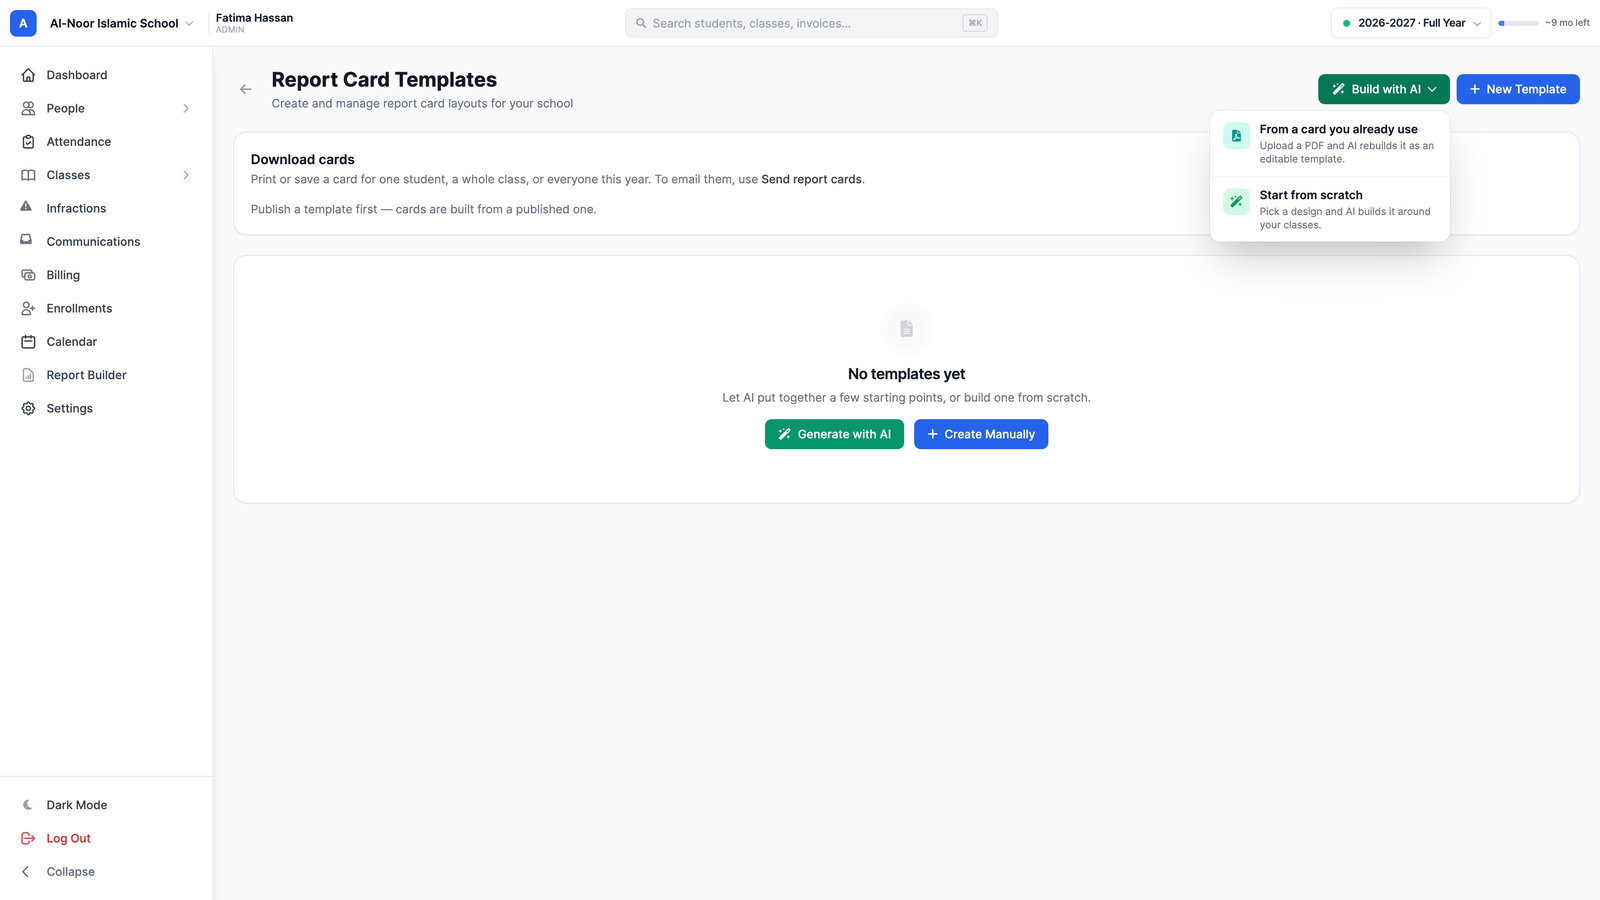
- Click Build with AI, then Start from scratch. (On an empty page, the Generate with AI button does the same.)
- Optionally add your school's logo with Choose File (if the school already has one, it's used automatically, with a Replace it link). This becomes your school's logo everywhere in MarkTrack.
- Describe the style you want, or tap a quick idea like Formal & traditional or Bright & playful (elementary). Describe the look: MarkTrack lays the cards out from your classes and terms itself, and AI picks the colours, fonts and heading style to match your words.
- Click Generate 4 options.
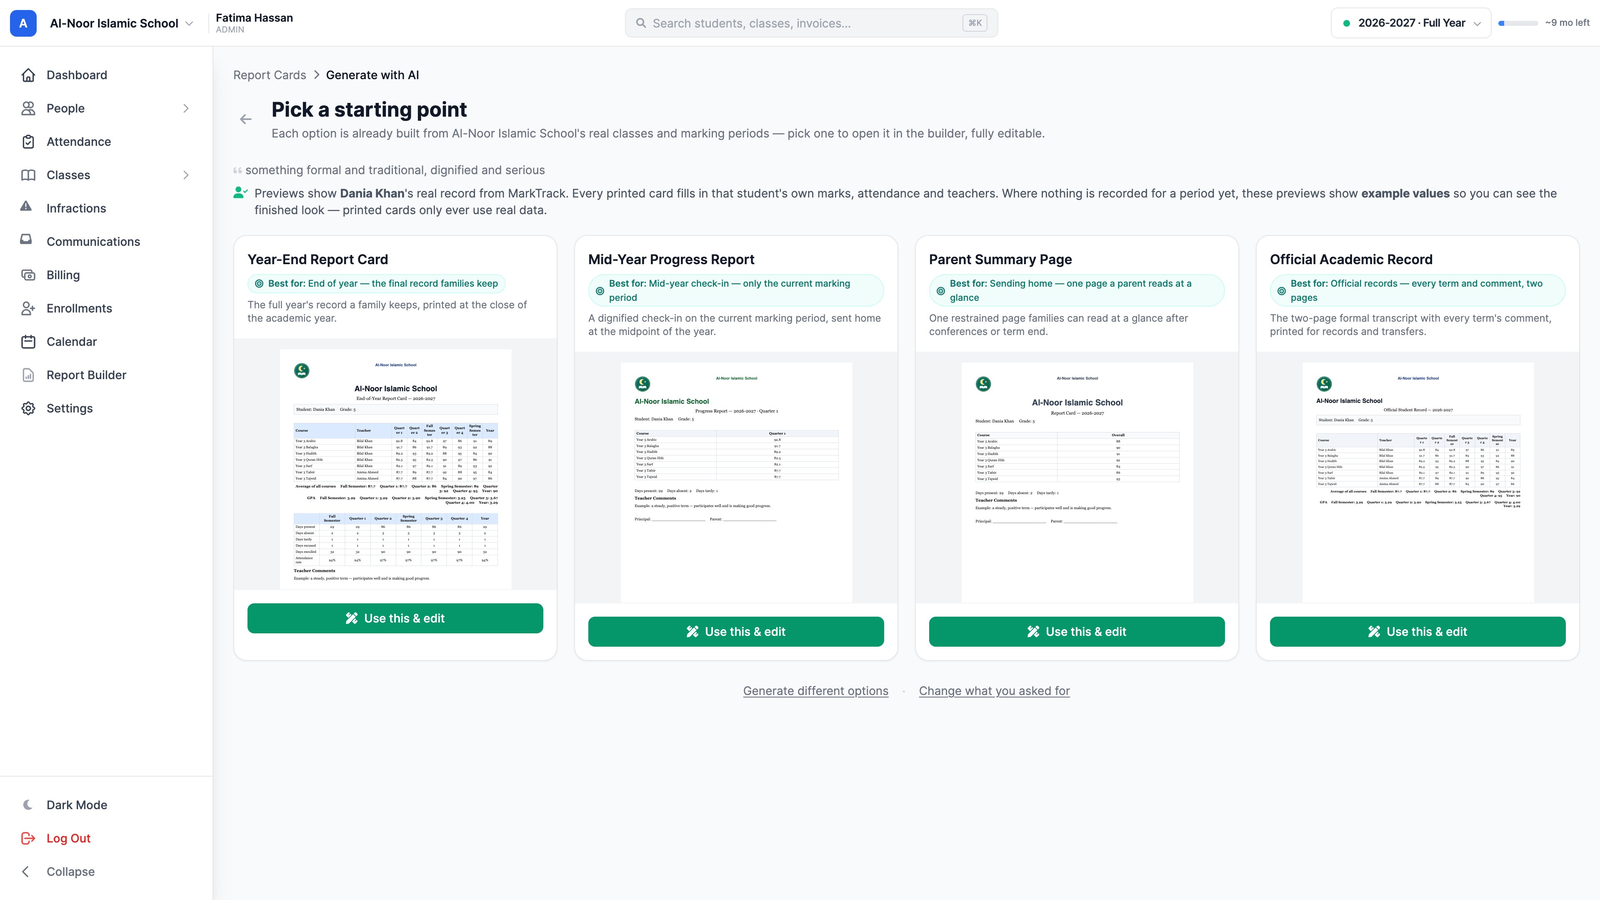
- Pick a starting point — a year-end card, a mid-year progress report, a one-page parent summary, or an official record — and click Use this & edit.
Way 2: Import the card you already use
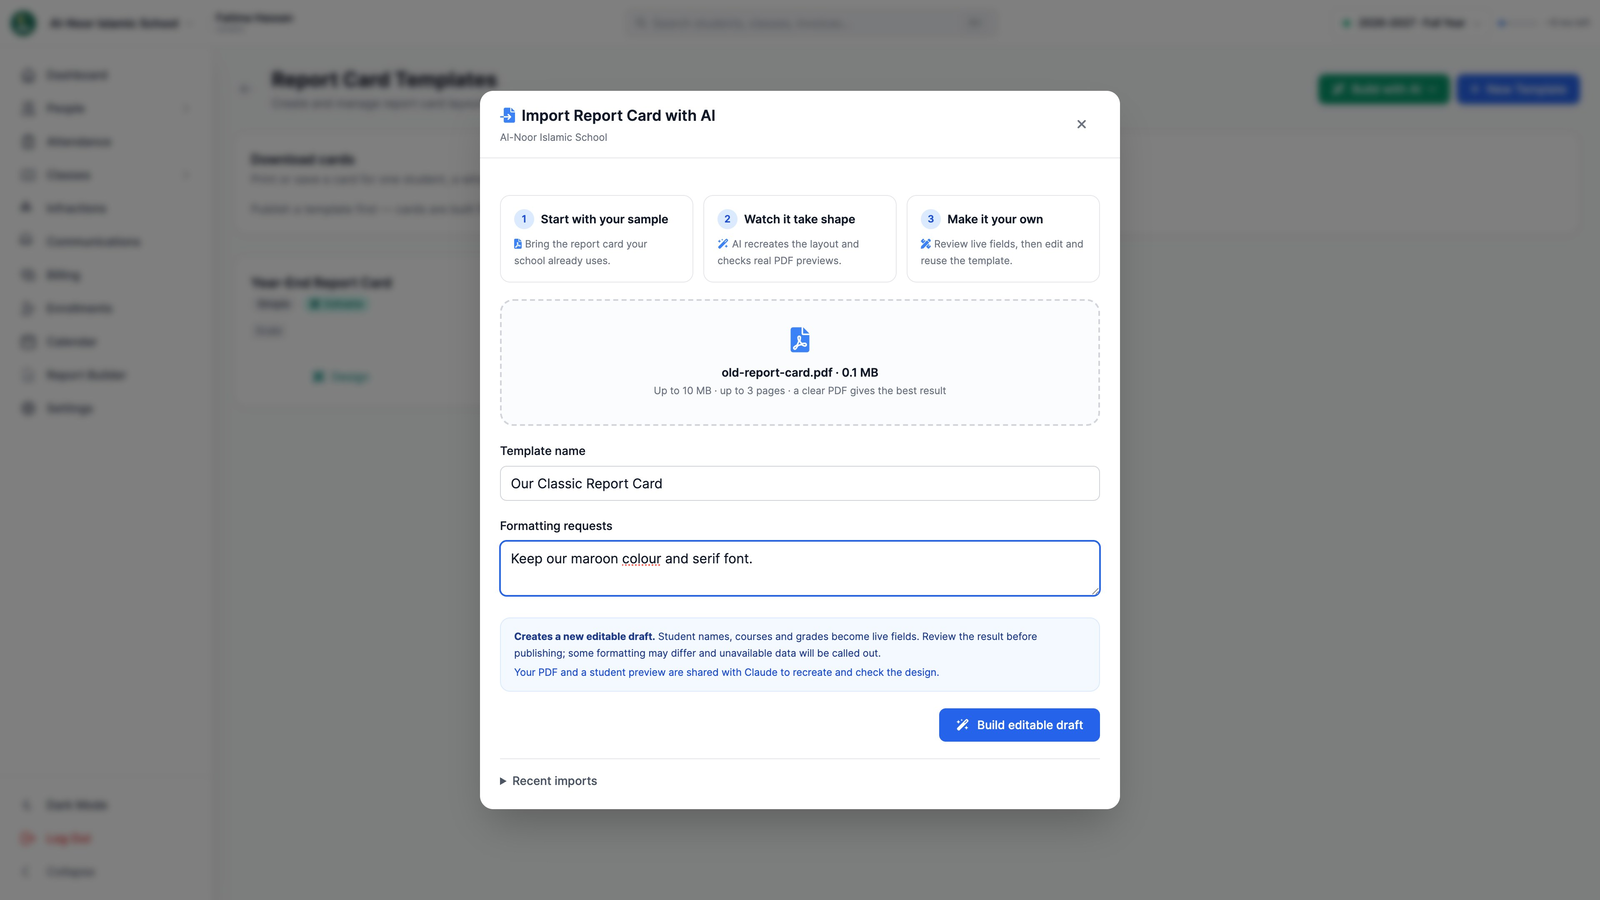
- Click Build with AI, then From a card you already use.
- Drop your report card's PDF into the box (up to 10 MB and three pages). A card you used to fill in by hand works fine.
- Give it a Template name, and add any Formatting requests, like "keep our maroon colour".
- Click Build editable draft. AI reads your card, picks the field that fills each blank, prints a test copy, compares it with your original, and fixes what doesn't match. It takes a few minutes. You can close the window: to check on it later, click Open import on the Report Cards page.
- When it's done, open Review notes if there are any — they tell you what to check yourself — then click Review and customize draft to open it in the designer.
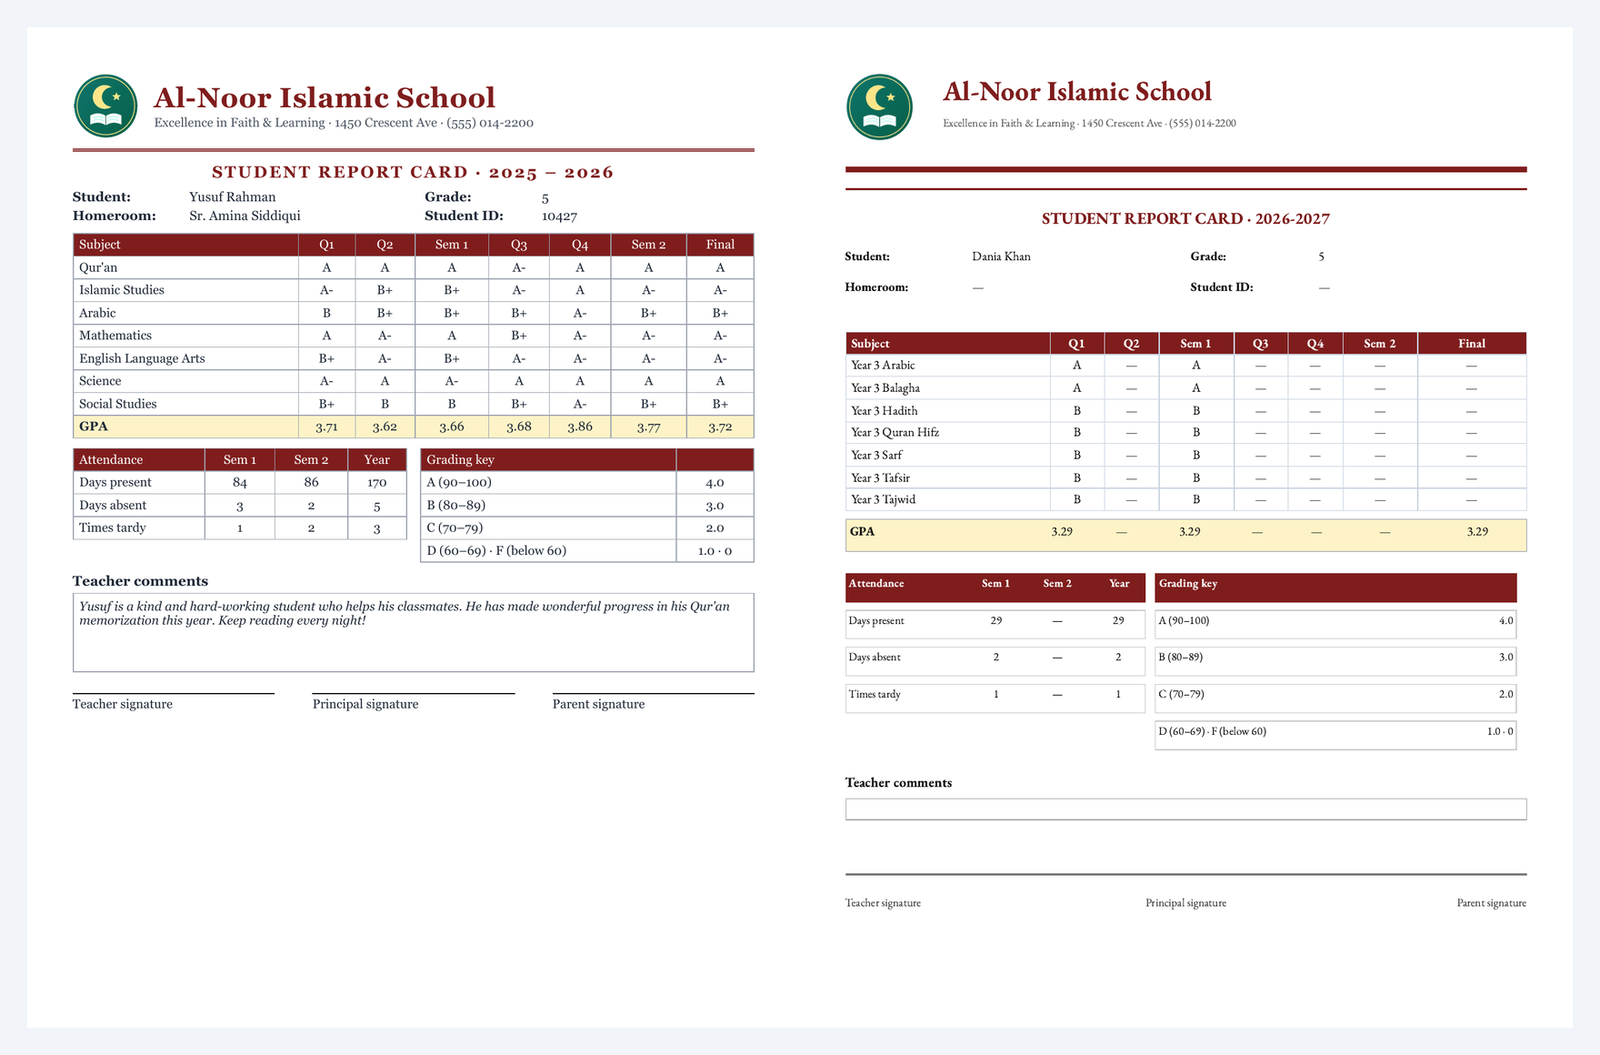
The import needs an academic year and at least one student, because it checks its work against a real student's data. Anything your card asks for that MarkTrack doesn't have is listed in the review notes rather than invented — but AI chose which field fills each blank, so check the draft against a couple of real students before you publish. Your PDF and one student preview are shared with Claude to recreate and check the design. Your existing cards are never touched; every import makes a new draft.
Way 3: Build it by hand in the designer
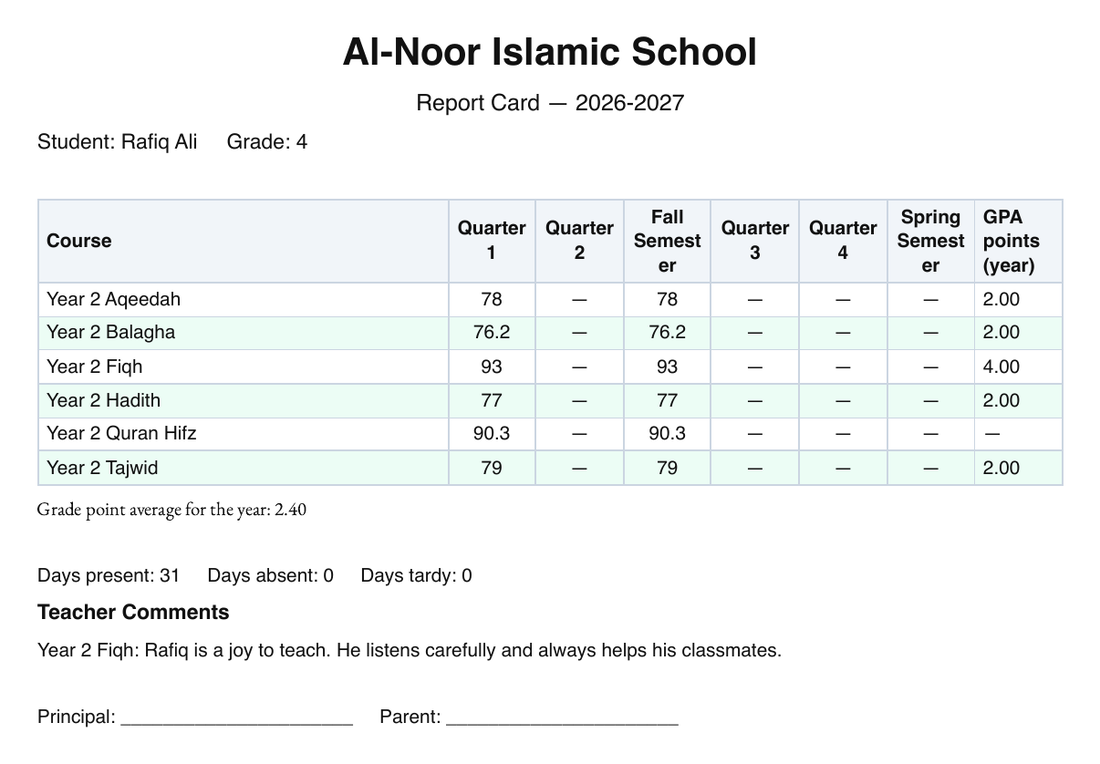
Click New Template. MarkTrack opens the designer on a simple card that is already wired up: the school name, the student, a table of courses with a column for every term, attendance, teacher comments and signature lines.
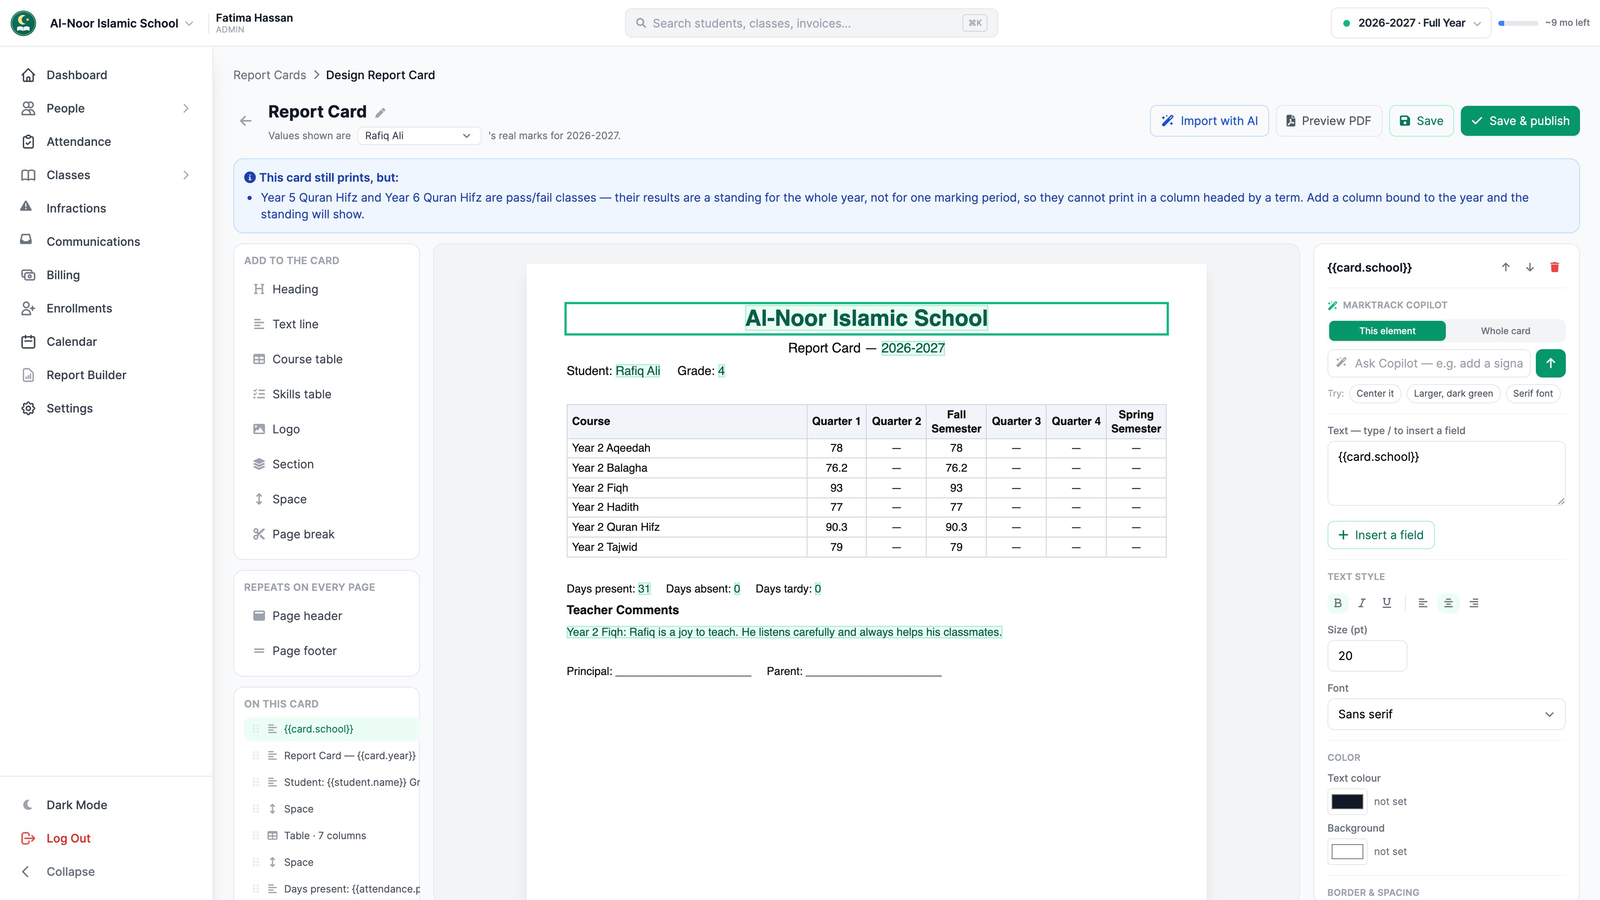
- Name it. Click the card's name at the top (or the pencil), type a new one, and press Enter; the new name is saved with your next Save. This is the name you'll pick when downloading and sending.
- Pick whose marks to preview. The list after Values shown are at the top switches the card to another student's real grades. Use it to check the card reads well for different students.
- Add things from the left: Heading, Text line, Course table, Skills table, Logo, Section, Space and Page break, plus a Page header and Page footer that repeat on every page. Drag items in On this card (or on the card itself) to reorder them.
- Click anything on the card to change it on the right.
- Read the blue note at the top. It lists anything that won't print the way you might expect. For example, a class graded pass or fail (such as Hifz) only prints in a whole-year column, and the starter card has none: add a column to the course table and choose Final grade (year) for it.
How the card connects to grades: fields
Click the course table and its Columns appear on the right. Every column has a heading and a field — the field is what fills it. Click Add a column, then Choose what this column shows, and pick from the list (type to search):
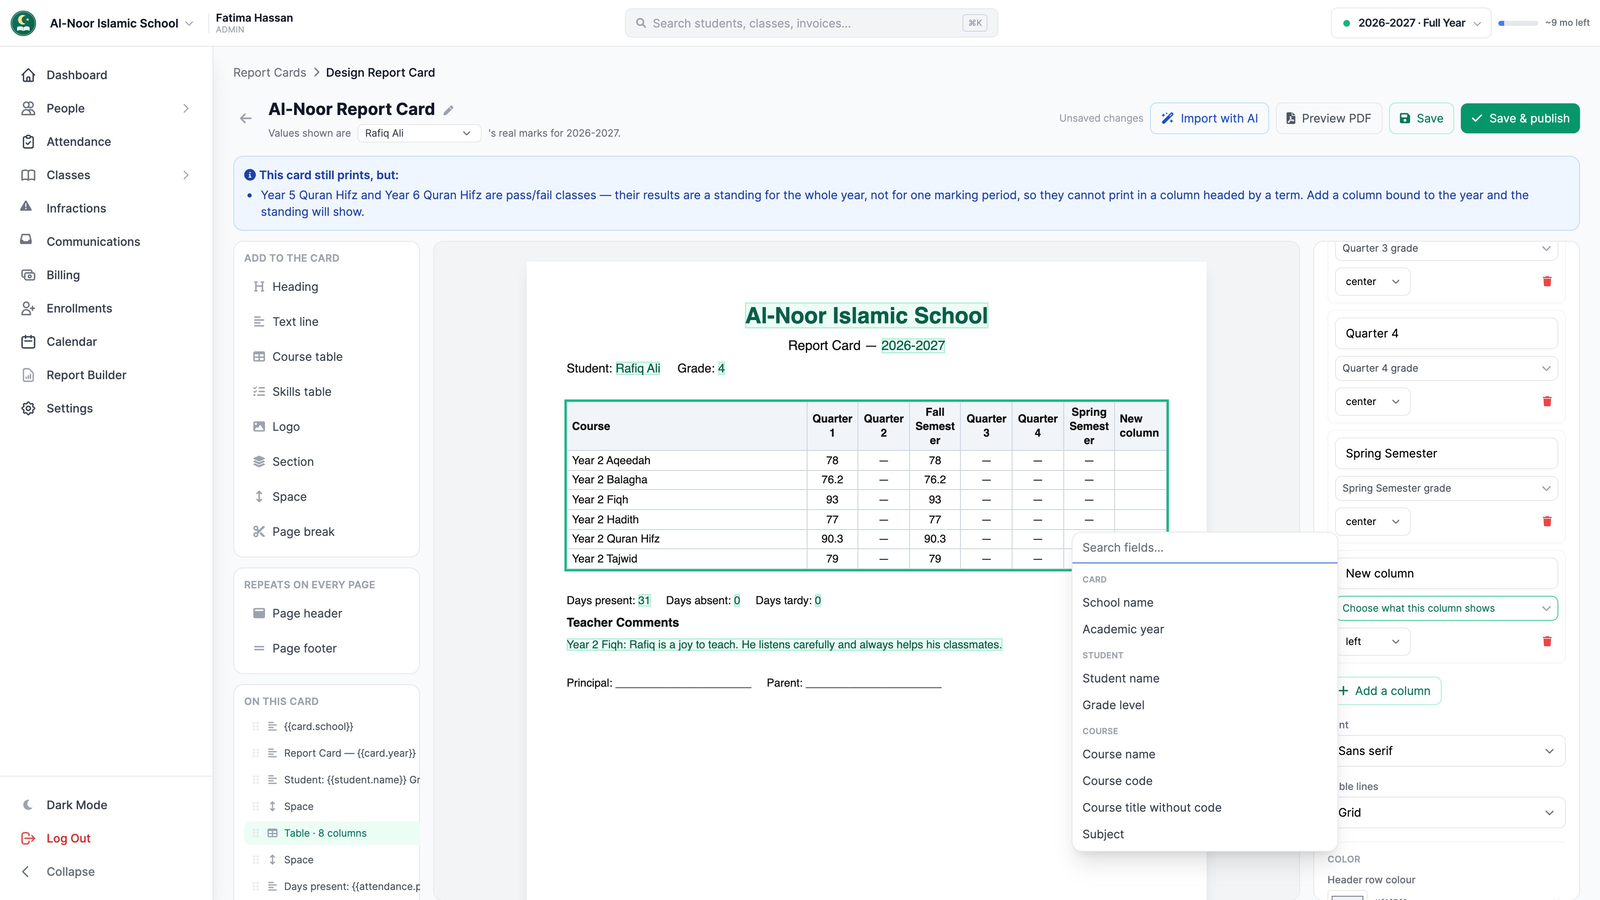
- Card — School name, Academic year.
- Student — Student name, Grade level.
- Course — Course name, Course code, Subject, Teacher, and more.
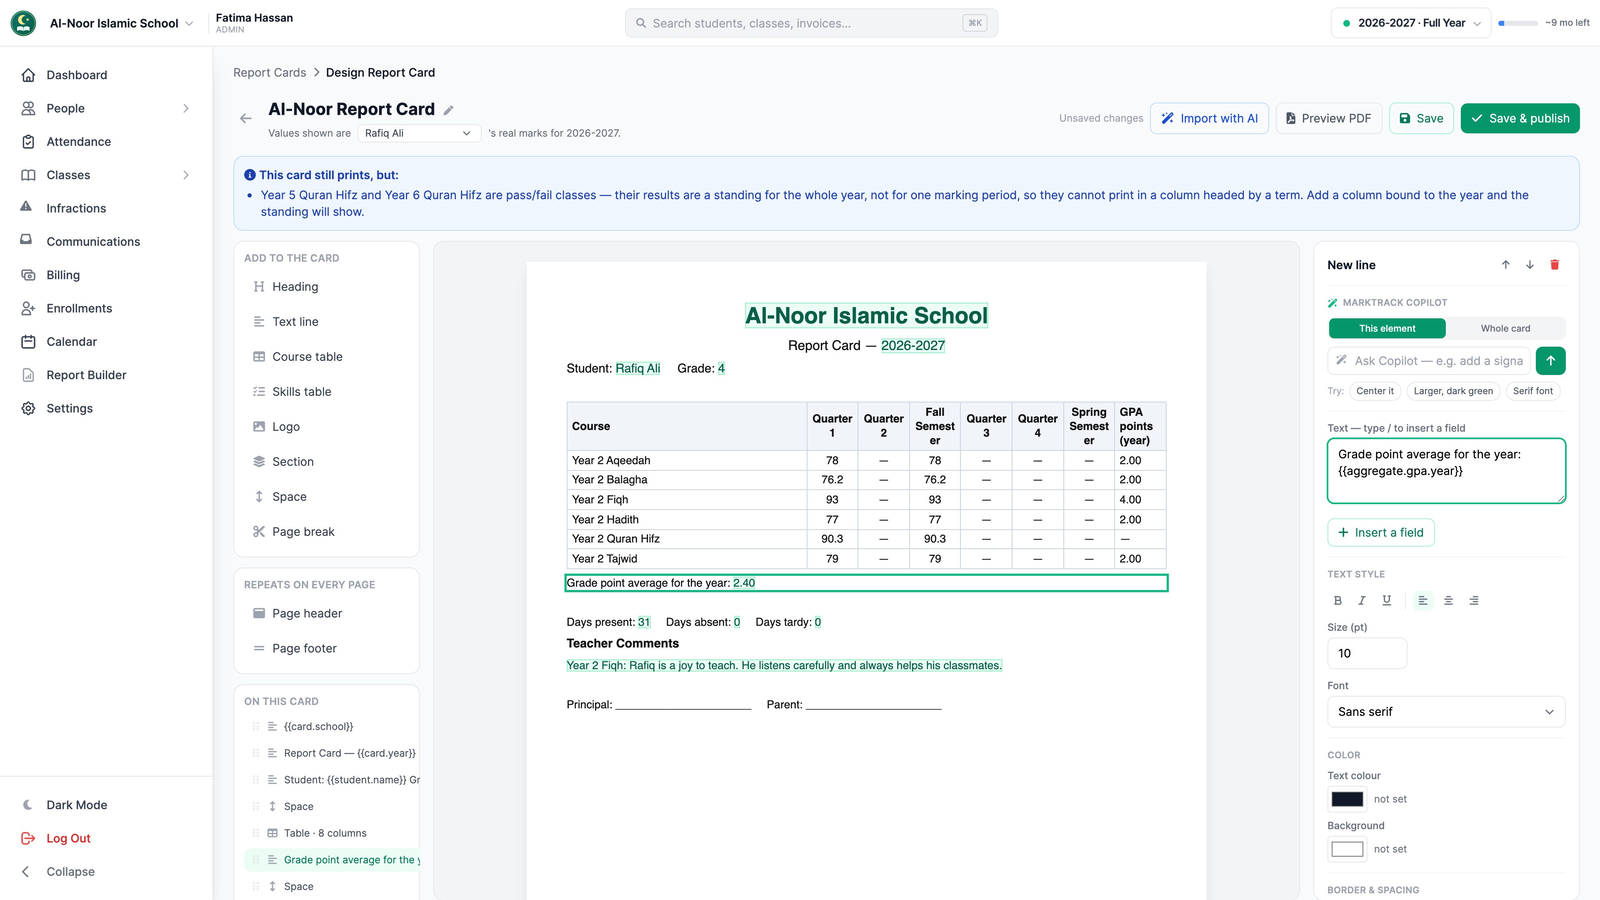
- Grades — for every term: the grade, the letter grade and GPA points; plus the final year grade, the average of all courses, term and year GPA, and cumulative GPA (GPA fields appear once GPA is on).
- Attendance — days present, absent, tardy, excused and enrolled, and attendance rate, for the year or a term.
- Comments — the teacher comment for the year or a term.
Fields work inside ordinary text too: click Text line, type your words on the right, then click Insert a field (or type /) to drop in, say, GPA (year). You never type a grade onto the card yourself. Fields point at terms by their place in the year rather than by a one-off record, so the same card keeps working next year as long as the new year has the same term layout (Start New Year copies it).
Making it look the way you want
- Text — font (Sans serif, Serif or EB Garamond), size, bold/italic, alignment, text colour and background.
- Tables — which classes appear (Every class this student takes or Only the classes I pick), grid or open rows, header colours, and each column's alignment.
- Boxes — borders (None, Hairline, Thin, Accent) and padding. A Section groups items and can lay them out side by side.
- Page position — pin something to a spot on the page (a corner, or a position across and down). A pinned item repeats on every printed page, like a header or footer.
- Logo — your school or organization logo, with height and alignment.
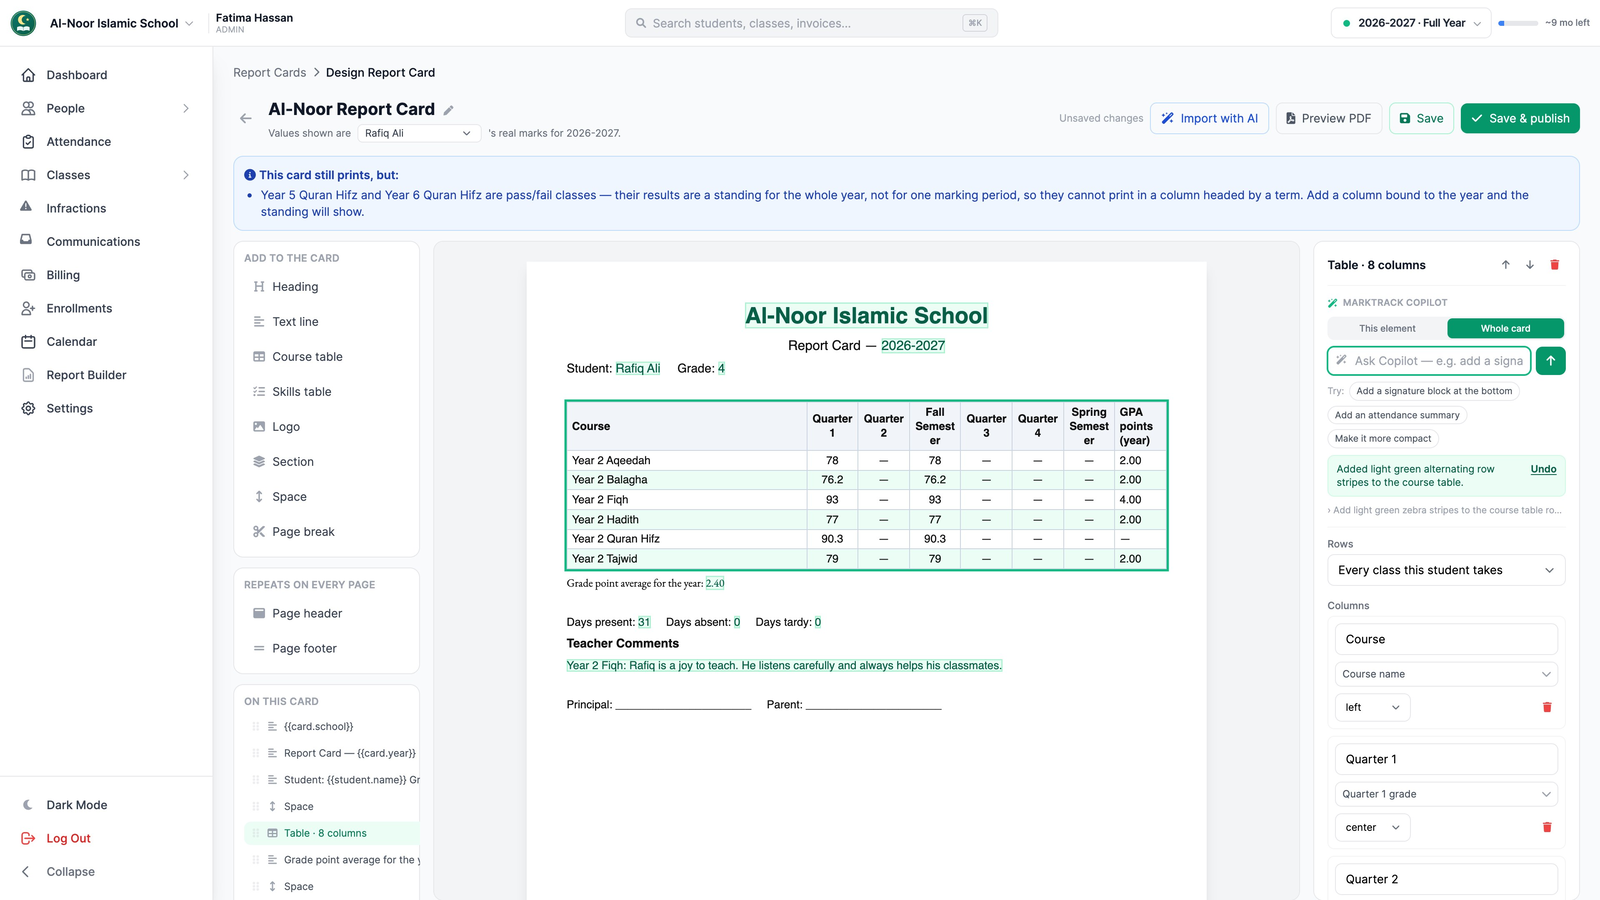
- MarkTrack Copilot — the easiest way of all. At the top of the right-hand panel, choose This element or Whole card, type what you want in plain English ("add light green stripes to the course table", "switch to landscape"), and click the arrow. If you don't like the result, undo it.
Publish it
Click Save to keep working on a draft, or Save & publish when it's ready. Only published cards can be downloaded or sent. Once a card is published, the button reads Save & keep published, and any save — even the plain Save button — changes the live card straight away. To take a card back, click Unpublish on its tile on the Report Cards page. If something on the card can't be filled in — a column pointing at a term that no longer exists, or a GPA field while GPA is off — MarkTrack tells you what and won't publish until it's fixed. A card that is already published stays published when you save it, so a problem saved into it stops it from downloading or sending until you fix it: read the note at the top before you save. A note at the top of the designer also tells you about anything that will print oddly, such as students who have no grade level set (their card leaves the grade level off).
Step 5 — Print and send
Download cards to print
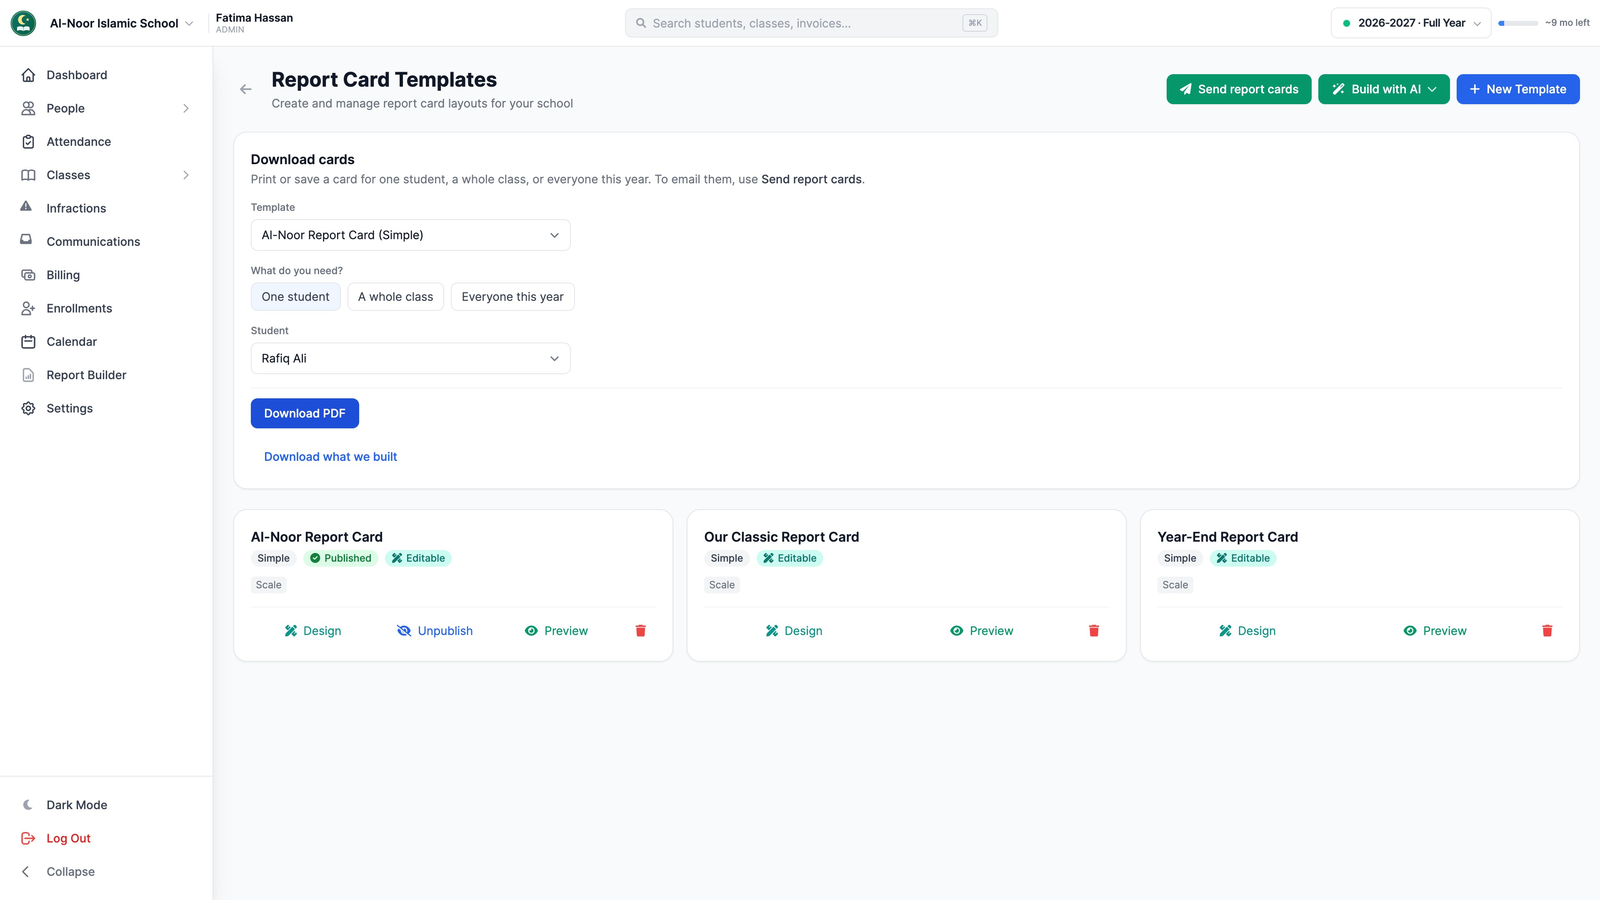
On the Report Cards page, use the Download cards box:
- Choose the Template (only published ones are listed). Cards are built for the year chosen at the top of the screen; to reprint another year, switch years there first.
- Under What do you need? choose One student, A whole class or Everyone this year, and pick the student or class.
- Click Download PDF (for one student) or Download zip (for a class or the whole year, one PDF per student). MarkTrack builds the cards in the background; when it's done, click Download what we built.
Email cards to families
- Click Send report cards at the top of the page (it appears once a card is published).
- Choose the Template and Academic year, then Who gets a card: Everyone this year, One class or One student.
- Under Send to, tick Parents, Students, or both. The counts update as you choose; "need attention" counts families who won't get an email (no address on file, for example), and Review lists each one with the reason.
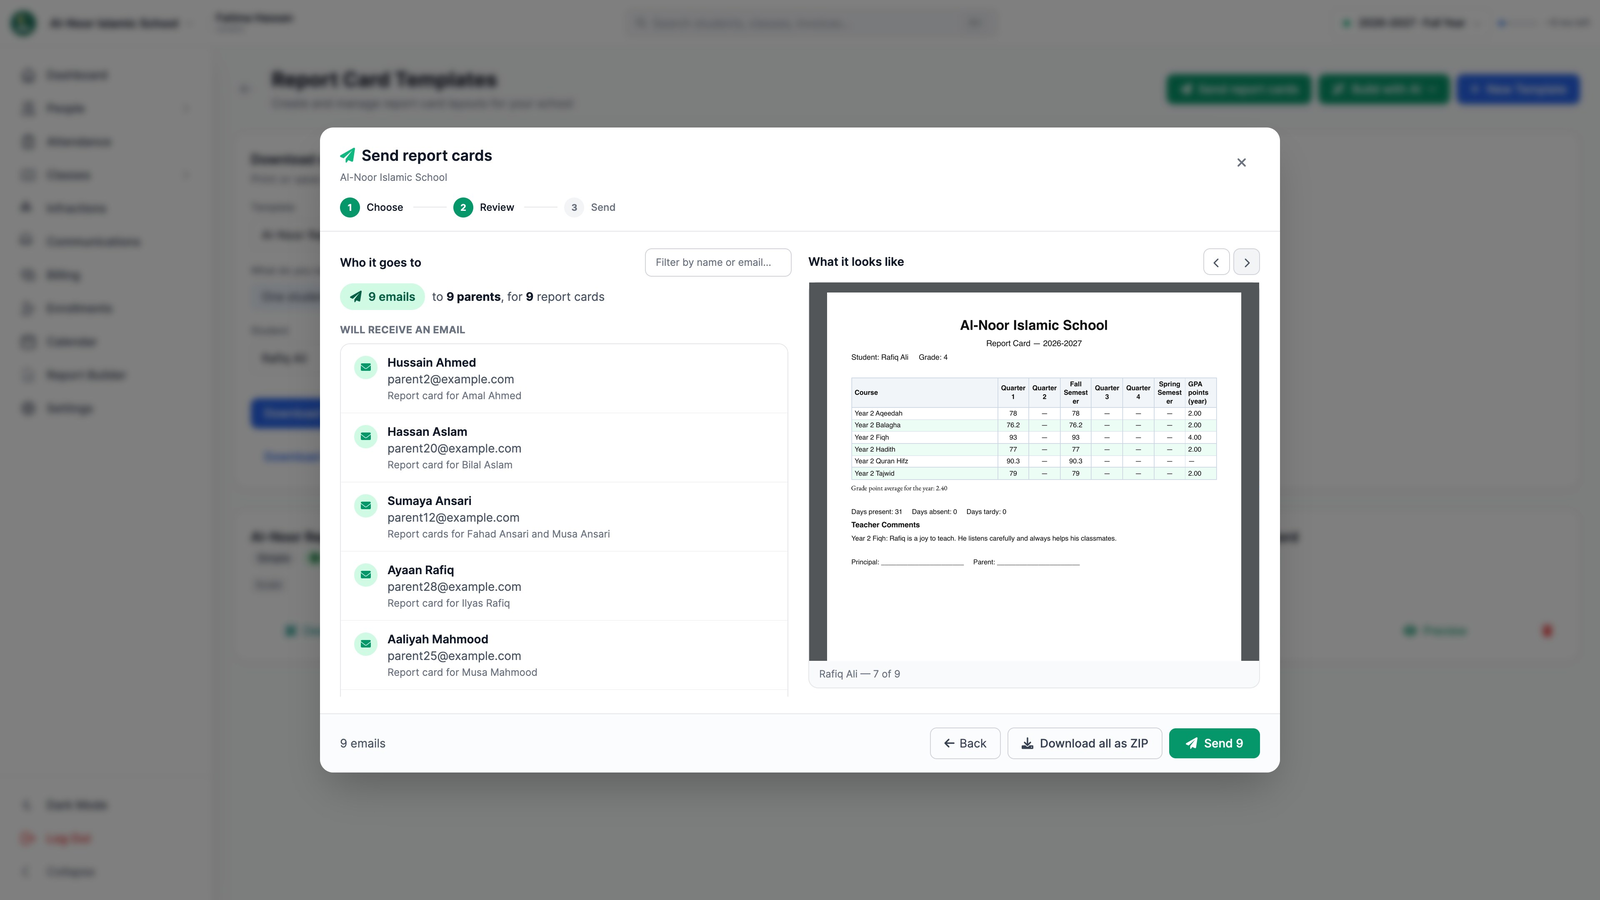
- Click Review. You see every address that will be written to, anyone who won't get one and why, and the real card each family will receive. Nothing is sent yet.
- Click Send (it shows how many emails, like Send 9), or Download all as ZIP to print the same cards instead. Sending carries on in the background, so you can close the window. It ends with Report cards sent (or Sent, with some problems), and the send is kept under Recently sent.
Common questions
Why does a column show a dash?
That term has no grades yet — usually because it hasn't started. Dashes fill in as teachers grade work dated in that term.
Why won't my card with a GPA publish or print?
GPA is off for the school. A card that shows a GPA can't be published, downloaded or sent while GPA is off. Turn it on (Step 2), or take the GPA fields off the card.
My imported card says "GPA unavailable" or "GPA not enabled"
The import found a GPA on your old card while your school had GPA off, so it printed that note instead of inventing a number. Turn GPA on (Step 2), then in the designer replace the note with a GPA field.
Why isn't my card in the Template list when I download or send?
It's still a draft. Open it with Design and click Save & publish.
Why is the grade level blank on some cards?
When a student's profile has no grade level, the card uses the level their classes share; if their classes don't agree, it leaves the grade level off rather than guess. The note at the top of the designer names a few of them, and the Send review step lists everyone affected. Set their Grade Level on the student's profile and the next card includes it.
Can I change the grades after the year is over?
Concluding a year freezes its report-card grades, so cards reprint exactly as they were. The Grades and Comments tabs become read-only. An admin can reopen the year if something genuinely needs changing; see Set up academic years and terms.
Set it up once, and every term after it just works
For the exact maths behind each grade, read How grades and report cards are calculated. For more on downloading and sending, see Generate and email report cards. Stuck? Contact support.
More in Reports
Still stuck?
Our team is happy to walk you through it.