Send an email to families
MarkTrack has a built-in email composer for sending a single message to many people at once — a whole class's parents, every student in a school, or a handful of people you pick by hand. This guide covers writing the email, attaching files, choosing exactly who gets it, and reviewing what you've already sent in the Communications history.
Two things worth knowing up front. First, the email comes from your own email address — the "From" line shows your name and your login email, so replies come straight back to you. Second, sending happens in the background: when you click Send, MarkTrack queues the email and shows you a confirmation. Large sends take a few moments to finish going out.
Who can send email
Admins and teachers can both send email. An admin can email any parent, student, or teacher in the schools they have access to. A teacher can only email their own students and those students' parents — teachers can't email other teachers or students outside their classes.
Step 1 — Open the email composer
The composer is a pop-up window you open from your dashboard.
- Go to your Dashboard (the home page after you log in).
- In the Quick Actions row, click Send Email (the paper-plane icon).
- The New email window slides open over the page. Its header shows who the email is from — your name and email.
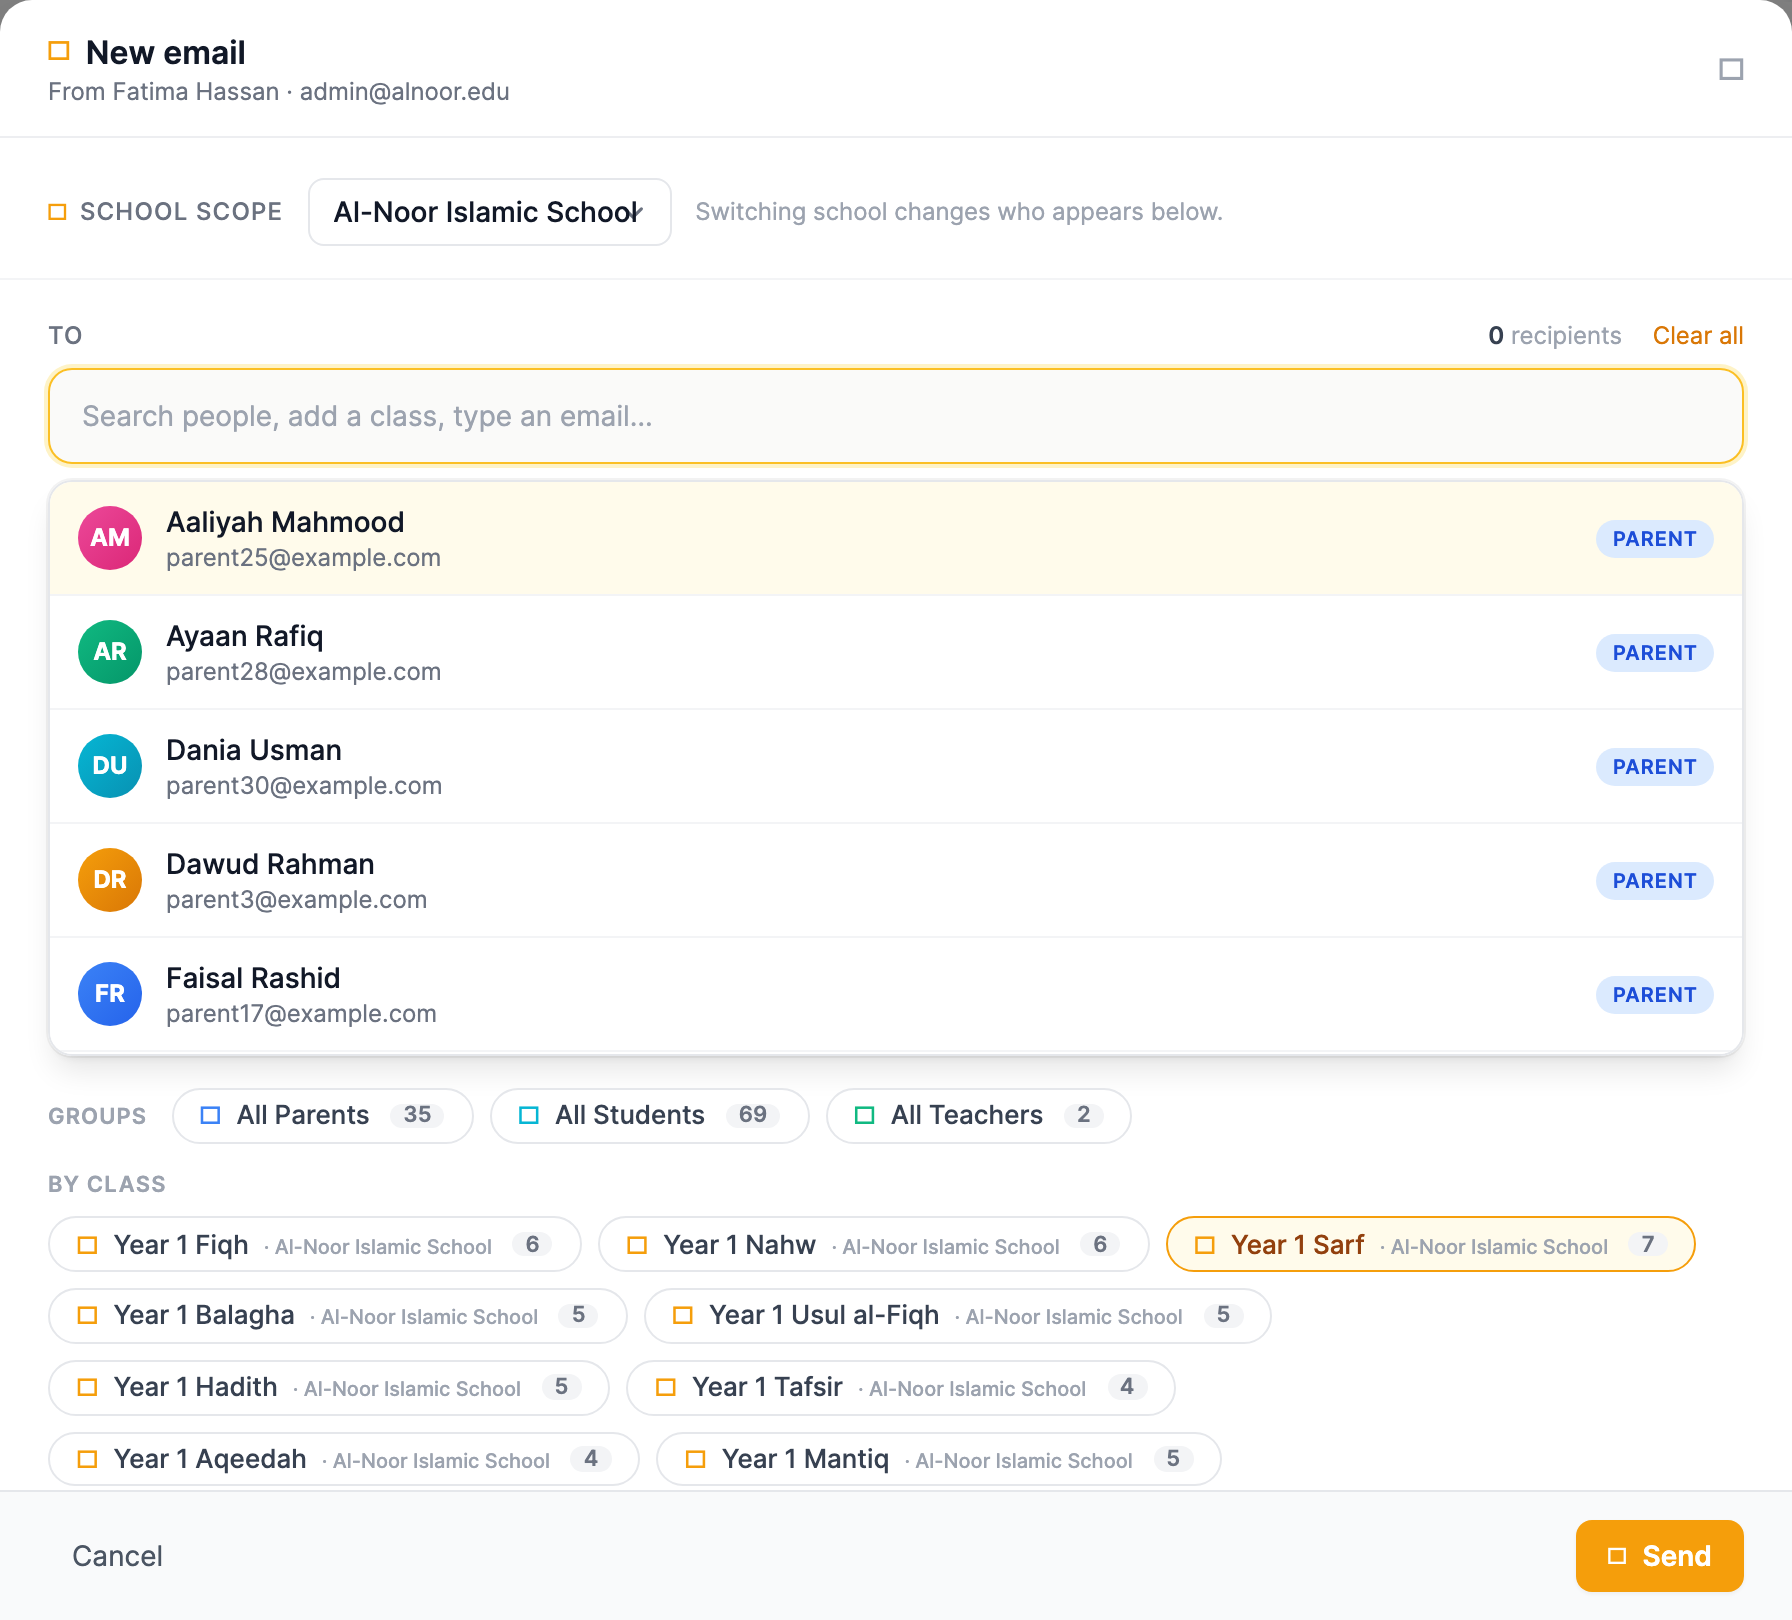
Step 2 — Pick your recipients
The To box at the top is where you choose who gets the email. You have a few ways to add people, and you can mix and match them. A running recipients count on the right tells you how many people you've selected so far.
- Search by name — start typing in the Search people, add a class, type an email… box. Matching parents, students, and teachers appear; click one to add it as a chip.
- Whole groups — click All Parents, All Students, or All Teachers to add everyone in that group at once. Each chip shows a count. (Teachers don't see the All Teachers chip.)
- By class or grade level — under By class, click a class to add every student enrolled in it. This is the fastest way to reach "all the parents of Arabic Level 1," for example.
- A manual email address — type any email address into the search box and add it directly, even for someone who isn't a MarkTrack user.
Each person or group you add becomes a removable chip. Use Clear all to start the recipient list over.
Sending to a whole class
When you add a class, MarkTrack emails the students in that class. To reach the parents instead, use the All Parents group or search for parents by name. Adding a class counts every enrolled student toward your recipient total.
Choosing a school first (admins with more than one school)
If your organization runs more than one school and you have access to several, a School scope dropdown appears at the top of the composer. It controls who shows up in the recipient lists below.
- Pick a specific school to limit the parents, students, teachers, and classes to that one school.
- Or pick All schools (org-wide) to reach everyone across your organization.
Switching the school refreshes the recipient lists. Teachers don't get this dropdown — their audience is always fixed to their own classes.
Step 3 — Write the subject and message
- Click into the Subject field and type a short, clear subject line ("What's this about?").
- Click into the Message editor and write your email. This is a rich-text editor: you can make text bold or italic, add bulleted lists, and insert links using the toolbar.
- To add a photo inside the message, paste or drag an image directly into the editor. It embeds in the email body where recipients will see it.
Let pasted images finish uploading
When you paste a photo, give it a second to finish uploading before you hit Send. If an image is still uploading, MarkTrack won't send a broken email — it stops you with "An image is still uploading — wait a moment and resend." Just wait and click Send again.
Quick templates
Click Quick templates to expand a row of starter messages — Weather Closure, Delayed Opening, Early Dismissal, Field Trip, Parent-Teacher Conf, and School Event. Click one to drop its wording into the composer, then edit it to fit. Templates are a starting point, not a fixed form.
Step 4 — Attach files (optional)
Use the Attachments area for files that should travel with the email, like a PDF flyer or a permission slip.
- Click Click to attach files to open your file picker, or drop files anywhere in the dashed box.
- Each attached file appears as a chip below the box. Remove one if you change your mind.
Attachments differ from pasted images: an attachment is a downloadable file at the bottom of the email, while a pasted image shows inline in the message body. Both are saved with the email so you can see them later in the history.
Step 5 — Send
- Double-check the recipient count in the To area and the Send button.
- Click Send.
- MarkTrack confirms with "Sending email to N recipients. This may take a few moments." The window closes and the email goes out in the background.
There's no separate "draft" to save. The composer holds whatever you've typed only while it's open — if you close it without sending, nothing is sent. If you forget the subject or message, or don't pick anyone, MarkTrack stops you with a clear message before sending.
What "sent" means
MarkTrack hands the email to its mail service and records it in your history. The recipient count includes every person, class member, and manual address you added. Replies go to your own inbox, since the email is from your address.
Step 6 — Review your email history
Every email you send is logged in the Communications hub, so you always have a record of what went out and to whom.
- In the left sidebar, click Communications (the inbox icon).
- The page opens on the Emails tab, listing the most recent emails with a count badge. (There's also a Texts tab for SMS — see Send text messages.)
- Click any email to open its detail — the full subject, message body, recipients, attachments, and any embedded images.
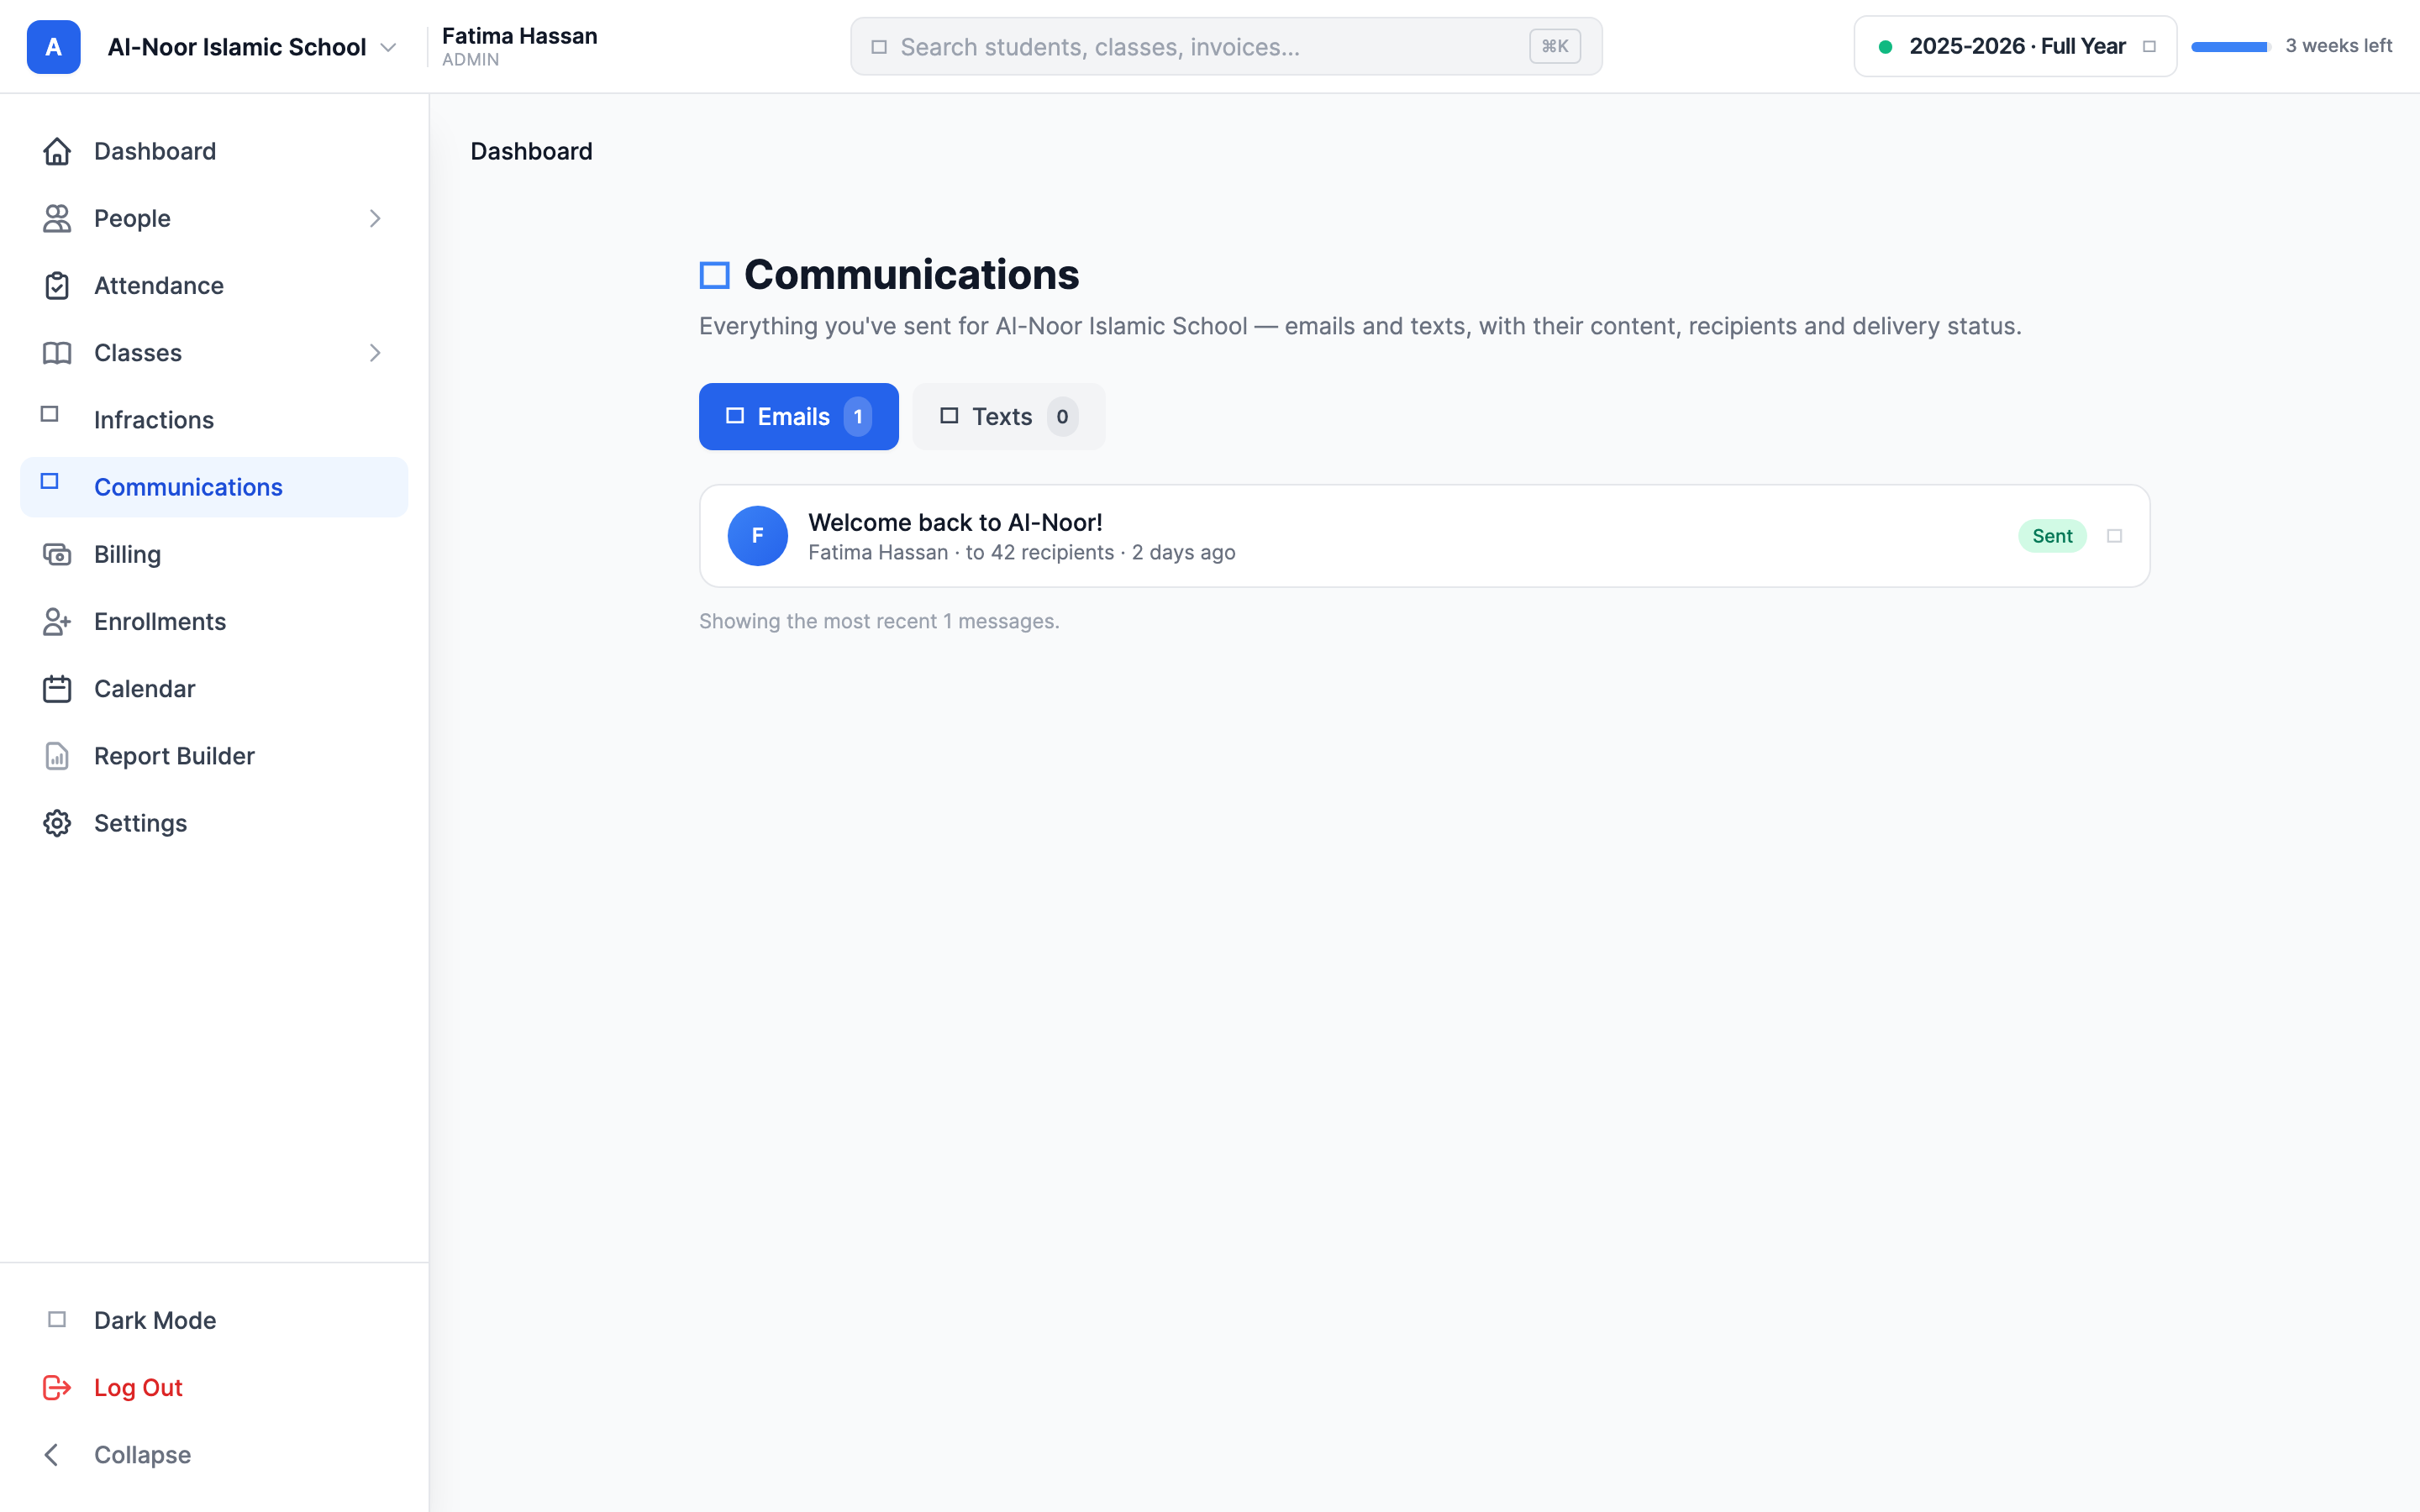
Who sees which history
An admin sees all the email sent for the current school (or everything across the organization when in "all schools" mode). A teacher sees only the emails they personally sent. The history is per school, so switching schools changes the list.
That's the whole email flow — open the composer, pick your people, write and attach, send, and check the history. For texting families instead, see Send text messages. If something isn't behaving as you expect, contact our support team and we'll help.
More in Communications
Still stuck?
Our team is happy to walk you through it.