Switching to MarkTrack
Move your roster from any LMS to MarkTrack with AI
The hardest part of switching school management systems isn't learning the new software. It's getting your existing students and parents into it without spending three weeks copy-pasting from your old LMS. Every roster export is shaped a little differently — RenWeb gives you one column layout, QuickSchools gives you another, Muntazim mixes school and masjid data together, and most schools end up exporting to a spreadsheet first and cleaning it by hand.
MarkTrack's AI Import reads whatever export you bring, auto-detects which columns are which (name, email, DOB, address, parent name, parent email, parent phone), groups parents and children into families on its own, and gives you a preview to review and edit before anything is saved. Below is the full walkthrough with screenshots, plus a sample CSV you can use to try it on your own admin account first.
Step 1 · Start with a roster export from your old LMS
Any school management system worth its salt can export a CSV. Open Students, Parents, or Families, choose Export, pick CSV. Don't worry about renaming columns or stripping extra fields — AI Import will handle whatever you bring.
For this walkthrough, here is a realistic sample export — 25 students across grades 3 to 9, with parent names, US addresses, phone numbers, and dates of birth. Notice the messy parts: some students have an email, some don't. Some have a phone, most don't. Two columns reference the year of birth, not the age. This is exactly the kind of partial, real-world export you'd get out of any system.
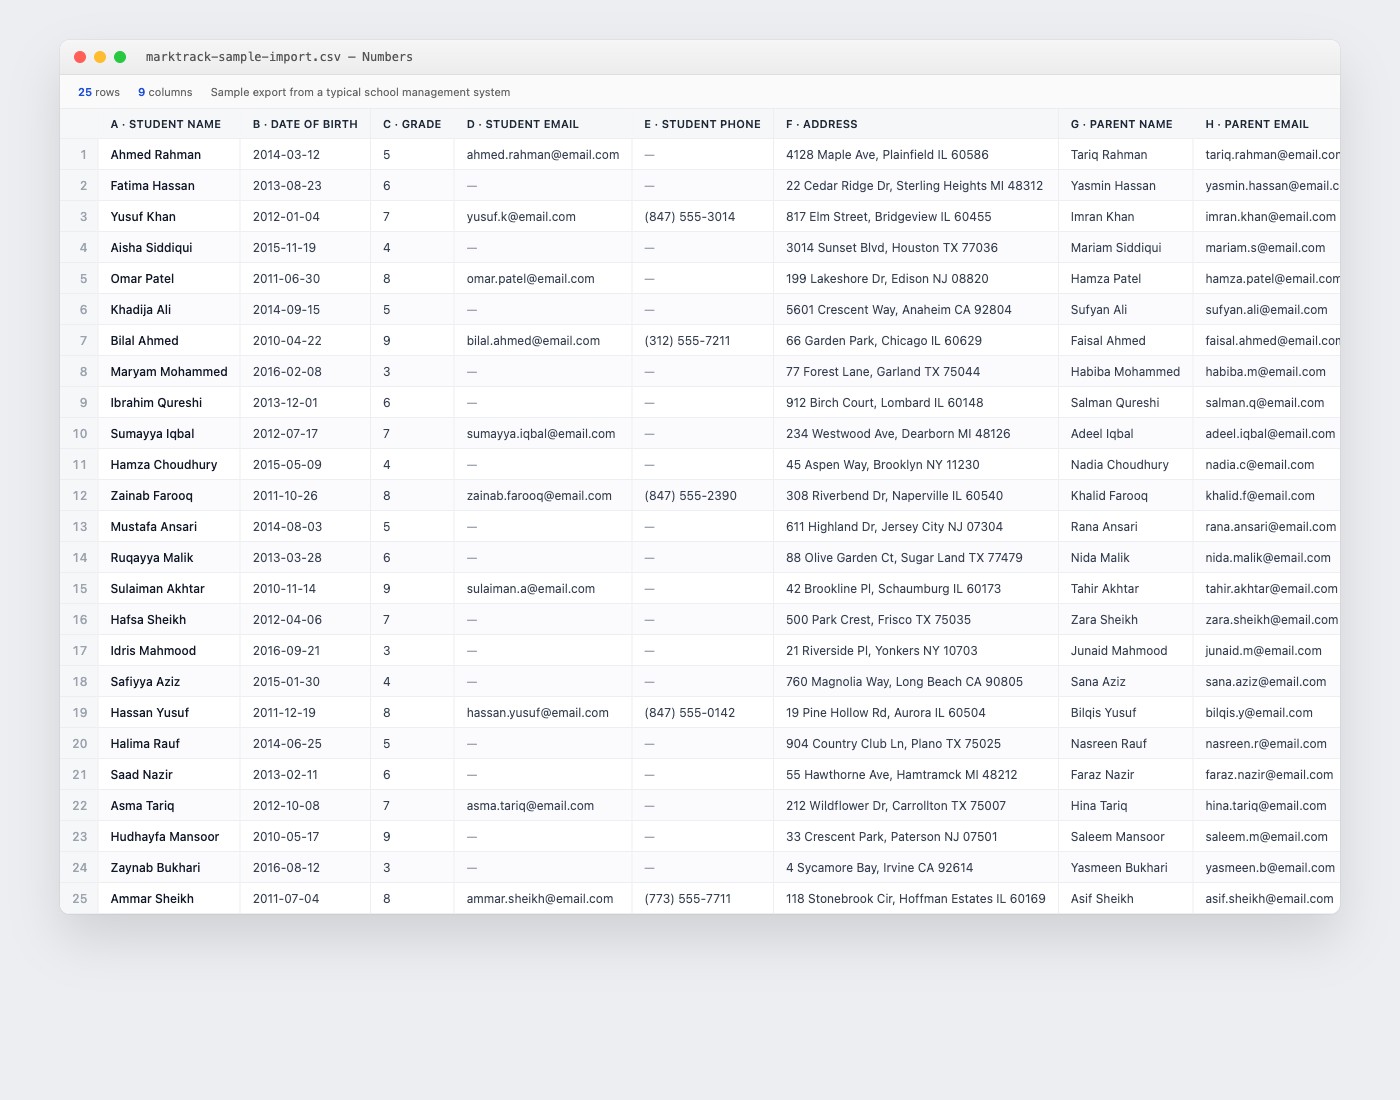
marktrack-sample-import.csv
— try the import on your own admin account.
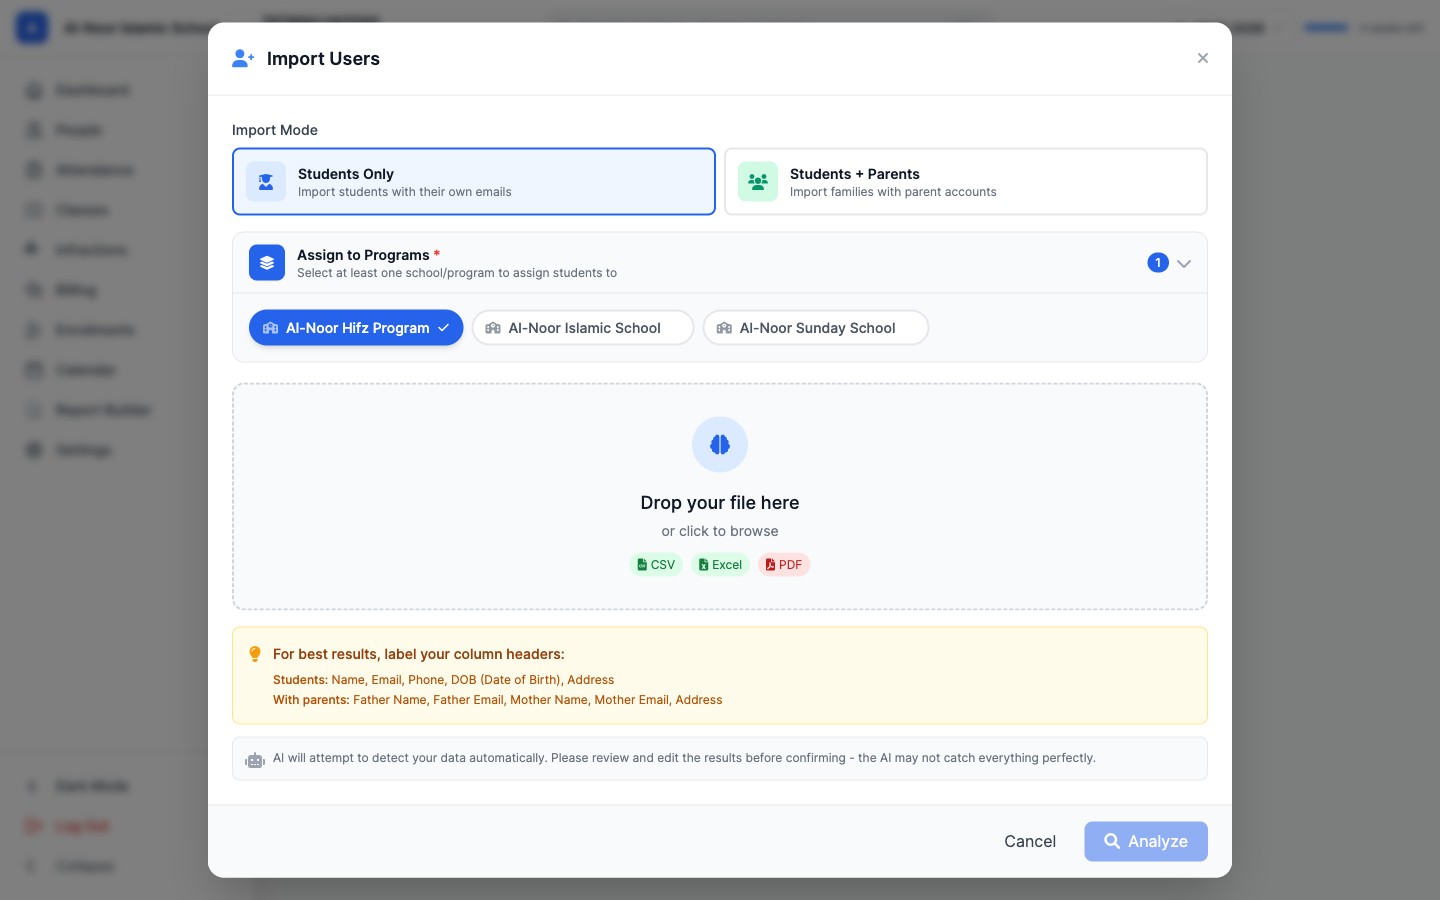
Step 2 · Open AI Import in MarkTrack
From the MarkTrack admin, head to People → Students and click Import Students. A modal opens with two import modes:
- Students Only — for files that contain just student rows
- Students + Parents — for files that contain both, where MarkTrack should also create parent accounts and link them as a family
Pick the school or program you want the new students assigned to (you can assign to more than one), then drag the CSV onto the dropzone — or click and browse. CSV, Excel, and PDF rosters are all supported.
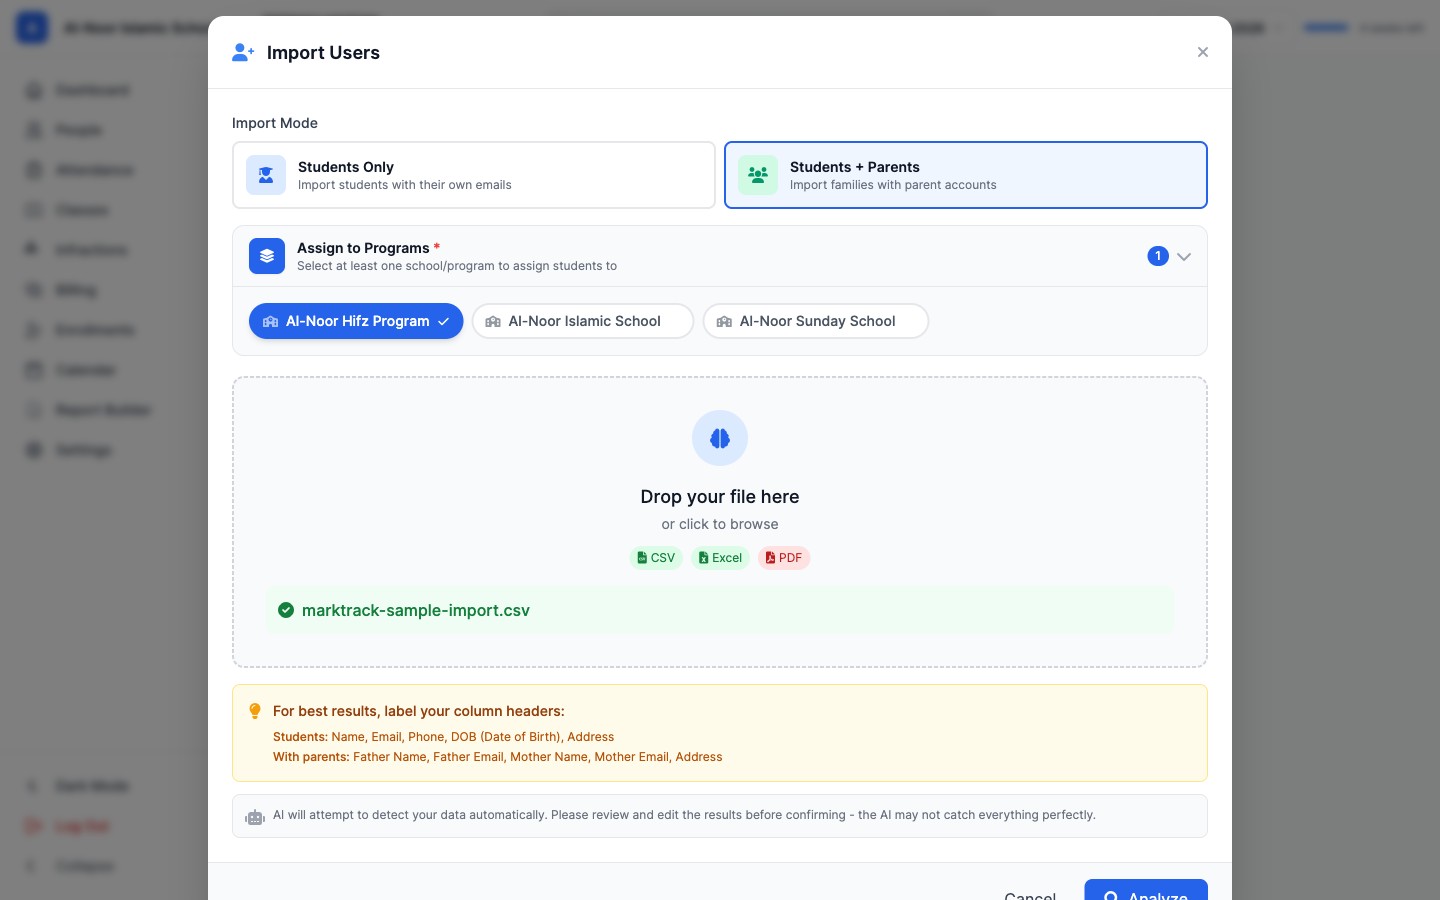
Step 3 · Drop the file in
Once the file is staged you'll see the filename pinned under the dropzone with a green check. At this point you can still swap modes, change which programs to assign to, or replace the file. Click Analyze when you're ready.
Step 4 · Review the AI preview
This is where AI Import really earns its name. In a few seconds you get back a clean, editable table with the data already mapped to MarkTrack fields. From a CSV of 25 student rows with parent columns, MarkTrack auto-built 50 accounts — 25 students plus 25 parents — and grouped them into five families:
- The Type column tells you whether each row is a Parent or a Child.
- DOB is parsed into a real date even when your file used a different format, and child age is derived from it.
- Address is kept on the row that has it (the parent), so when the family is created it sits on the household, not duplicated.
- The Family column shows AI's grouping — you can rename it, merge two rows into the same family, or split a family apart right in the preview.
- A green Data Quality badge tells you whether the AI saw anything worth a second look before you confirm.
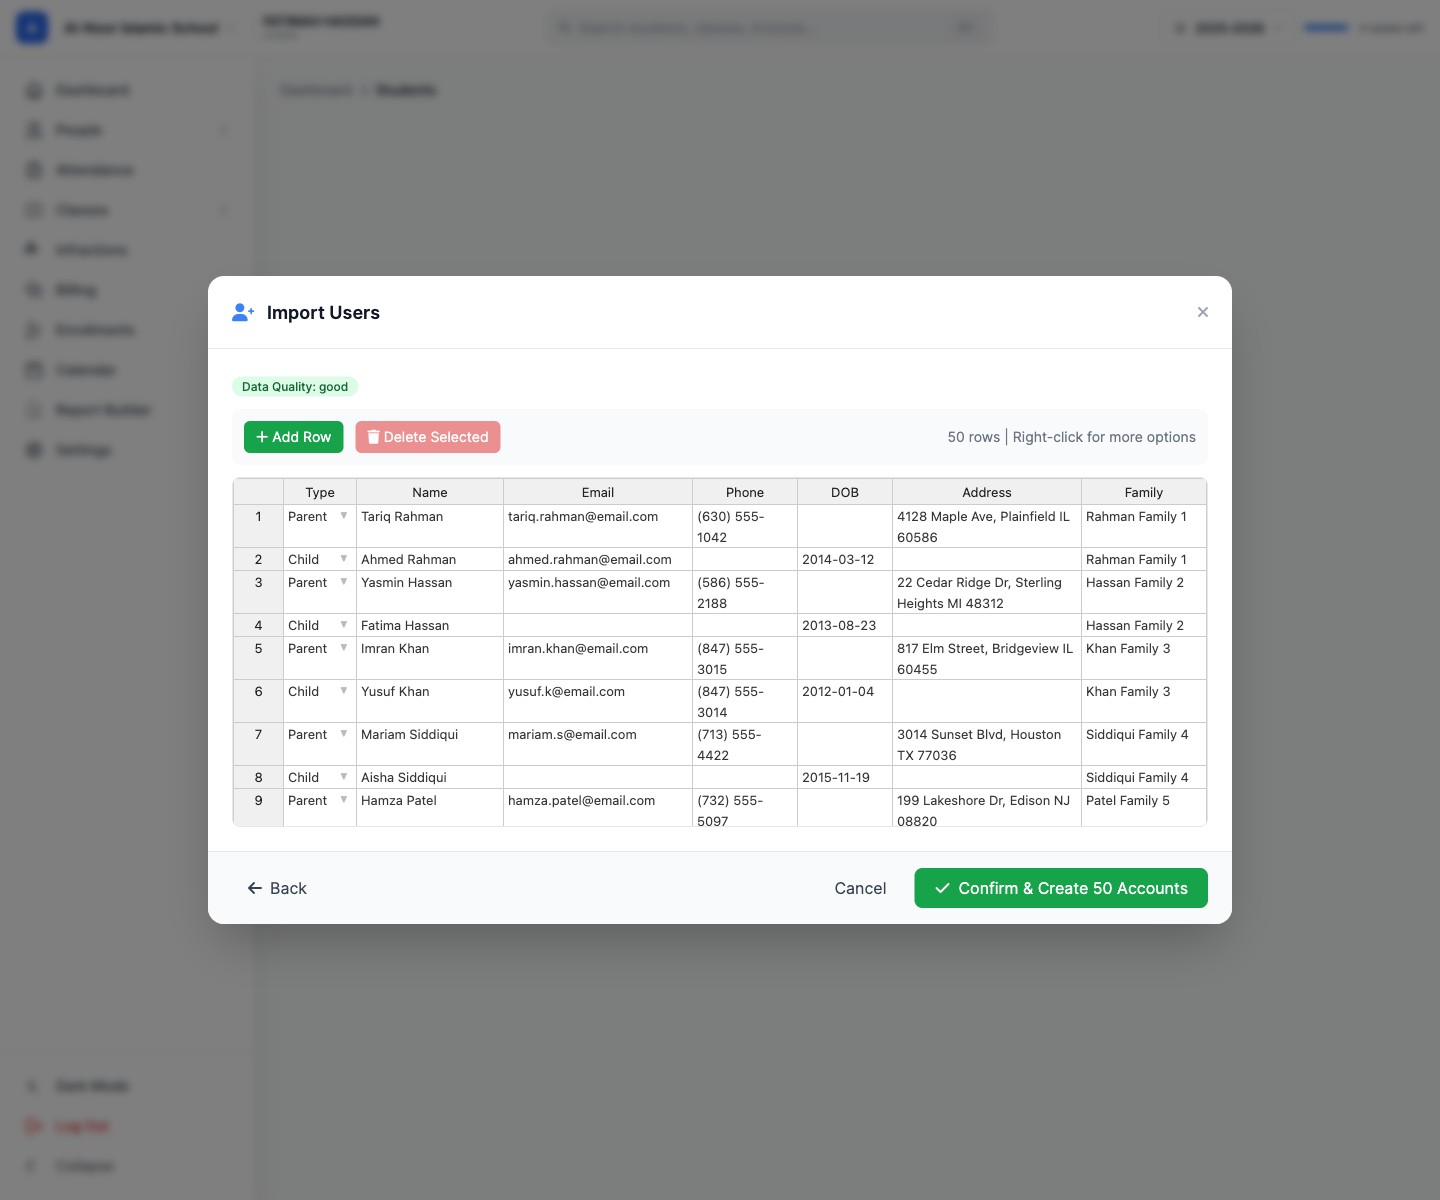
Take a minute to scan the table. If something is wrong — an apostrophe got stripped out of a name, a parent is missing an email, two siblings ended up in different families — fix it right here. Nothing is saved until you click confirm.
Step 5 · Confirm and create the accounts
Click Confirm & Create 50 Accounts. MarkTrack provisions every account, creates the family links, assigns each student to the program you picked, and shows you a clean completion screen.
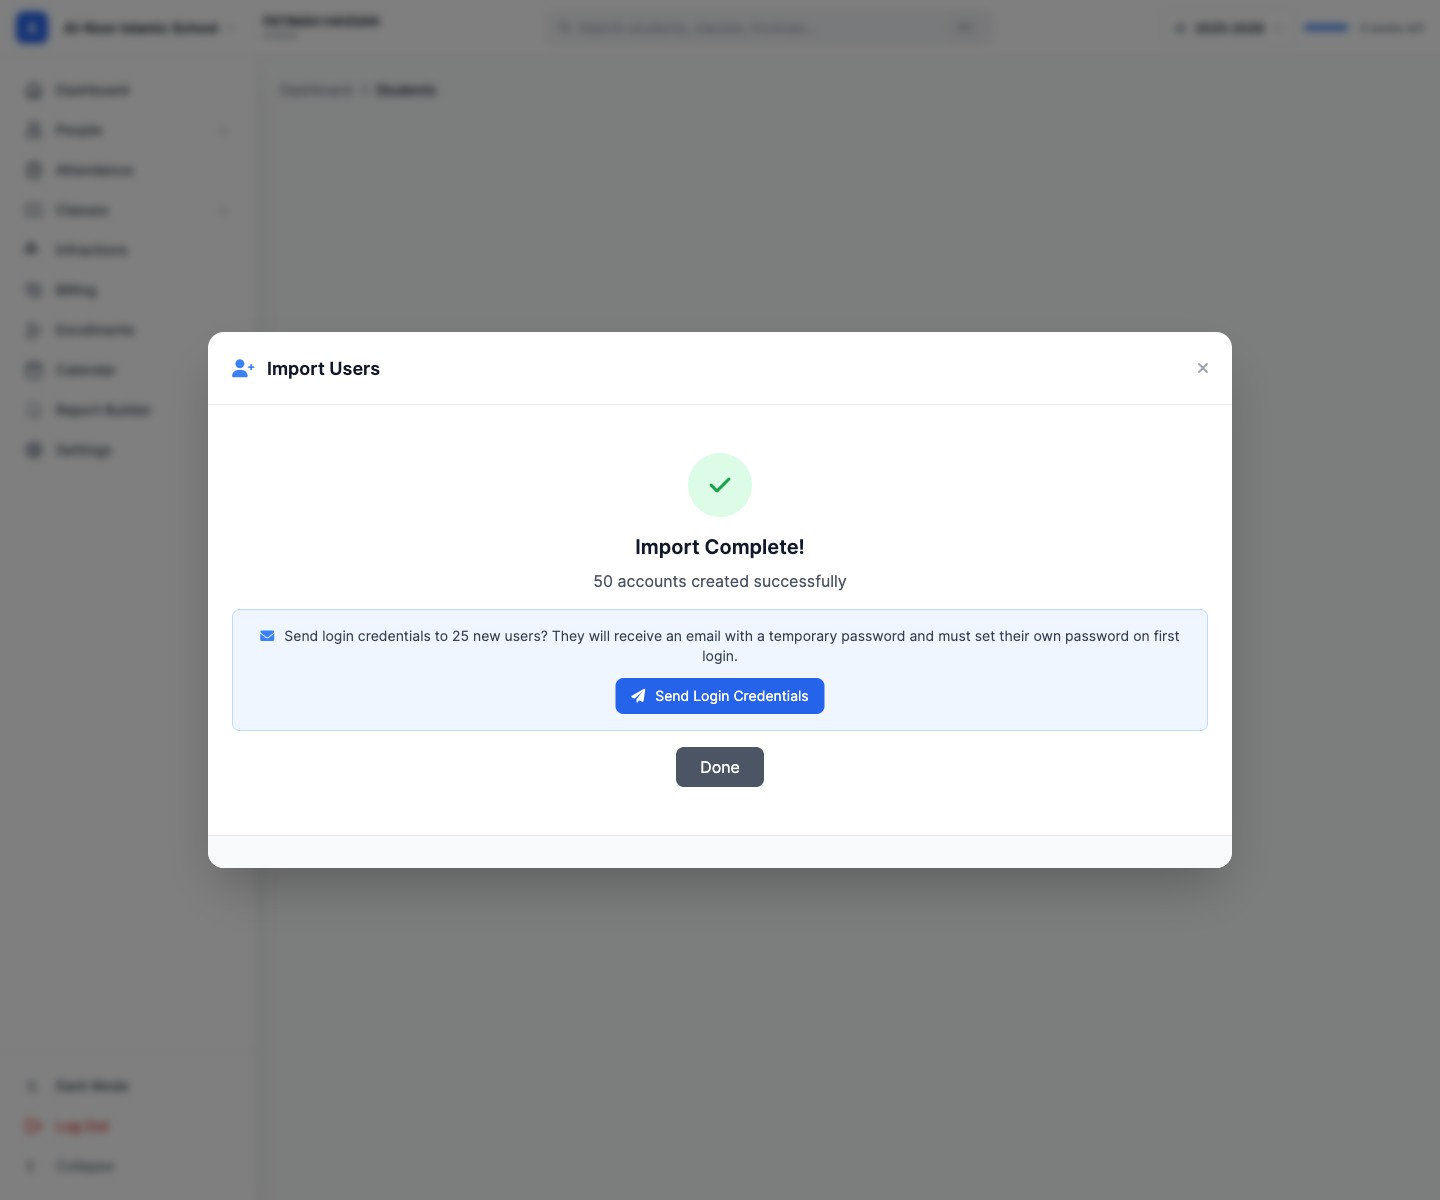
From here you can Send Login Credentials with one click. Every parent receives an email with a temporary password and a prompt to set their own on first login. Children under their parents don't need a login. The new students appear immediately in the Students list and on the dashboard.
What AI Import handles for you
- Any column order. AI maps the columns by name, content, and position — you don't need to match a specific template.
- Mixed parent/student rows. If your file has parent and child info on the same row, AI splits them into two accounts and a family. If they're on separate rows, AI groups them by last name and address.
- Date formats.
2014-03-12,3/12/2014,12 Mar 2014all parse correctly. - Phone formatting.
(630) 555-1042,630-555-1042,6305551042normalize to one shape. - Empty cells. Missing emails, phones, or addresses don't break the import — the account is created without that field and you can fill it in later.
- Excel and PDF rosters too. Drop
.xlsx,.xls, or a PDF roster export and AI will pull rows out of those too.
Tips for a clean migration
- Run a small batch first. Export ten students from your old LMS, import them, click around, then come back and run the rest. Catches any column naming surprise in five minutes instead of fifty.
- Use real headers when you can. Headers like Student Name, Parent Email, Date of Birth, Address give the AI the strongest hints. Generic headers like Col1, Col2 still work but are slower.
- Keep one row per student. If your old LMS exports the same student three times (once per class enrolled), dedupe in your spreadsheet first.
- Hold off on sending credentials. If the import is for next term, create the accounts now and send login credentials closer to the start of school. You can send them later from the Students page.
Switching from a specific system?
Most schools that migrate to MarkTrack come from one of a handful of systems — here is where to find the right export in each.
- RenWeb / FACTS SIS — Reports → Students → Export. Pick the family-and-contact report; the columns map cleanly.
- QuickSchools — Students → Export to CSV. Run a separate export of Parents and AI Import will rejoin them by family name and address.
- Muntazim (Mohid) — the masjid side exports community members; the school side exports students separately. Bring both files in two imports.
- A spreadsheet you already maintain — just save it as CSV and drop it in. This is the easiest case of all.
If you're comparing MarkTrack against your current system, or you want to see how the rest of the onboarding works, the Fall 2026 setup guide walks through the whole flow — import, classes, billing, and enrollment forms — end to end.
Interested in trying out MarkTrack for free?
Get in touch